


When you pick up your iPhone to take pictures of the beautiful scenery or people in front of you, you often subconsciously press the shutter a few more times to prevent your hands from shaking and ruining the photo, someone closing their eyes, or the composition being ruined by people and things around you. After all, it is safer to press a few more times. But if you don’t clean it manually often, more and more identical photos will accumulate in your photo album, which will undoubtedly take up valuable space on your phone and iCloud. If you don’t want to spend too much time manually organizing photos, you can try the built-in deduplication feature.
How to quickly organize duplicate photos in your iPhone photo album to free up space?
Excessive duplication of photos can take up a lot of storage space in iPhone and iCloud depending on the size, so it is a good habit to organize photos regularly. In addition to making it easier and more concise to review back, it can also give you precious storage space. Apple launched the function of filtering duplicate items in iOS 16 as early as 2016, which naturally also has a contribution to AI. However, due to the revision of the photo album, the functional item defaults are squeezed to the bottom by numerous memories and recommended photos, so they are not easy to be discovered. Next, we’ll show you how to use it and how to sort the options in the Photos app according to your personal preferences.
Clean up duplicate items
Apple uses on-device AI to find duplicate photos in the Photos app and groups them into groups so you can take the next step. Because it is judged by AI, the “Duplicate Items” option will not always be fixed there. It will only be displayed when the iPhone detects duplicate photos. In addition, even if you see the selection, the photos you see will be different every time you click on it. According to Apple at the time, the photos listed were either exact copies or photos that looked identical or slightly different. However, I would like to mention here that according to the author’s own tests, AI’s judgment is not that timely, and it may not always be able to find the same photos.
- Open the Photos app.
- Scroll down and click “Duplicate Items” in the “More Items” category.
- After entering the duplicate items, you can click the button to start merging. Merging will keep the best quality photos and delete others, so check to make sure you want to keep the ones you want before merging the copies.
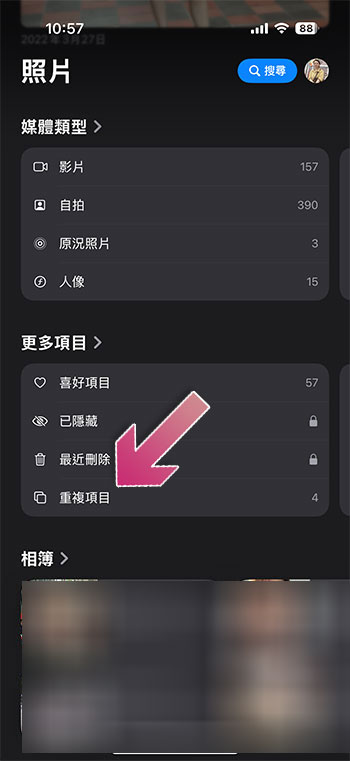
If you accidentally merge the photos you want to keep, these photos will not disappear forever. They will just be moved to “Recently Deleted” after you choose to merge them. They will not be completely deleted until 30 days later, so you can still hurry up and get the photos back.
Options in custom sorting photos app
If you don’t want to scroll down several times each time to find more features or filter media types, you can use custom sorting to choose which items to bring to the front. Let me tell you how to do it next:
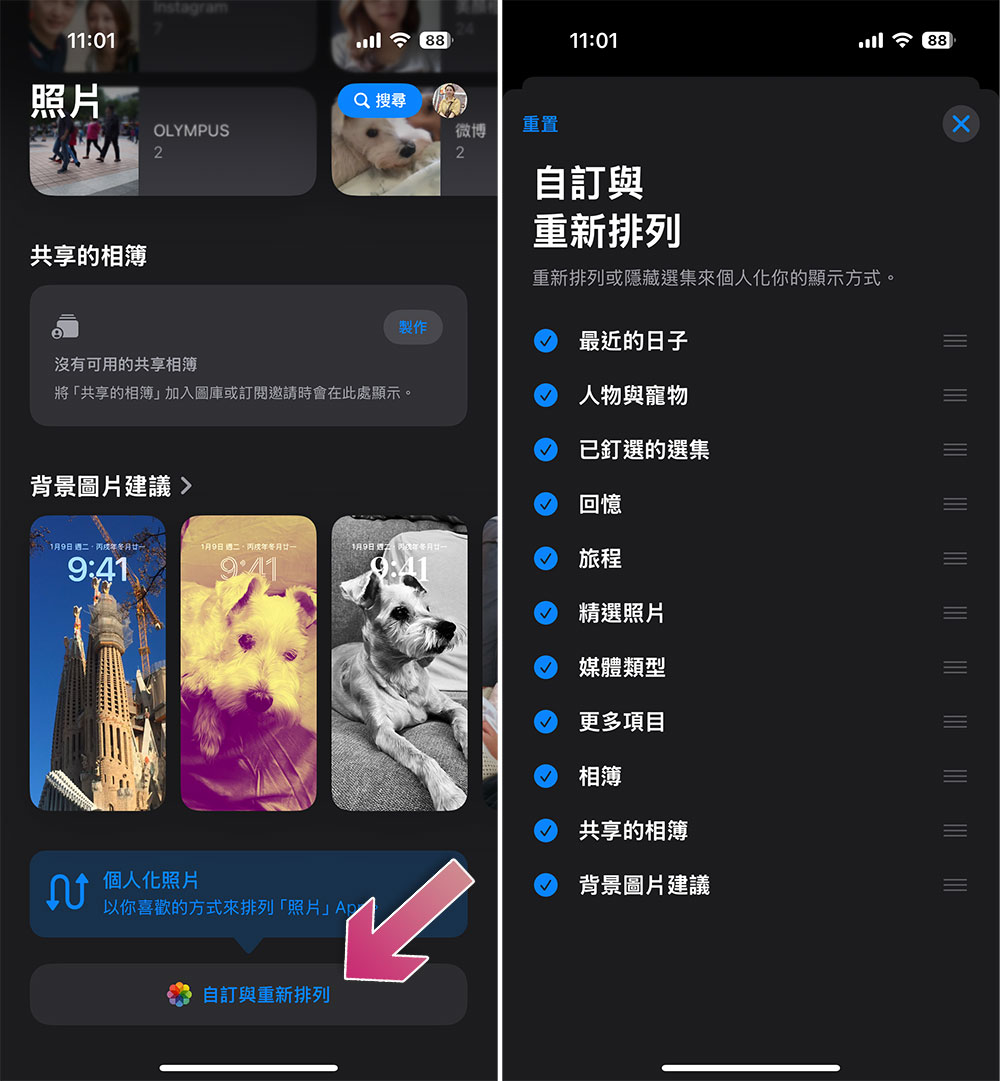
- After opening the “Photos” app, scroll all the way down to the bottom and click “Customize & Rearrange” at the bottom.
- By pressing and holding the three bars at the back, you can drag up and down the order. The blue check mark in front can also be clicked off to hide the default field.
If you still want to clear up more space, you can also check the “Recently Deleted” photos. You can delete all the photos that you are sure you no longer need. This will be helpful for people who take a lot of photos every day and have sorted out duplicate items in their albums.
Source: KOCPC Chinese