


In today’s era of developed Internet, more and more emerging creators are rising, but how to protect your own graphic creation is very important (although there are still plagiarism incidents). For example, our computer king Ada’s articles will have a watermark in the lower right corner to prevent intentional people from stealing the pictures. However, if you are still adding watermarks one by one, it is too slow. Although there are free tools on the Internet that allow you to add watermarks, some of them must be uploaded to the Internet before they can be used. Some of them have very poor image conversion quality. It is better to use professional photo editing software! For example, after I take a bunch of Raw photos, I choose to process them directly in Lightroom. When converting to JPG, I just need to quickly apply it, so that every picture has a watermark in the same position:

Create your own signature file first
After opening Lightroom, go to the upper layer Edit > Edit Watermark:

Then the watermark window will pop up, where you can choose to use existing fonts to create the watermark directly, or use existing images to create it:

Take our computer king Ada’s watermark as an example. As long as you select the image and read it in, you can determine the position, size, and transparency:

After confirmation, click Customize in the upper left corner to save the current watermark:

Then create your own name for your watermark!

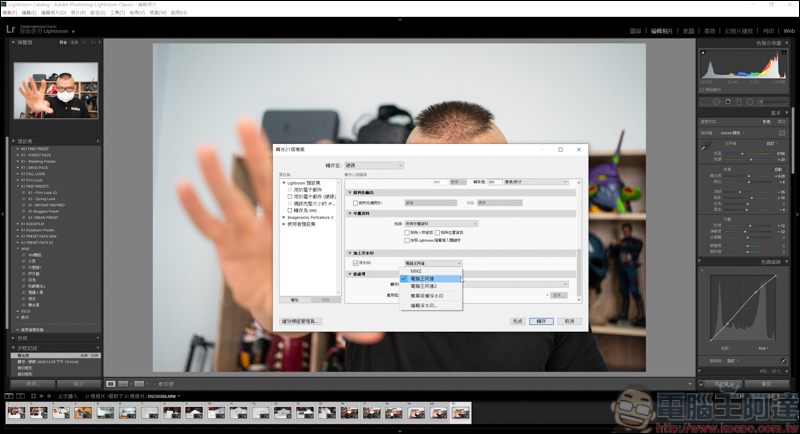
The method of use is also very simple. When transferring files:

When transferring, after checking the watermark at the bottom, you can see the watermark you just created, but remember that only TIFF, PNG, and JPG can have watermarks:
The transferred pictures will have exclusive watermarks. When processing a large number of photos, this function can unify the position and transparency of your watermarks, which is very convenient!

In addition, if you want to share the signature file with others or take it with you when changing computers, just go to the following path C:\Users\users\AppData\Roaming\Adobe\Lightroom\Watermarks, you can find your watermark, and then put it in the same location on other computers to share it:

Source: KOCPC Chinese