


Have you ever noticed that when you switch to an open Chrome tab, it automatically updates? When system resources are insufficient, paging enters a dormant state, or interference from installed expansion plug-ins, etc., the paging will be automatically updated, which is sometimes inconvenient for users. This time we have provided several solutions to help you solve this problem.
How to fix Chrome’s auto-update pagination issue
Before solving a problem, we must first determine the problem. We can perform troubleshooting by performing some preliminary checks. First, you can restart the browser and your computer to eliminate any temporary errors. If the problem persists, please check the stability of the network connection to ensure that there are no intermittent interruptions or disconnections. Also, clear your browser cache and cookies to prevent them from interfering with operation.
If these basic troubleshooting steps don’t diagnose or fix the problem, try the other fixes that follow.
Check the prevalence of the problem
To check if the problem still exists in a specific tab or affects all open tabs, you can switch to another tab and check if it updates after some time. Also, make sure that the website you visit is not a website that automatically updates after being idle for a period of time, such as a bank website. If the problem is limited to a specific tab, turn it off and on again to rule out any temporary errors causing automatic updates.
You can also try opening the website in another browser to confirm whether the problem is unique to Chrome. If the site fails to load on alternative browsers, there is a potential technical issue with the site, in which case please report it to the webmaster or support team. If the problem extends to all other open tabs (including newly opened tabs), the problem is larger. In this case, you can continue with other solutions below.
Make sure the update or shortcut keys are not pressed
If Chrome keeps automatically updating pagination when you open it, make sure the update key or its shortcut key on your keyboard (usually F5 on Windows or Command+R on macOS) isn’t stuck. To eliminate this possibility, press the update key (or shortcut key) and make sure it’s not stuck updating. If the keys are not stuck, make sure the keys are not damaged, otherwise automatic web page updates may be triggered. Go to the Keyboard Tester website and start testing to confirm if the update key is automatically registered, if so, the key may be faulty, in which case you should turn off the key or shortcut.
Set up automatic pagination discarding
If your browser tabs only update when you switch to them after a long period of inactivity, you must prevent them from going to sleep.
One option is to turn off Chrome’s memory-saving mode, which puts inactive tabs to sleep to avoid memory cannibalization. To turn this feature off you can do this:
- Click the three-dot menu in the upper right corner of the browser and select “Settings.”
- Click “Performance” in the left sidebar.
- Turn off the “Memory Saving Mode” switch.
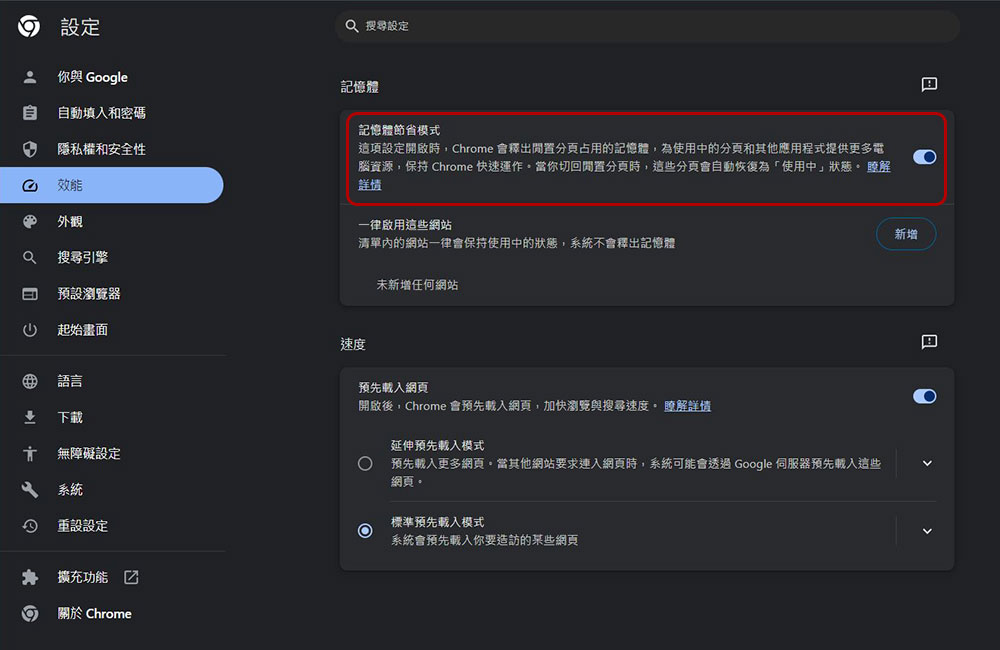
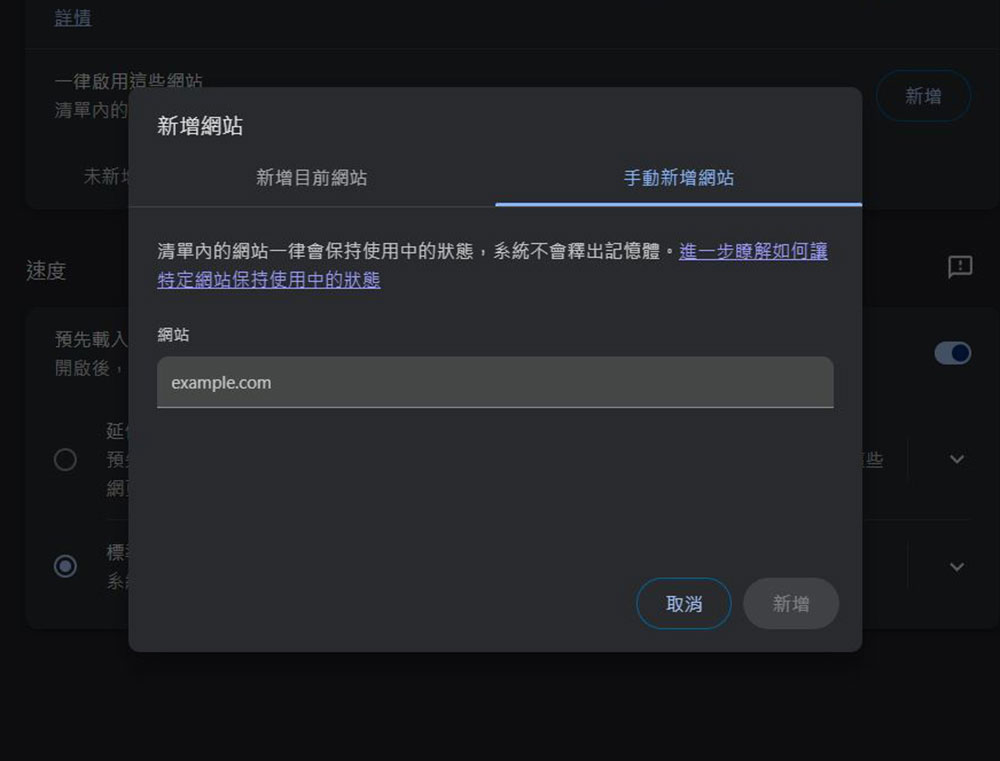
If you want memory saving mode to remain enabled but want to exclude specific web pages, such as those for work, you can whitelist them. Click the “Add” button after “Always enable these websites” under Memory Saving Mode. Then you can choose to exclude the currently opened URLs or manually enter other URLs to exclude them from Memory Saving Mode.
Check for interference from extension plug-ins
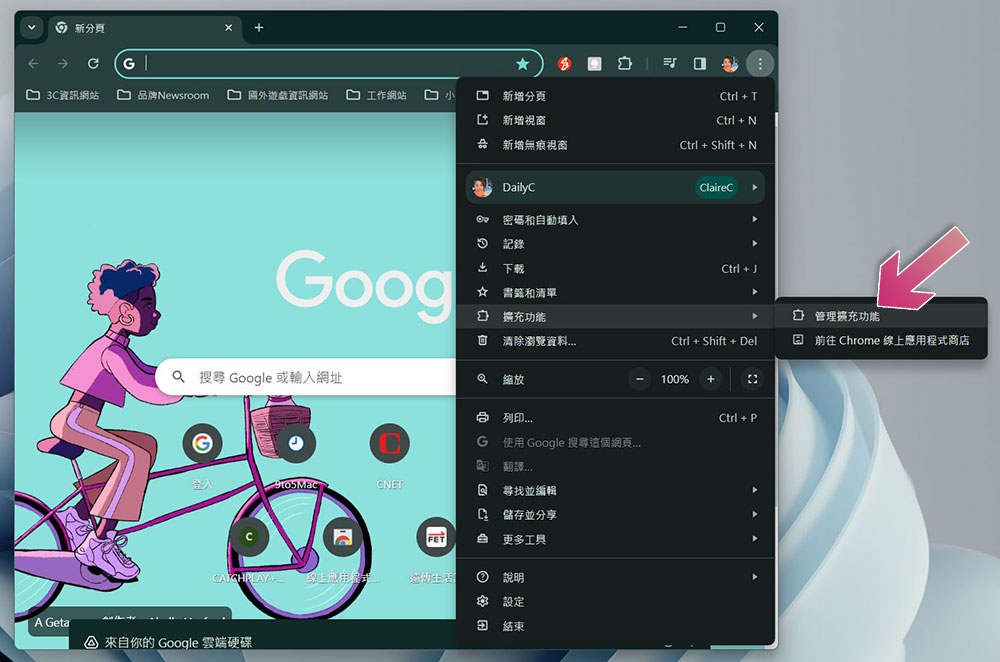
If you have installed any extensions that automatically update your tabs, they may interfere with other tabs, so please temporarily turn off any such extensions. First click on the three-dot option in the upper right corner, select “Extensions” and then click “Manage Extensions”. Next, turn off affecting plug-ins such as Adblock for YouTube.
If you do not have such a plugin installed, check for other installed extensions that may be causing the issue. Try turning off each extension one by one. If the problem is resolved by turning off a specific extension, that extension may be the cause of the problem and consider permanently removing the extension from your browser.
Release system resources
Insufficient system resources can also cause Chrome to behave unexpectedly. To rule out this possibility, determine which processes are resource-intensive and avoid executing them simultaneously. To check these processes, follow these steps:
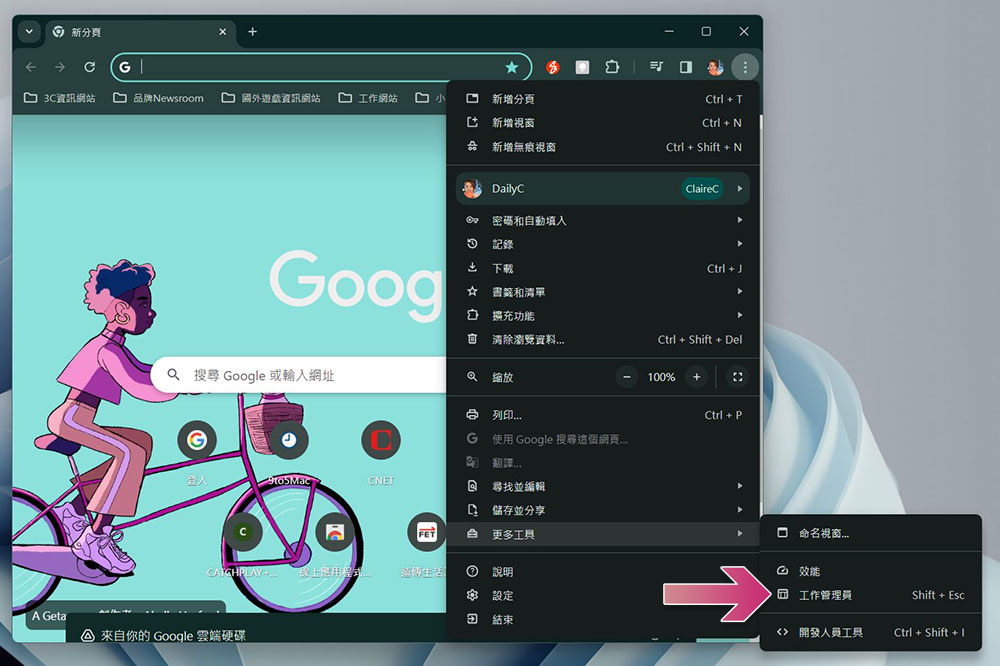
- Click the three-dot menu in the upper right corner of your browser.
- Select “Job Manager” in “More Tools”.
- Click the “Memory Usage” header in Chrome’s task manager window to sort all processes by usage.
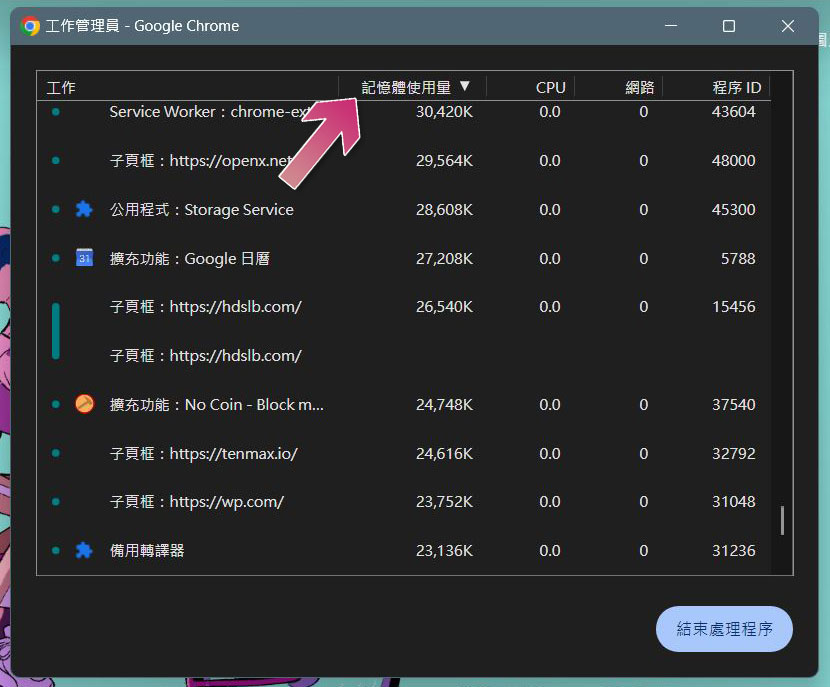
- Identify those processes with large memory usage and deactivate them if necessary. To close a specific process, select “End Handler” in the lower right corner of the back tome. As a reminder, be careful when deactivating processes and do not close important browser processes to avoid affecting active browser sessions. If you’re using Chrome on a smartphone, close any other apps that are running at the same time.
Check for Chrome updates
Failure to update your browser for a long time may cause unexpected problems. To confirm whether Chrome is the latest version, please click the three-dot menu in the upper right corner and select “About Google Chrome” in “Help”.
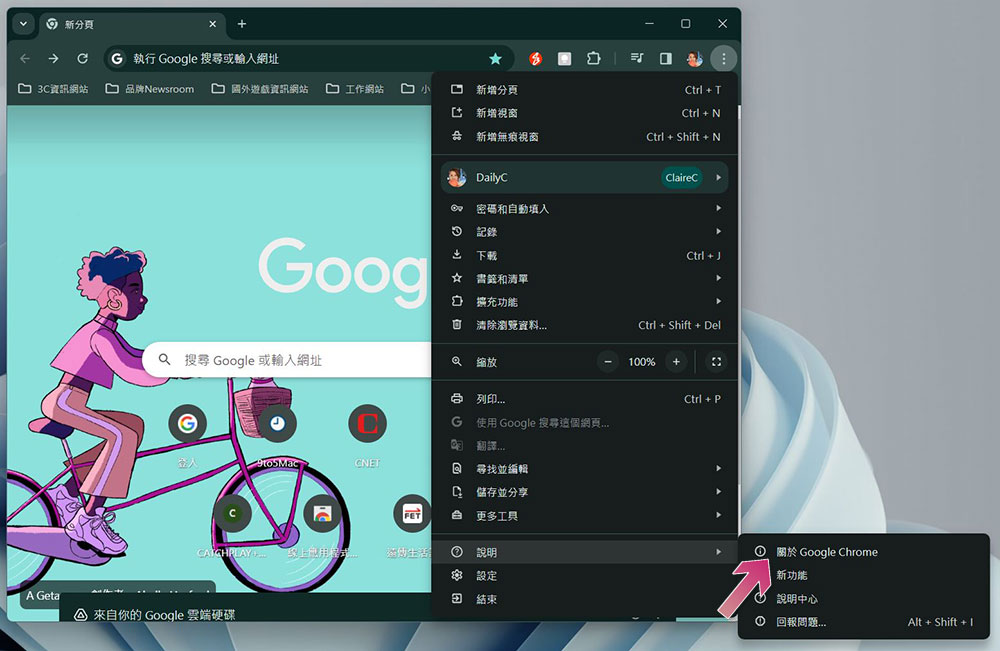
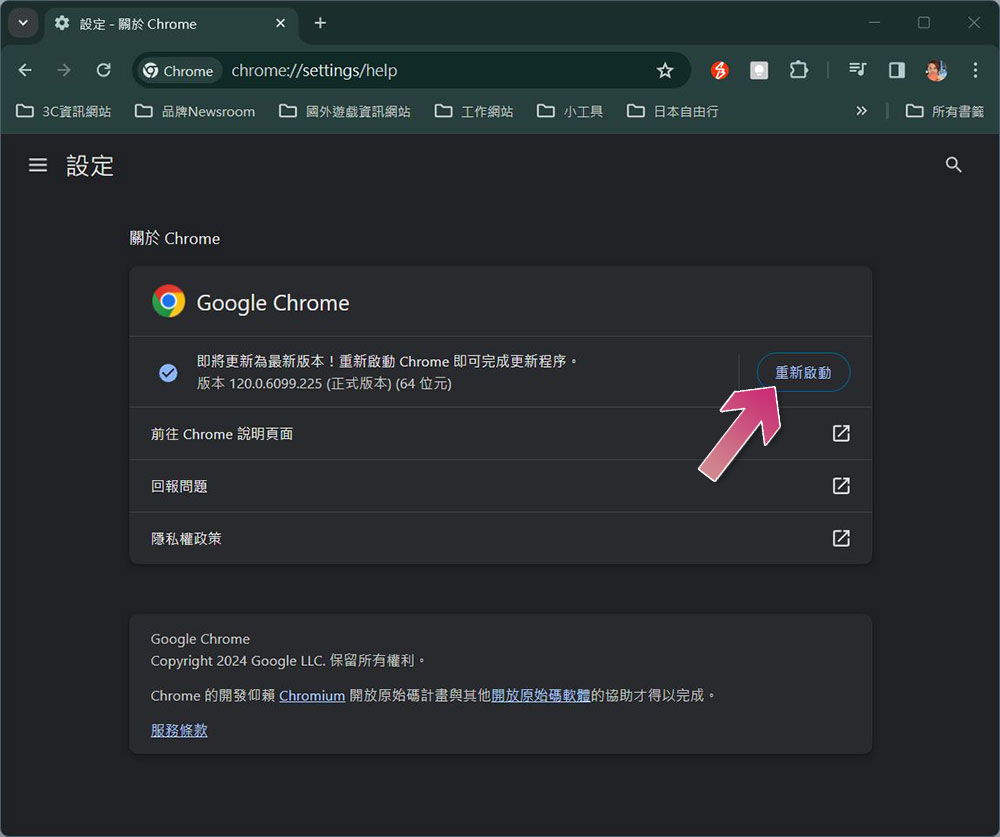
If Chrome is not the latest version, it will update automatically (if not, click Update manually). Once the update is complete, click Restart to apply the update. If you see an “Updated” message on the About Google Chrome page, you’re ready to go.
On Android, you can update Google Chrome in the Play Store, or enable auto-update to automatically update all apps, including Chrome.
Reset Chrome settings
If the above solutions don’t resolve the issue, you can try resetting Chrome settings. Resetting your browser will return its settings to the default configuration, undoing any customization options you’ve made, but it usually resolves ongoing issues. However, consider this option as a last resort before other repairs fail.
To reset Chrome, follow the steps below:
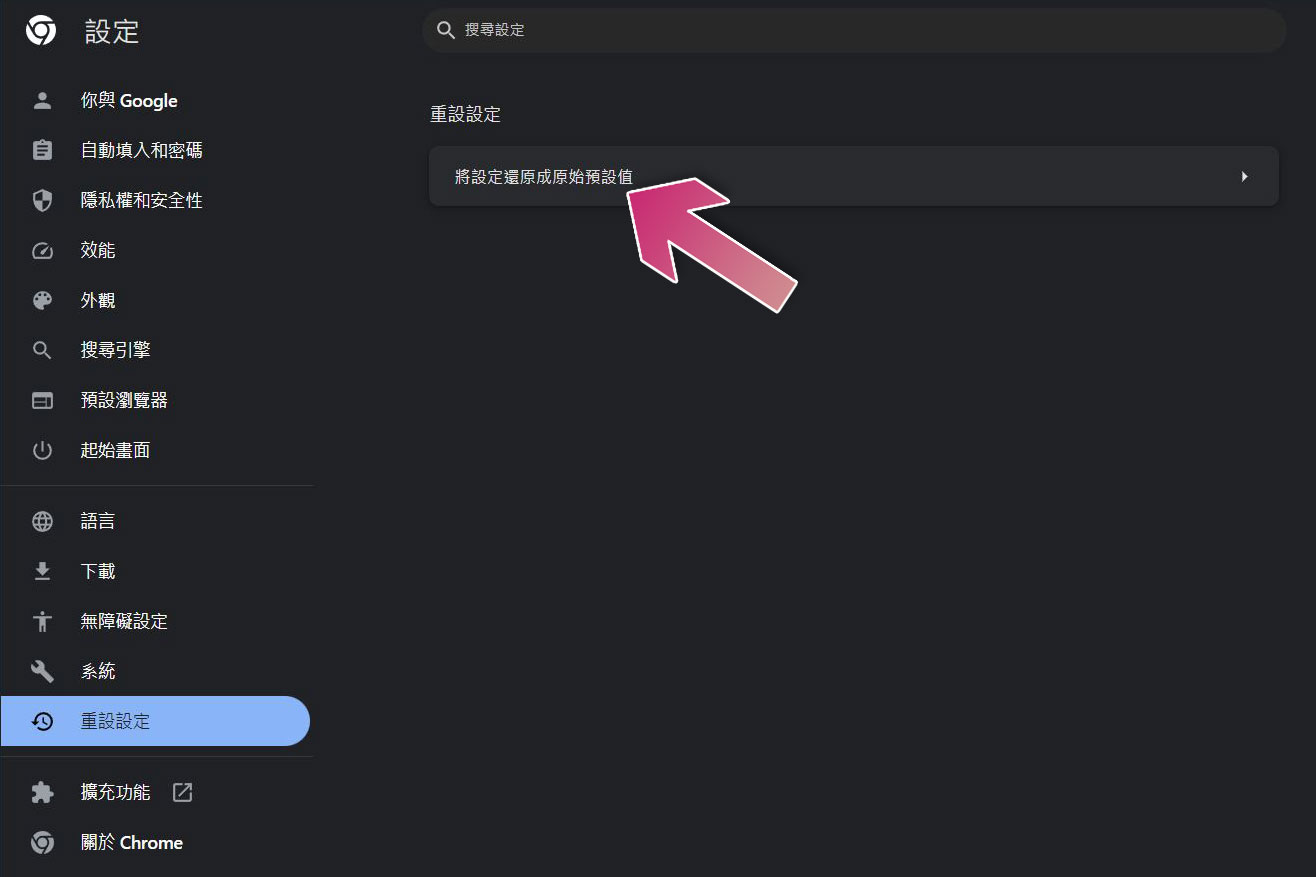
- Please click on the three-dot menu and go to Settings.
- Select “Reset Settings” in the left column and click “Restore settings to original defaults.”
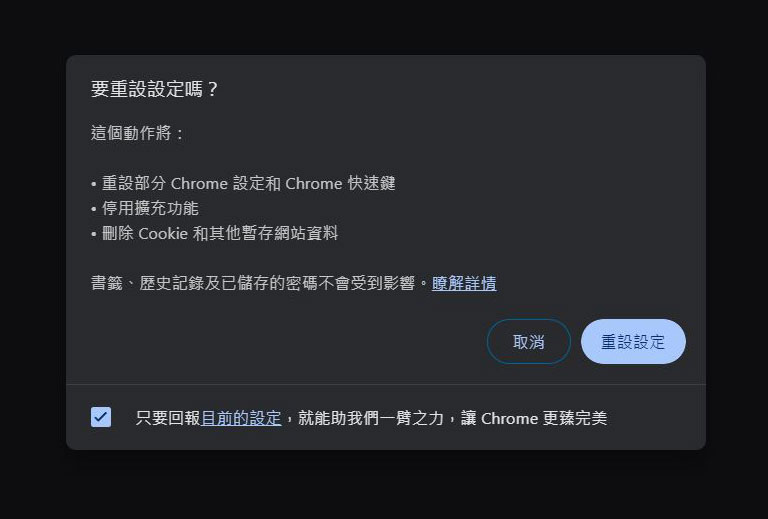
- Click “Reset Settings” in the pop-up window.
The above fixes should help you solve the pagination auto-update issue and allow you to browse the web smoothly. If none of the fixes work, your last resort should be to uninstall and reinstall Chrome from scratch, if that doesn’t work either, you have the option of switching to another trustworthy or more reliable browser.
Source: KOCPC Chinese