


One of the most discussed points on Windows 11 is the taskbar. It has changed a lot compared to Windows 10, and some of the old features you are used to have disappeared on Windows 11. Having said that, it does not mean that the Windows 11 taskbar is not easy to use, it just goes against your original habits. It can still do a lot of things for you. This time the author has sorted out the functions that you must use, especially if you are planning to get rid of the old and replace the computer at the end of the year, so that you can get started quickly and easily.
Newbies on the road! Windows 11 taskbar features you must know how to use
Move the app icon to the left
The biggest visual change in Windows 11 is that the taskbar places all icons in the center. By default, the start menu and all application icons pinned to the taskbar are located in the center of the taskbar, which is more like macOS and Chrome OS than previous versions of Windows. If you are more accustomed to the classic left alignment, you can easily change it back:
- Right-click the taskbar and select “Taskbar Settings.”
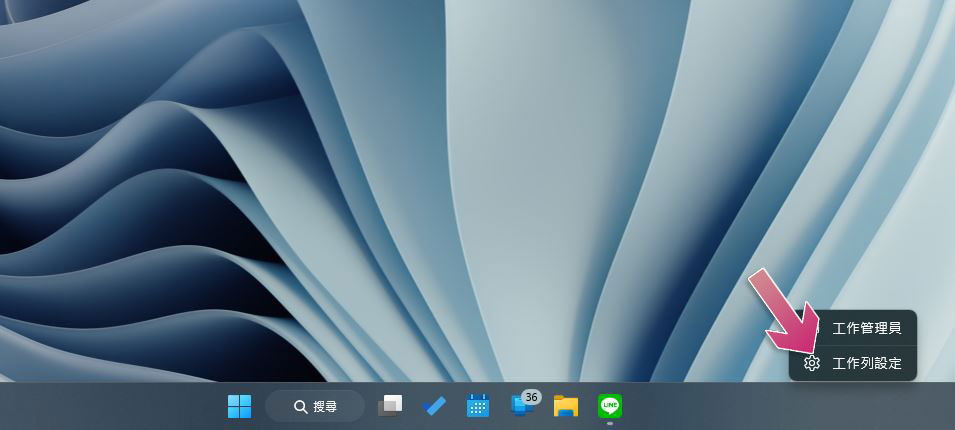
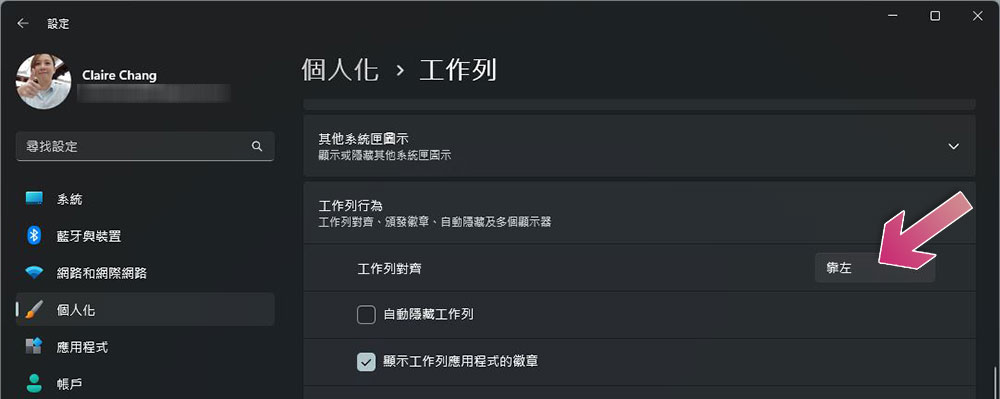
- Open the collapse menu of “Task Bar Behavior” and change the task bar alignment to “Left”.
Hide taskbar
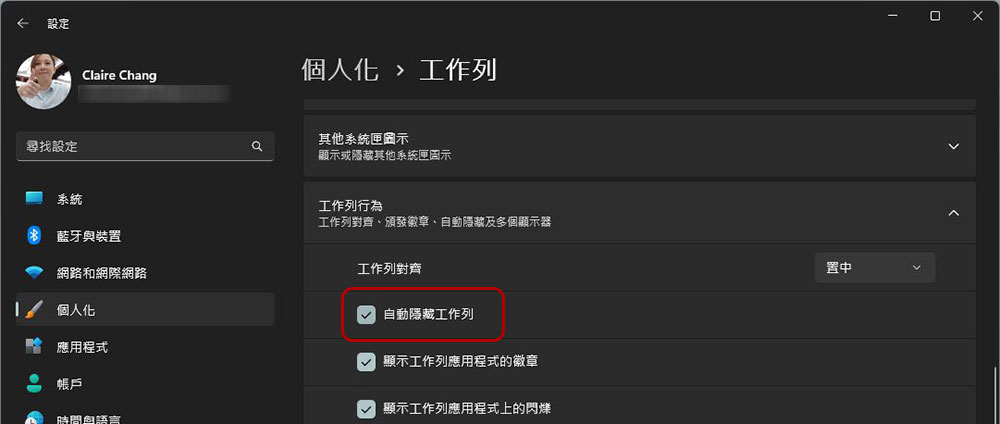
If you don’t want to see the taskbar at all and want to automatically collapse it when not in use to gain some extra screen space, you can try hiding it. When you need it, just move the mouse cursor to the edge of the screen, and the taskbar will automatically slide up, just like a drawer:
- Right-click on the taskbar and select “Taskbar Settings”.
- Open the collapse menu of “Task Bar Behavior” and check the “Auto-hide task bar” option.
Ctrl + click the application icon to jump to the last active window
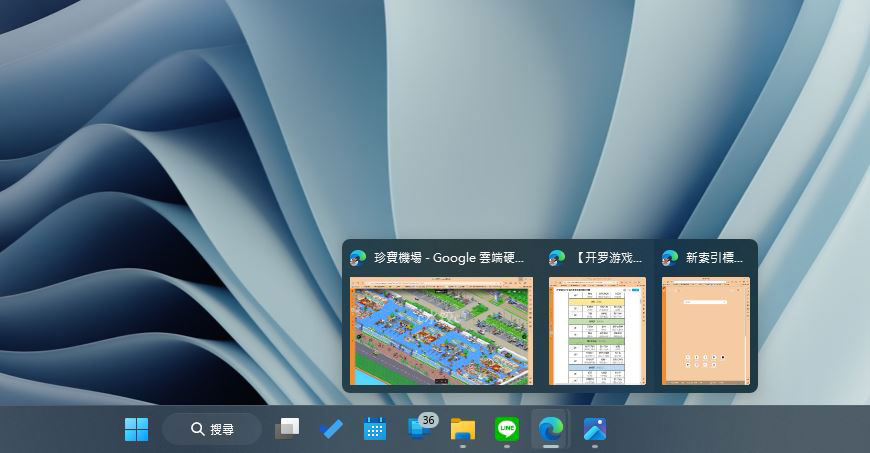
Windows 11 stacks windows from the same application together in the taskbar. When you hover the mouse cursor over the icon, a preview of all the current windows of the application will be displayed, and then you can select the window you want. This is a bit annoying for people who frequently switch windows. There is a shortcut in Windows 11 that simplifies this process. Just hold down the Ctrl key and click the app icon to bring up the last active window.
Drag and drop files into the app
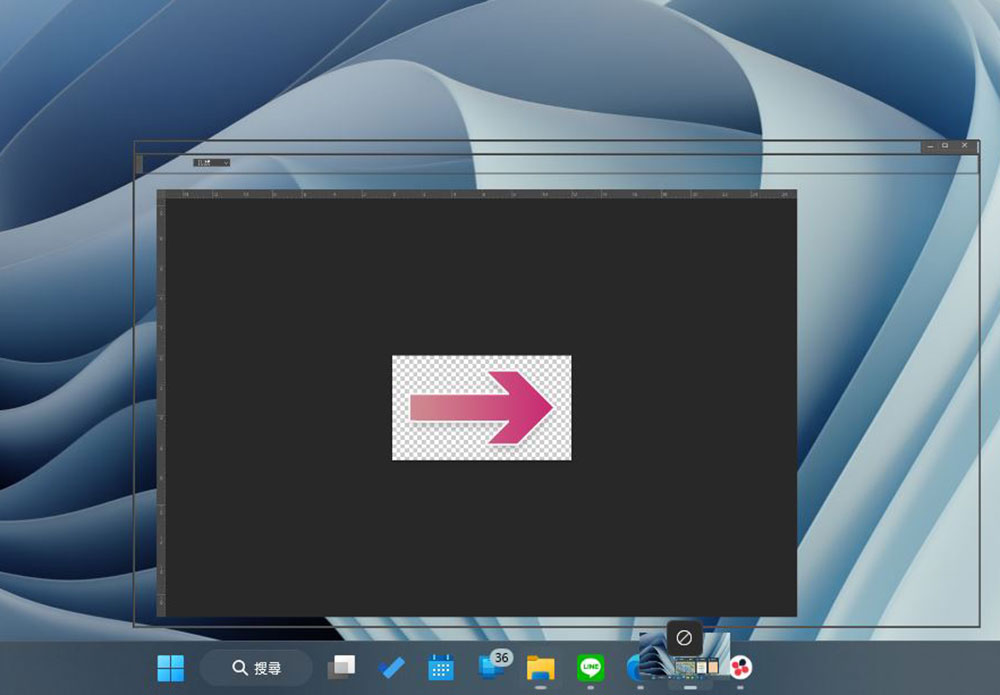
When Windows was first launched, the taskbar lost the most convenient feature of dragging and dropping files to open applications. Fortunately, it came back in the 22H2 version update. Now you can once again drag and drop files directly into applications on the taskbar. For example, if you want to edit a photo with Photoshop, you can drag the photo directly to the Photoshop icon on the taskbar and it will automatically open in the application without having to start from “Open Old File”.
Change audio device from taskbar
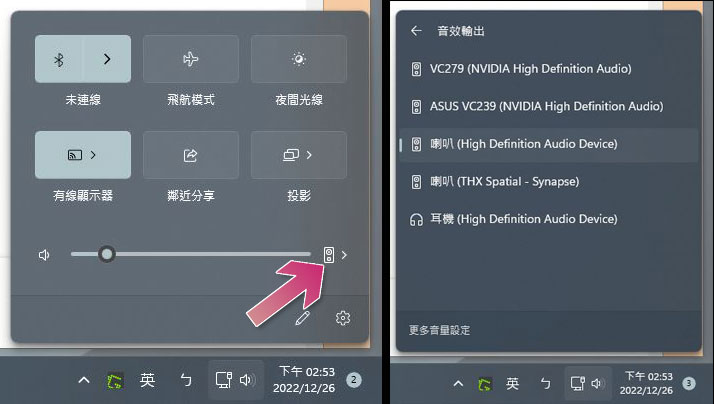
If you want to switch between headphones, speakers, or other sound devices on Windows 11, there’s a less obvious but faster way to switch. What you have to do is very simple, click on the sound effect icon on the taskbar, and then click on the small arrow to the right of the volume adjustment slider on the small tray. Then you can select the audio device you want to use.
Change taskbar color
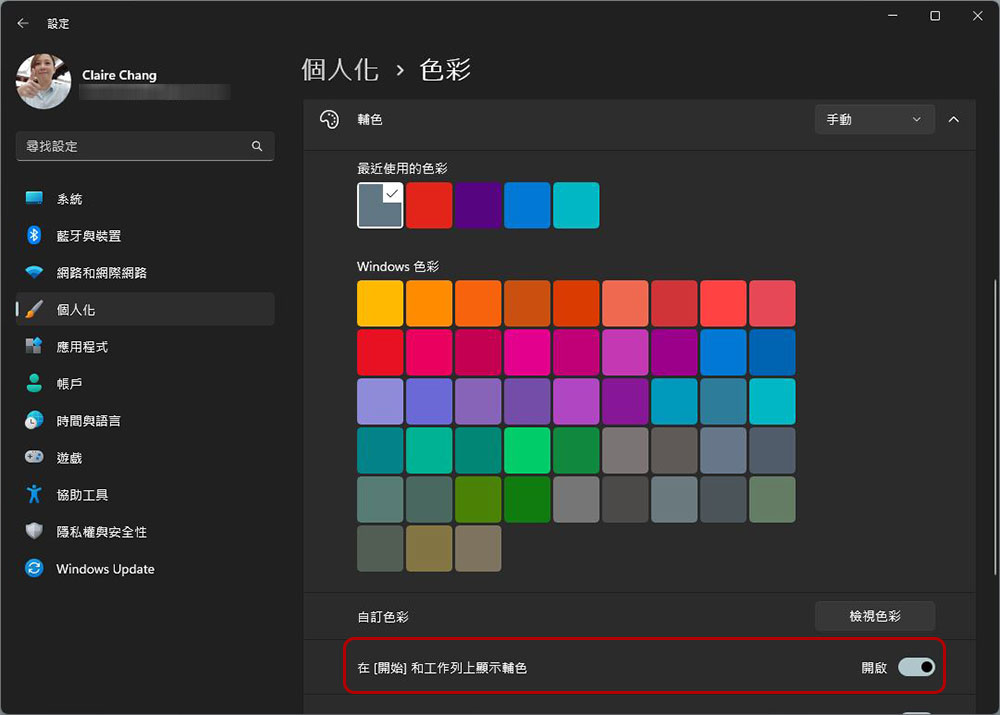
By default, the Windows taskbar appears white in light mode, and can automatically change to dark when switching to dark mode. So, what if you want to customize the color? If you want a different color, you have to select the desired color in the “Secondary Color” field in “Settings >> Personalization >> Color”, and then turn on “Show secondary colors in start and taskbar”.
View the weather on the taskbar
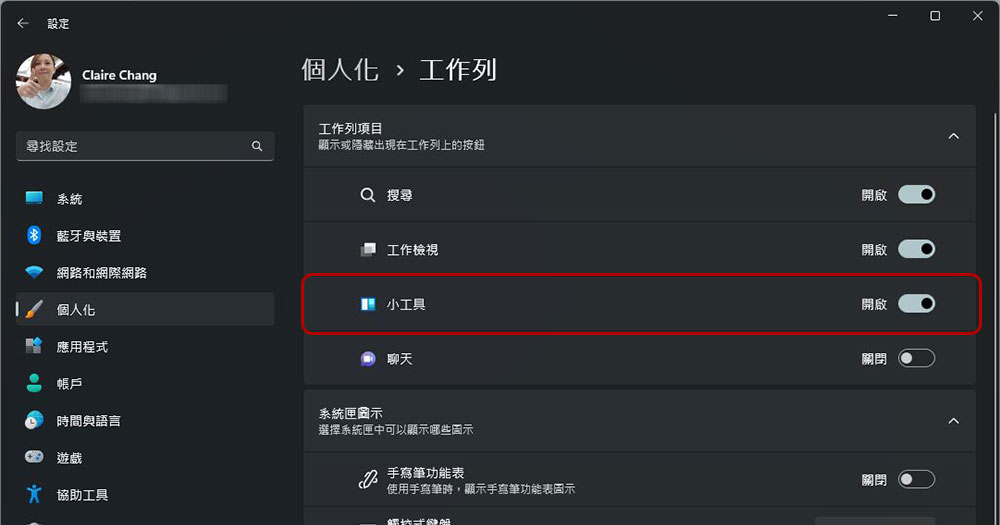
When Windows 11 was first released, there was a gadget button to the right of the Start button. If you have been using it for a long time, you should have disabled it to avoid accidentally pressing it all the time. However, the widget button now displays the current weather conditions on the taskbar, which is much easier to use than the original one. It can display a climate icon, temperature, and a short description. If you want to re-enable the gadget, follow the steps below:
- Right-click on the taskbar and select “Taskbar Settings”.
- Just turn on the “Gadgets” switch at the top.
Show the taskbar on multiple screens (or not)
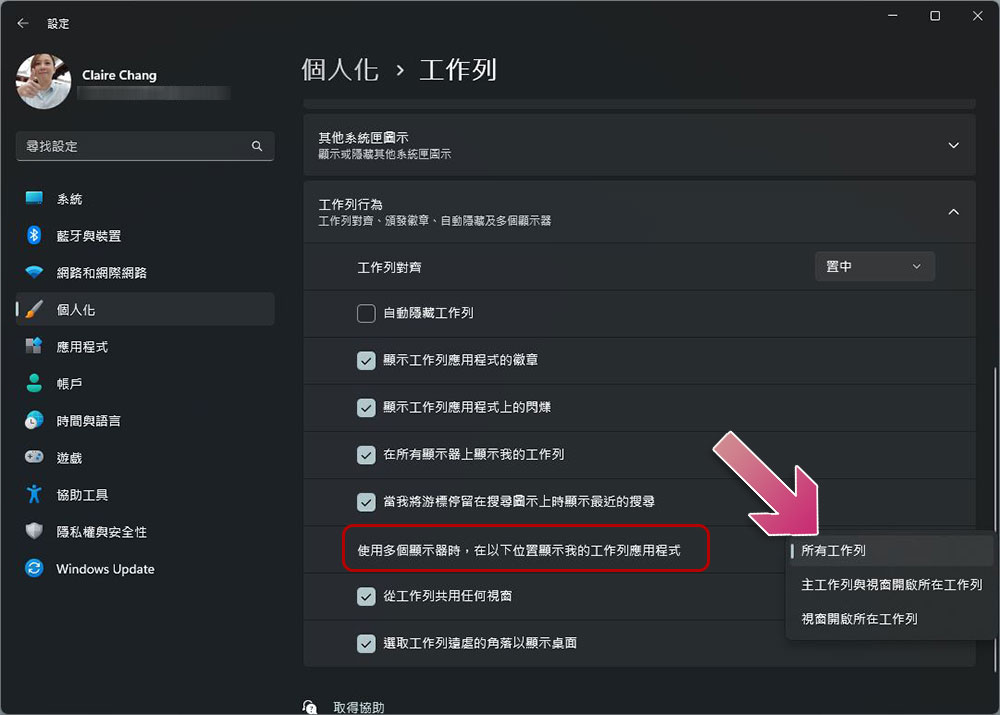
If you are a multi-screen user like me, you may want the task bar to appear on each screen so that you can click directly without having to move the mouse cursor long distance to the main screen; or you may want the secondary screen to be fully used for display and do not want to be disturbed by the task bar. Setting this switch is also very simple:
- Right-click on the taskbar and select “Taskbar Settings”.
- Adjust the options after “Show my taskbar apps when using multiple monitors” to where you want it to appear or not appear.
Select the system tray icon to show or hide
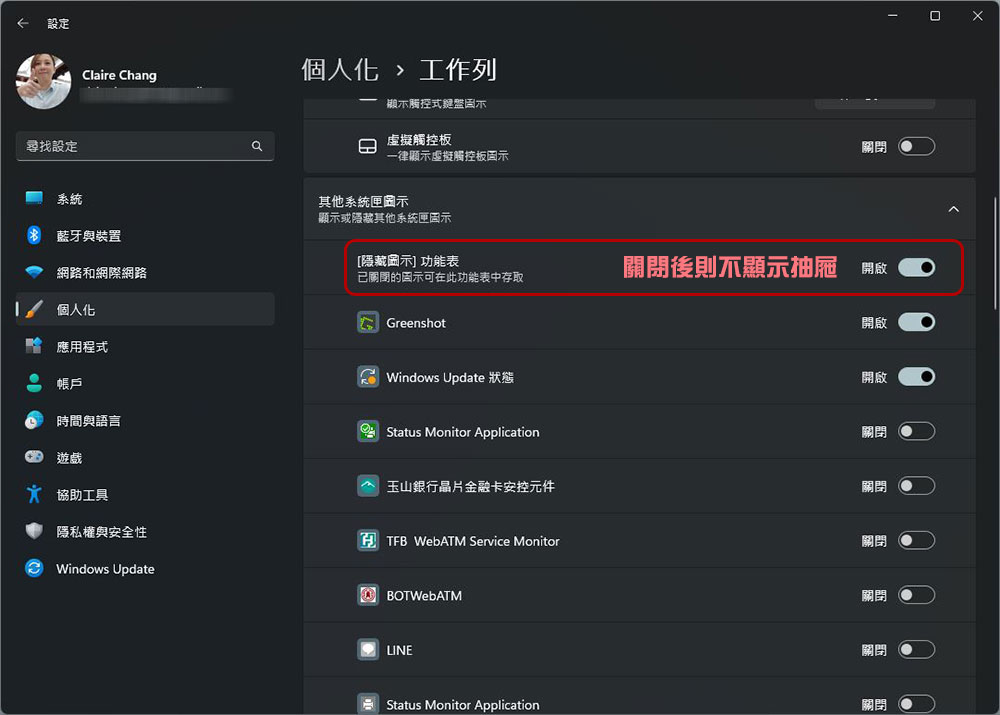
There will be a small icon next to the input method on the far right side of the Windows 11 taskbar. By default, there will also be a small arrow that allows you to expand the drawer to view all system box icons. If you have small icons that you particularly want to display here (such as commonly used gadgets, Windows Update status notifications, etc.), or background processing components that you do not want them to display here (such as bank security control components), you can exclude them one by one from the settings, or even close the drawer and do not expand it upward:
- Right-click on the taskbar and select “Taskbar Settings”.
- Expand the collapse menu of “Other system tray icons”.
- From here you can check which ones you want to open and which ones you want to put in the drawer.
- If you don’t want to show the drawer, please turn off the “Hide Icon Menu” at the top.
The above are the most practical taskbar functions for Windows 11 novices. They fully use the built-in settings and do not need to use advanced techniques such as modifying login files. Of course, Microsoft continues to receive user feedback to add more functions to meet everyone’s needs. You can wait for future changes.
Source: KOCPC Chinese