


In today’s online world, your every move is monitored, with different types of apps and websites tracking and hunting for your data for a variety of purposes. For example, through personal data, Apple can process your transactions, Twitter and Facebook can serve you ads that are of interest to you, and Google can provide search results based on your location.
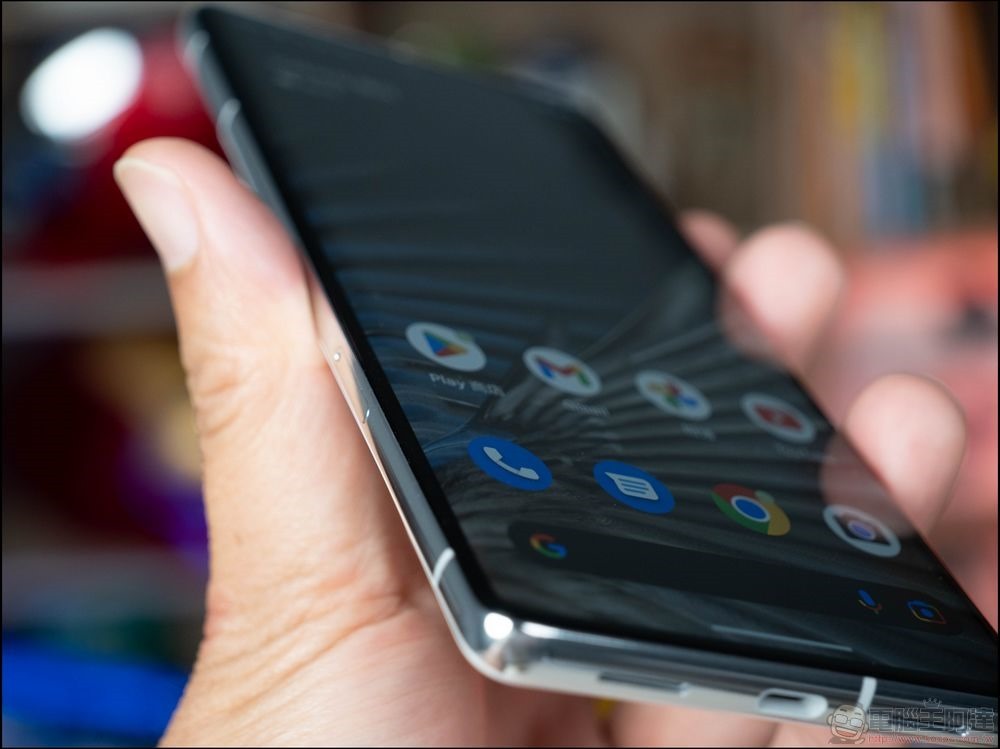
If you don’t want your Android phone to track you, don’t forget to check these settings
However, not every application and website you use will use your information for greater benefit, and not every website or service will protect your data with great care, so protecting your privacy as much as possible is a very necessary daily task. If you want to protect yourself, the first step is to start with the mobile phone you keep in hand every day. This time the author will guide you to learn the 6 simplest methods to prevent Android phones from tracking users, including deleting network and application activity records, turning off the location information access permission of the application, and deactivating some necessary location information.
Use your location history
One of the main ways Android phones track users is by tracking your location. When you sign in to your Google Account and turn on Location History, Google can keep tabs on every place you visit. This can be quite helpful in some ways, giving you personalized maps, giving you real-time traffic information and helping you find your forgotten phone. But if you don’t want Google to follow you at all times, you can choose to turn off location history as follows:
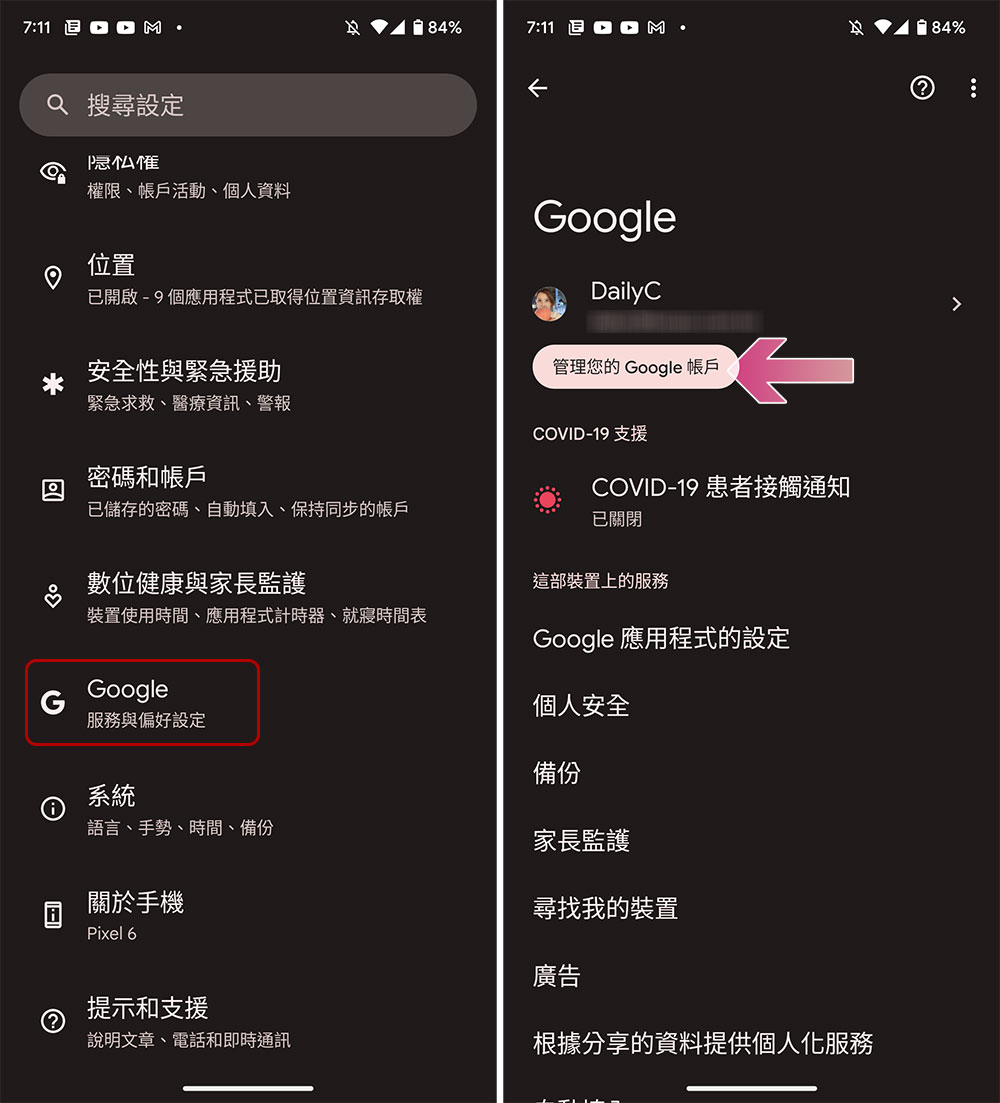
- Open the “Settings” app, scroll down to find “Google”, open it, and click “Manage your account” under your personal account.
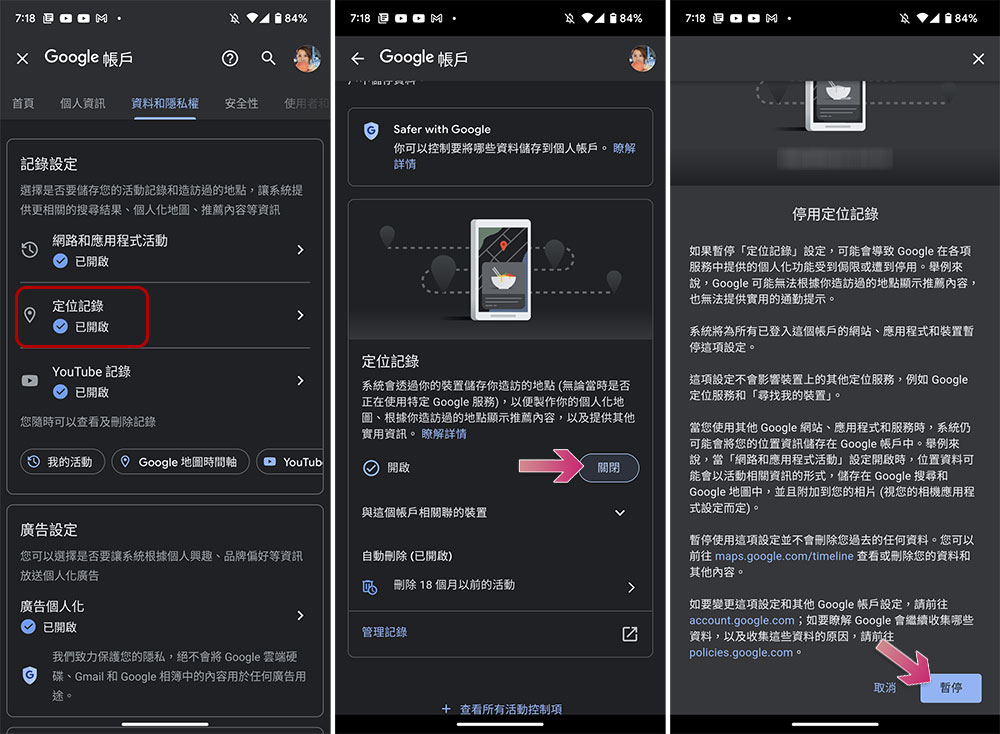
- Go to the “Data & Privacy” tab, scroll down and click the “Location History” item in the logging settings item. Then click the “Close” button at the back, scroll the page to the bottom of the description, and click “Pause” in the lower right corner.
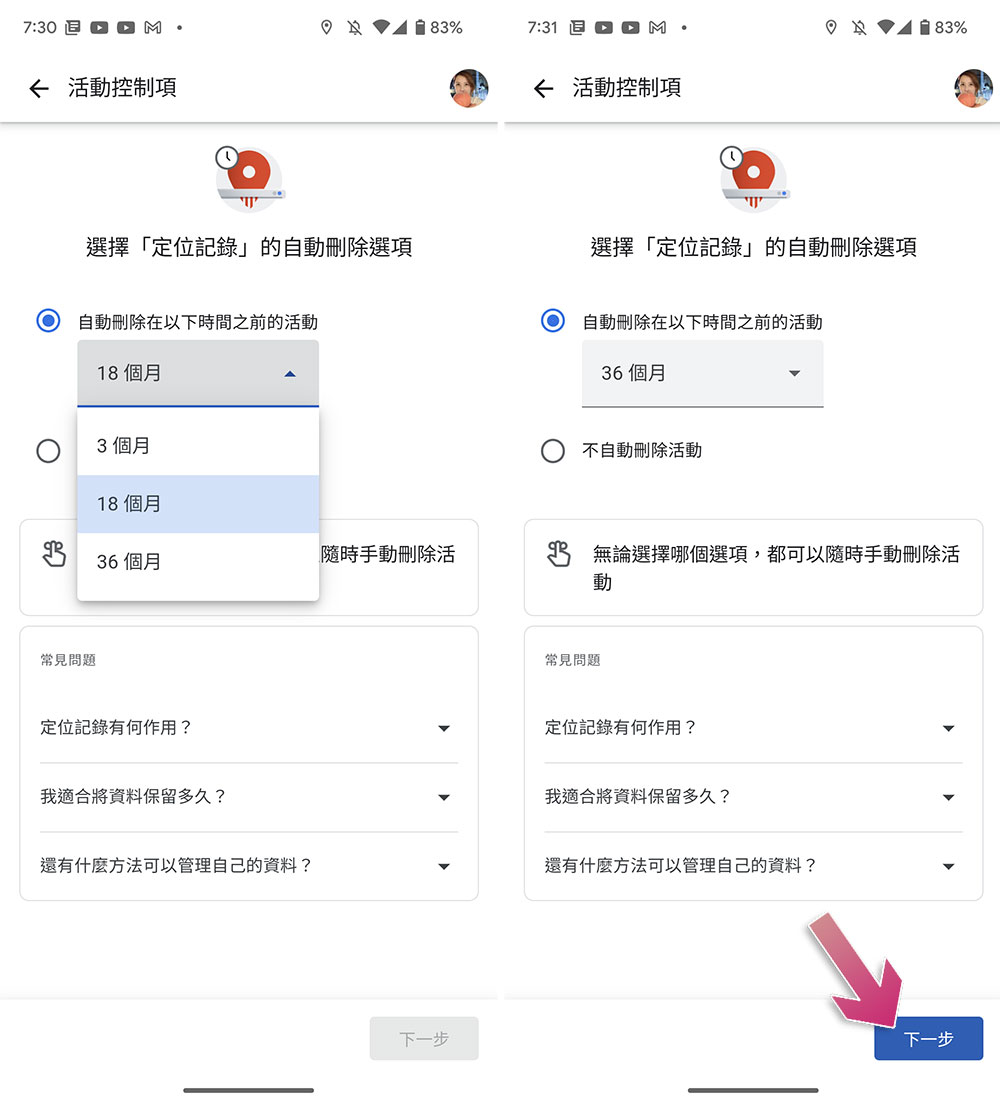
At the same time, you can also choose to delete personal location history, but you can only set to delete data older than 3 months, 18 months, or 36 months. The following is the operation required to set automatic deletion:
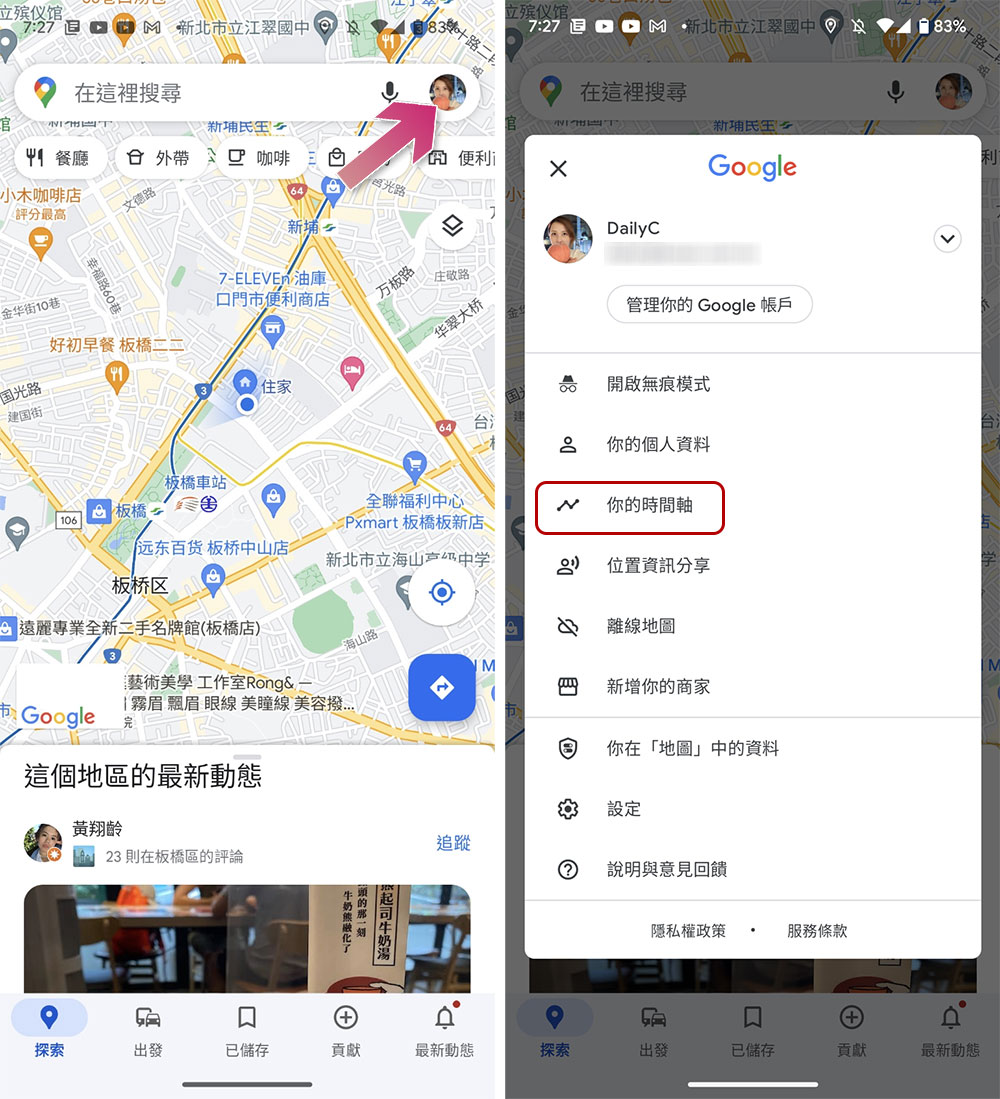
- Open the Google Maps app, click on your profile picture, and select “Your Timeline.”
- Click the three-dot menu in the upper right corner of the timeline page and select “Settings & Privacy.” Click “Automatically delete location history” in the location information setting item.
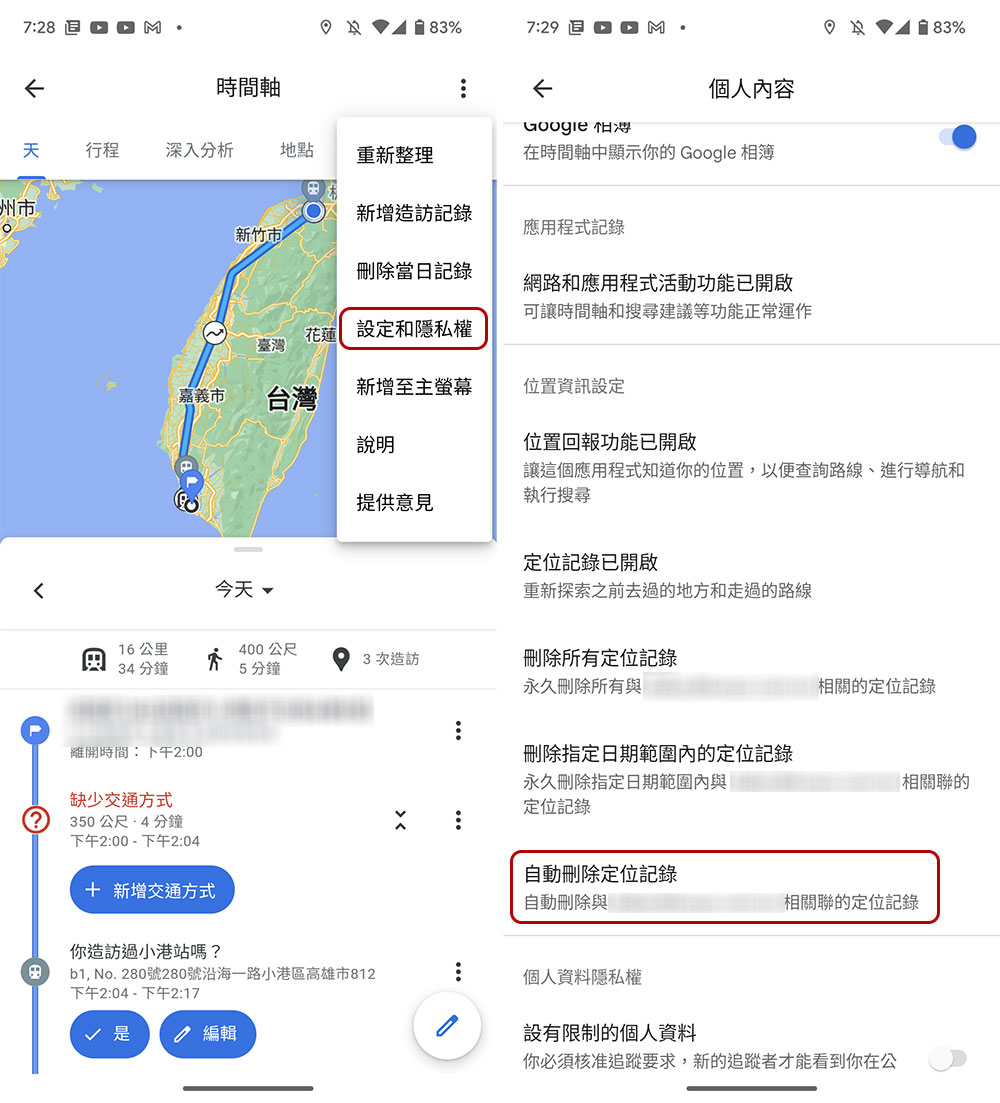
- You can then set the retention period, select one of the three options from the drop-down menu, and click Next and then Confirm.
Track website and app activity
Location History isn’t the only place where your location is saved, Site & App Activity has similar features and even more access. When you turn on “Website and App Activity”, the information including search history, location, IP address, clicked ads and even the products you purchased will be saved in your Google account. If you want to turn off this setting, please follow the steps below:
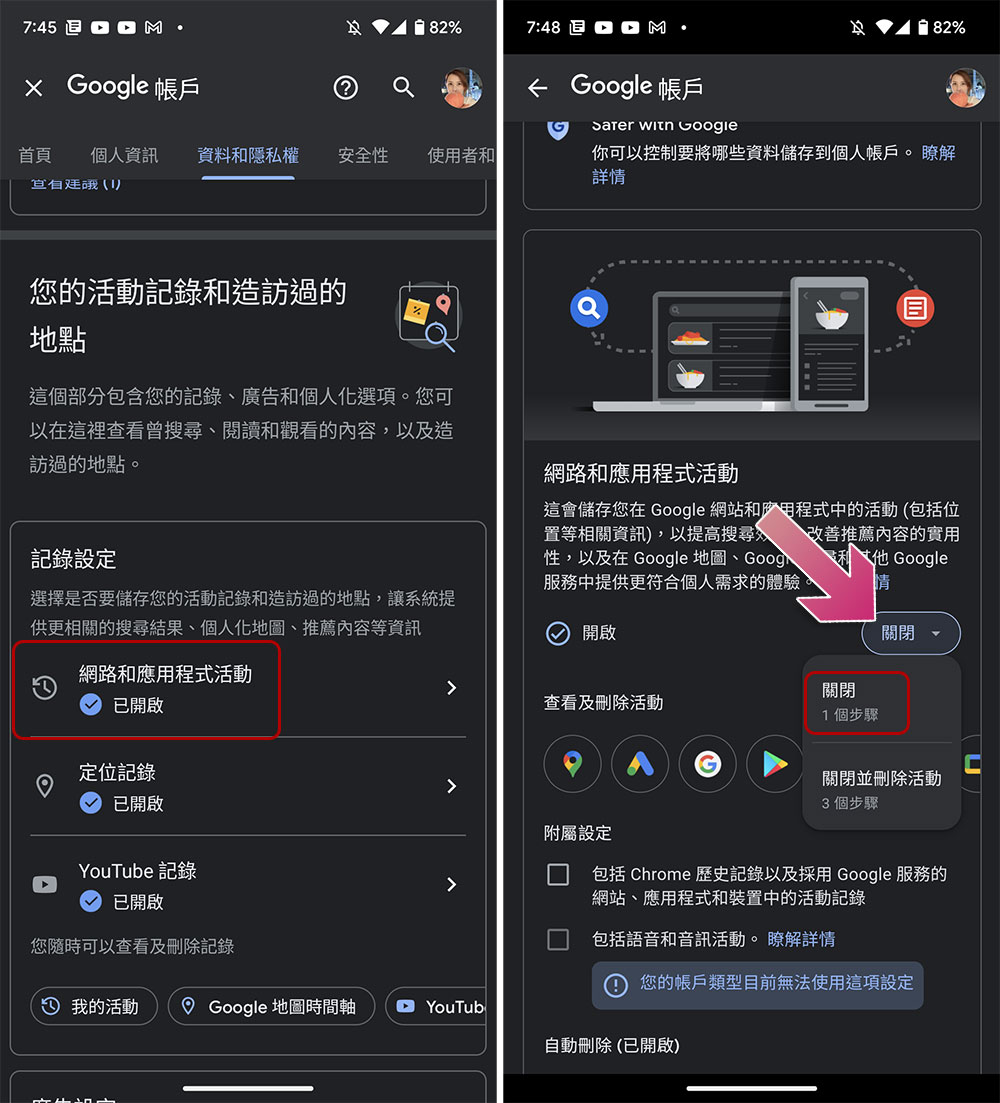
- Open the “Settings” app, scroll down to find “Google”, open it, and click “Manage your account” under your personal account.
- Go to the “Data & Privacy” tab and click “Web & App Activity” under the “Logging Settings” category. After entering, click “Close” and then select “Close”.
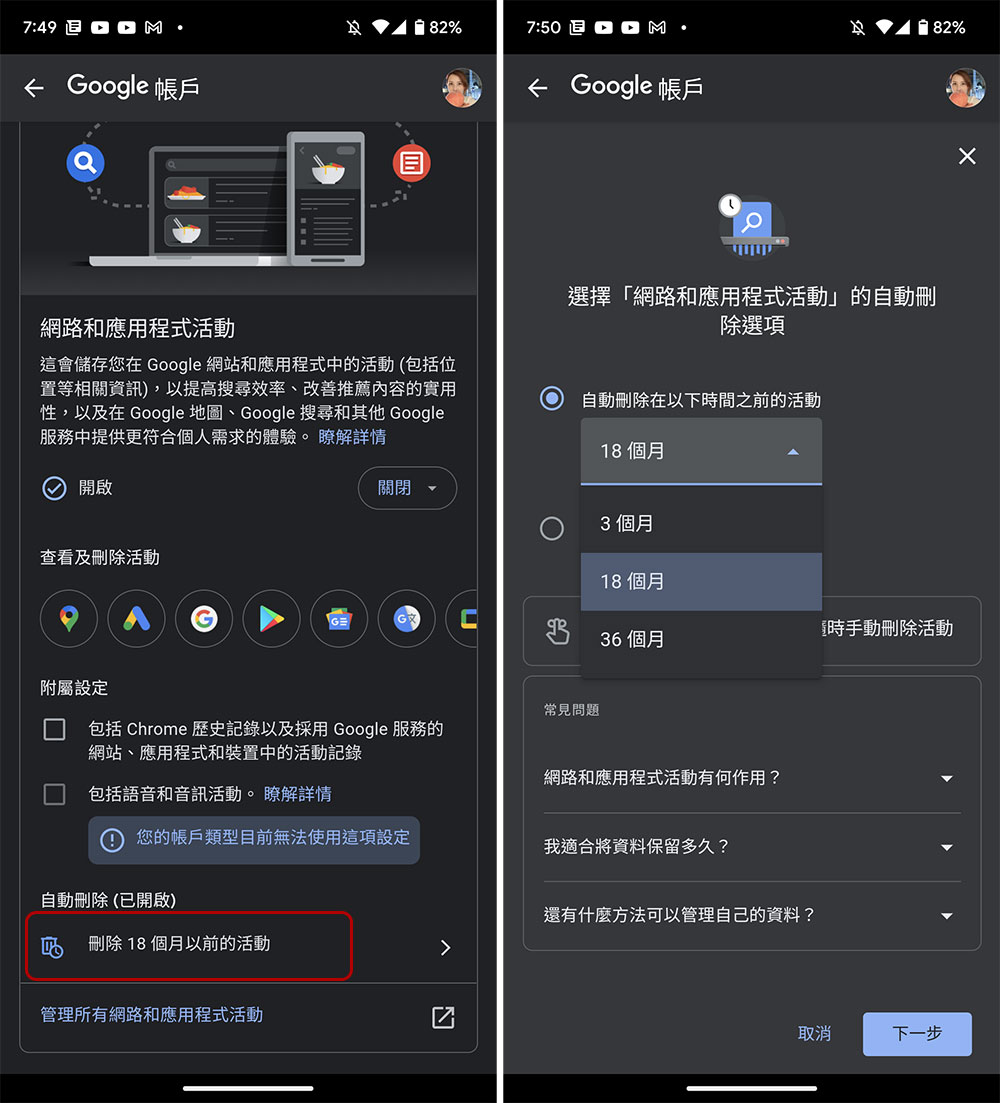
- Similarly, you can also set the automatic deletion period on this page, providing three options of 3 months, 18 months, and 36 months for you to choose.
Change location information
In addition to preventing Google from saving your personal data, you can also change the location settings on your phone itself. Settings you can turn off include:
- Location
- WiFi and Bluetooth scanning: This allows the phone to scan for nearby WiFi and Bluetooth devices to get better location information.
- Emergency location service: This allows the device to send its location to cooperating emergency rescue partners.
- Google Location Accuracy: Uses your phone’s sensors, WiFi, and mobile network to improve location information.
If you want to manage these settings, follow these steps:
- Close position
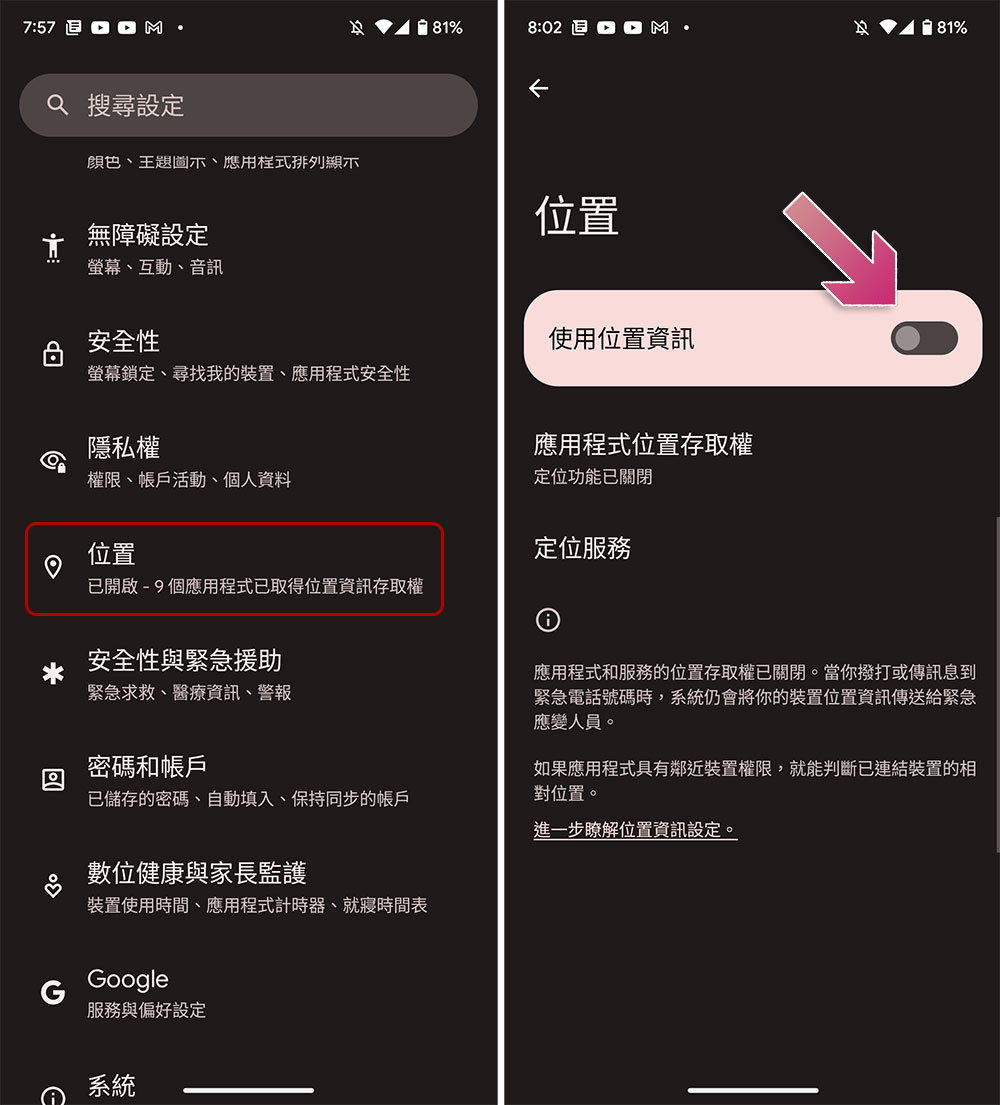
Open the “Settings” app, select “Location”, and turn off the “Use Location Information” switch at the top.
- Turn off WiFi and Bluetooth scanning, emergency booking services and location accuracy
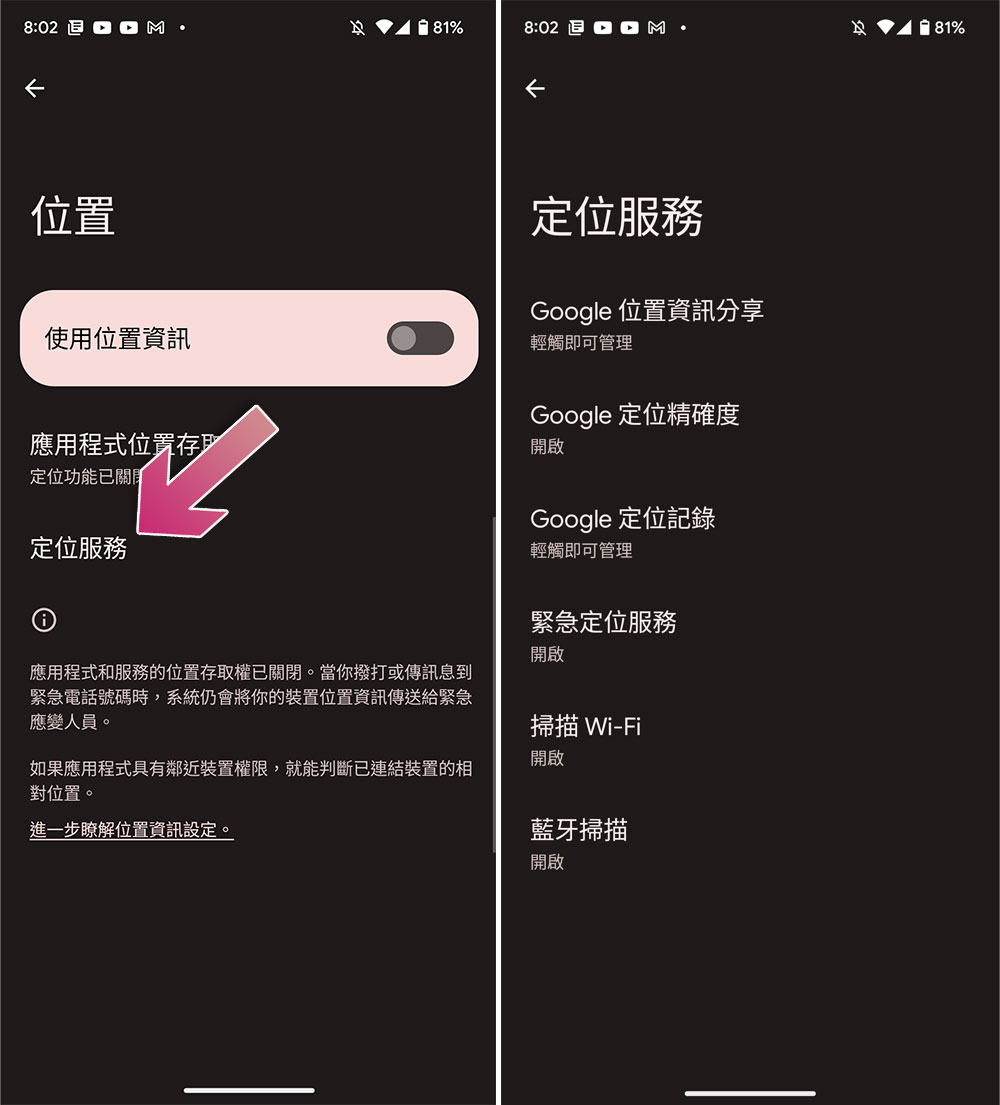
After completing the previous setting of turning off location, click “Location Services” on the same page, and then turn off “Scan WiFi”, “Bluetooth Scan”, “Google Location Accuracy” and “Emergency Reservation Service”.
Change application permissions
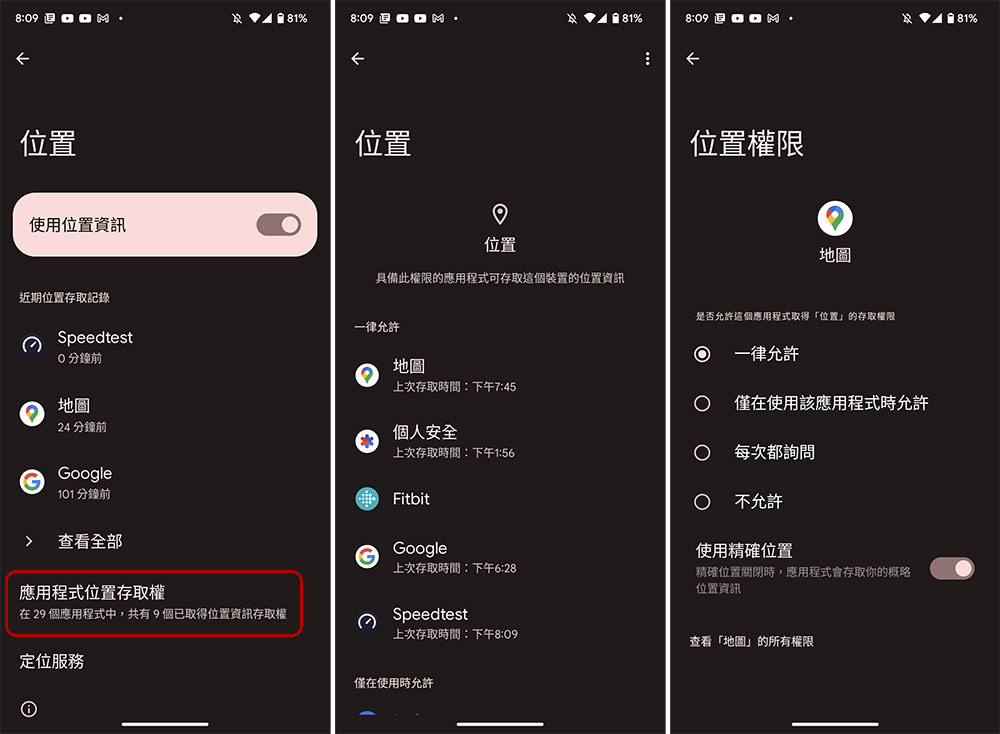
Most apps require your location access permission to provide you with better functionality. For example, Facebook uses it to automatically tag your location on posts, help you find nearby places, and use its own algorithms to serve location-relevant ads. You can view which apps have this permission through “Location >> App Location Access” in the “Settings” app (valid when location is turned on) and set it up one by one. You can set four tiers for apps: Always allow, Allow only when using the app, Ask every time, and Don’t allow.
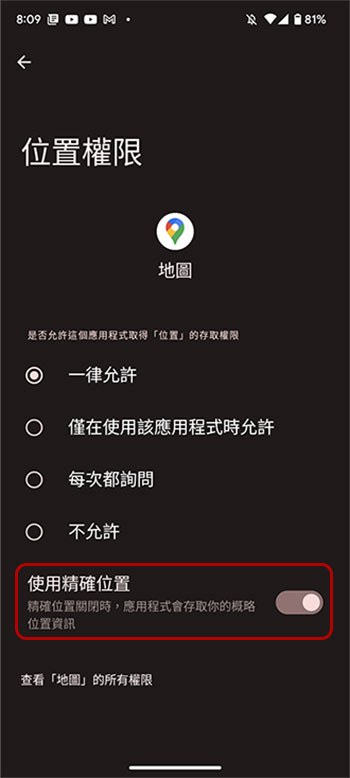
If you are using Android 12 or above, you will also see an additional switch that allows you to choose whether to “Use precise location.” Enabling this feature will accurately locate your phone’s location; turning this feature off will only allow the app to narrow down your approximate location, which is approximately a location within a radius of three kilometers.
Check your Chrome browser settings
When browsing the web online, you will often come across websites that want to access your location, which may be helpful to you in certain situations, such as accessing a retailer’s website. Allowing access to your location can provide you with nearest store recommendations, etc. But you can check which websites can access your location through Chrome:
- Open the Chrome app, click the three-dot menu in the upper right corner of the screen and select Settings.
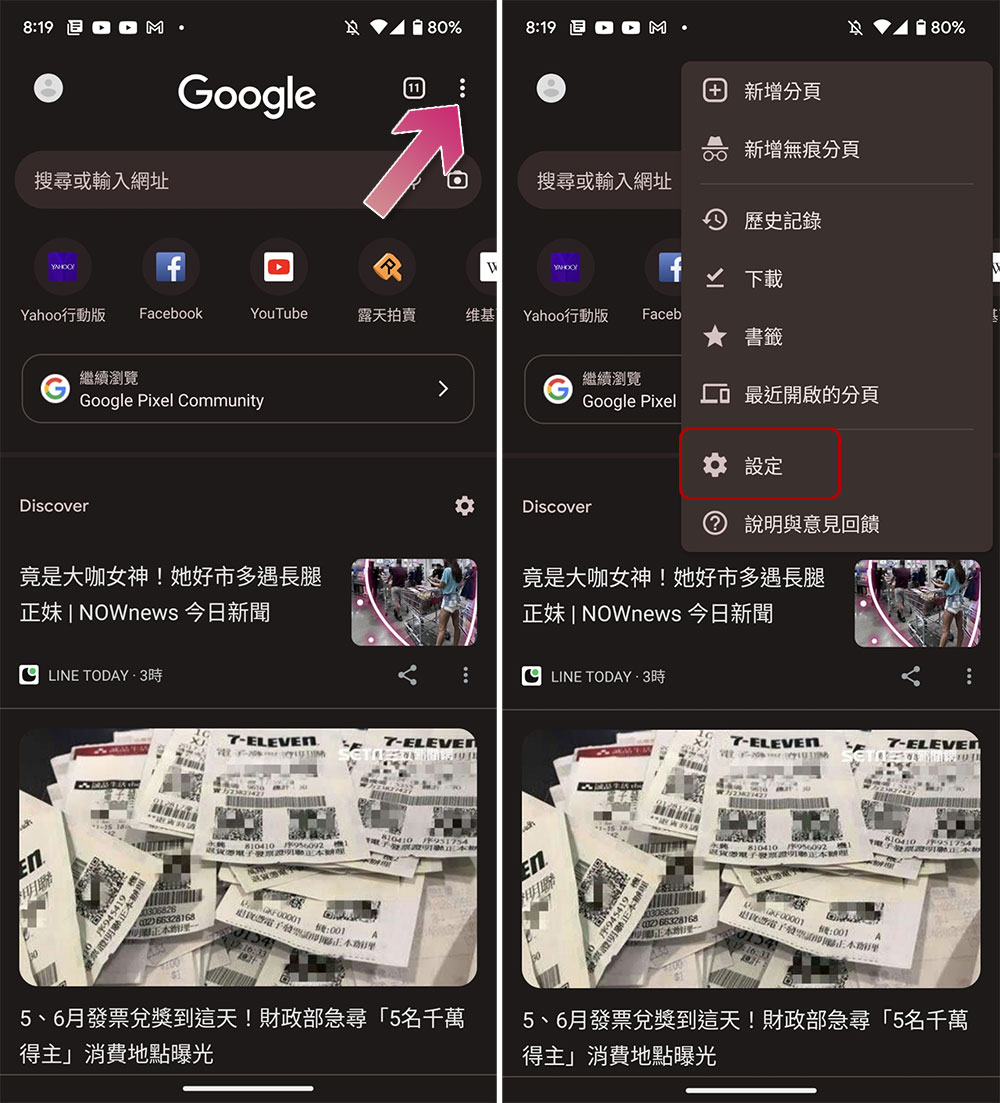
- Scroll down to the Advanced category, click Site Settings, then select Location to see the apps that can see your location.
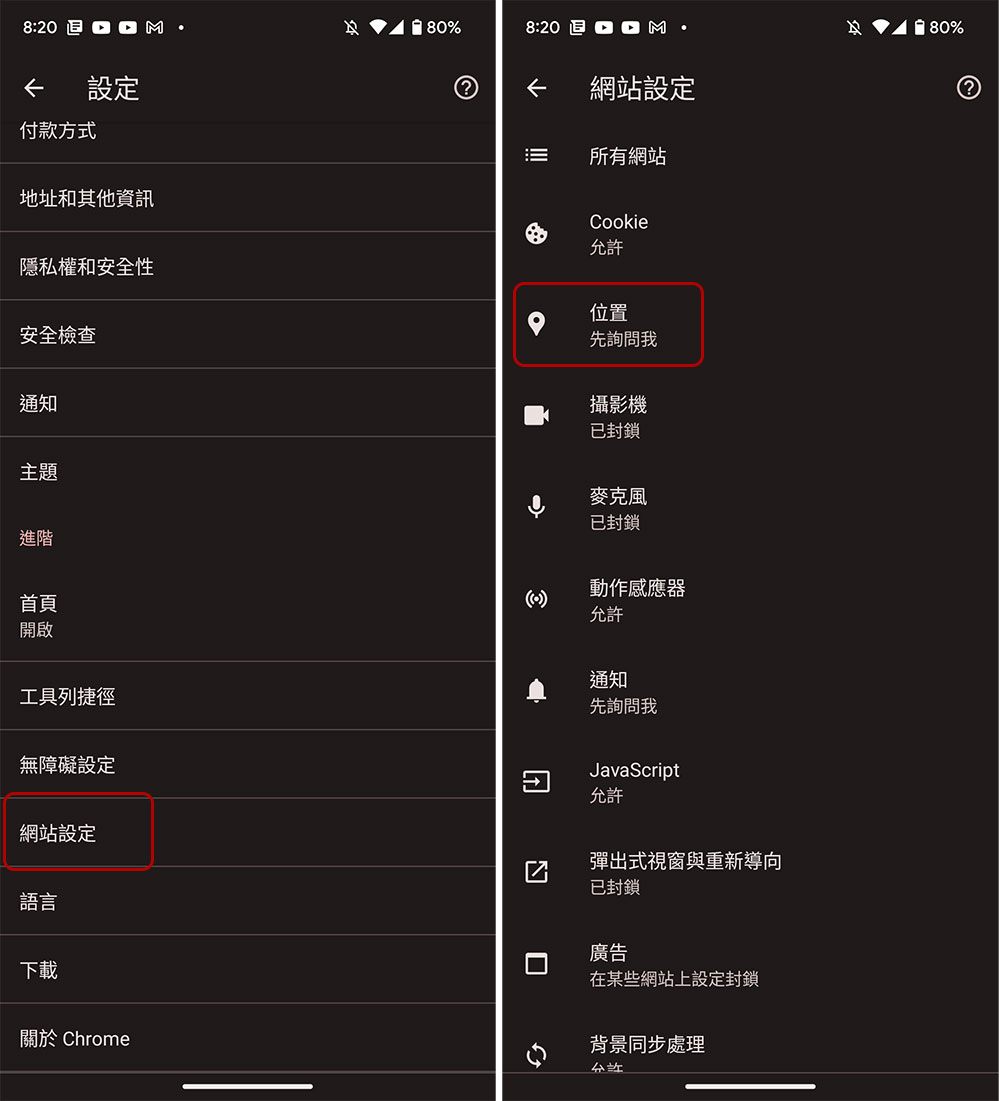
If you want to remove location access from a site, just click on the site and select Block. You can also prevent the browser from completely sharing your location with the off button. Once this feature is disabled, any website you visit will not ask you to share your location. If you’re particularly concerned about your privacy, consider switching to other Android browsers such as Tor and Firefox.
Turn off advertising ID
Today’s advertising is getting smarter and smarter. You may have just searched for dehumidifiers one day, and the next day you will see dozens of dehumidifier ads in the embedded advertising column of the website. It is as if advertisers are observing your every move online and know exactly what you like. This is the result of personalized advertising. To turn off this feature on your Android device, you need to do the following:
- Open the “Settings” app, scroll down to find “Google”, open it, and click “Manage your account” under your personal account.
- Switch to the “Data and Privacy” tab. In the “Ad Settings” item, you can see that “Ad Personalization” is turned on under “Ad Personalization”. Click to enter and turn off the “Ad Personalization” switch.
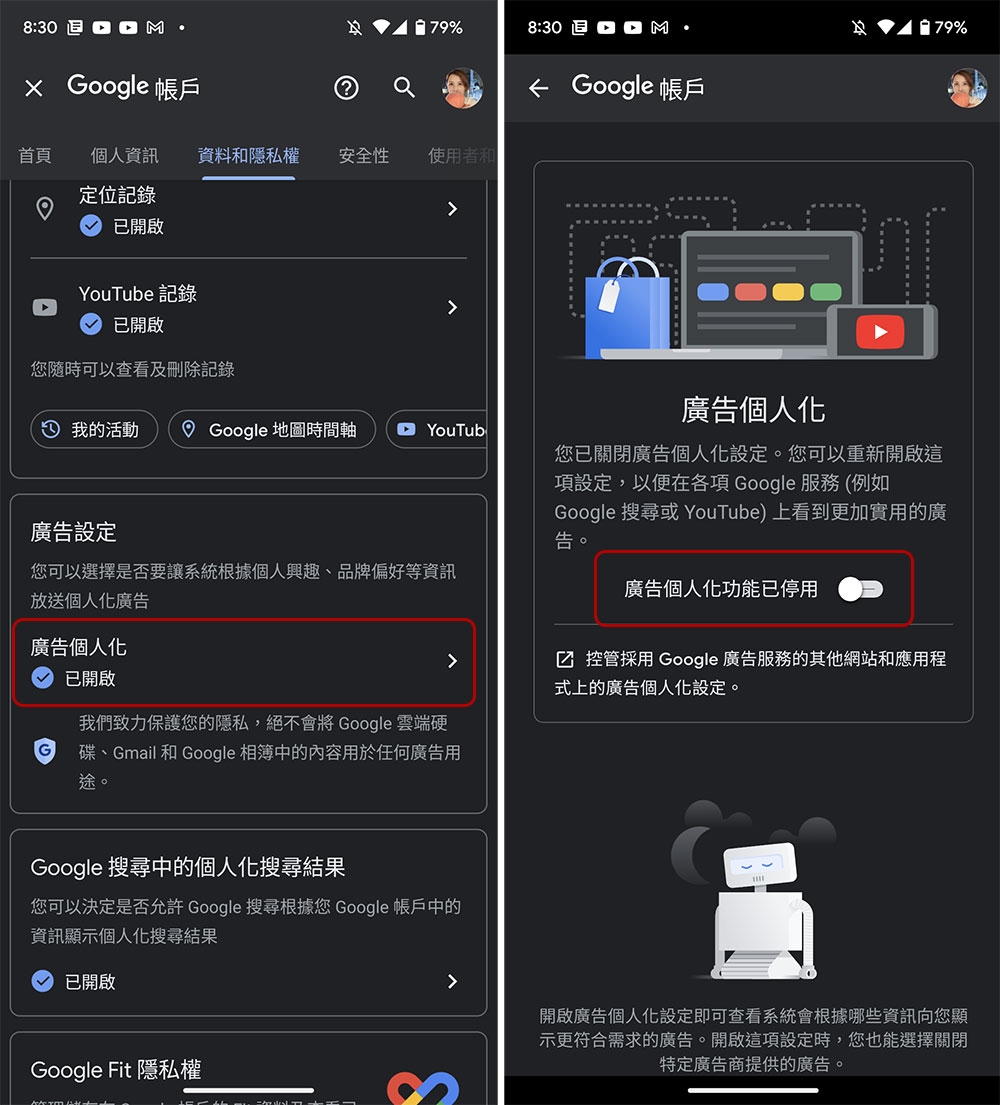
Disabling ad personalization does not mean that you will stop seeing ads. The ad columns on each website are still there. The advantage is that they will only display general ads instead of feeding you specific ads following your footsteps.
Source: KOCPC Chinese