


For those who are hesitating whether to switch from Google Workspace to Microsoft 365, most of them are actually worried that the original data cannot be saved and have to start over. Some small and medium-sized enterprises are worried that they do not have internal IT technical capabilities, which will prevent the migration from going smoothly. Regarding this point, this time the author breaks down the steps of the three major transfer procedures one by one, so that even if you have no technical skills, you can easily complete it!

No need for IT staff! A beginner’s guide to painlessly moving from Google Workspace to Microsoft 365
Moving from Google Workspace to Microsoft 365 may sound like a hassle, but the barrier to entry is actually not that high. For micro or small enterprises, the company may not have the MIS manpower to solve technical problems. Fortunately, Microsoft has simplified the transfer procedure. Many parts can be handled through system automation, saving a lot of time and effort in trying. There is also professional support waiting for you to ask questions. As long as you follow the instructions, you can quickly transfer without any pressure.
★ Quickly jump to paragraph navigation
- Set up Microsost 365 for Google Workspace migration
- Use Migration Manager to move Google Workspace to Microsoft 365
- Move business email and calendaring from Google Workspace to Microsoft 365
3-1 Phase One: Create a Google Service Account
3-2 Phase 2: Enable API usage for the project
3-3 Phase 3: Grant access to the service account
3-4 Phase 4: Create a third domain for mail sent to Microsoft 365
3-5 Phase Five: Establish an email alias in Microsoft 365
3-6 Final stage: start the transfer - Conclusion and reader discounts

Set up Microsoft 365 for Google Workspace migration
Before officially entering the transfer, there is always some preparatory work to be done. In this paragraph, we will first learn to set up Microsoft 365 to prepare for the subsequent transfer of connection with Google Workspace.
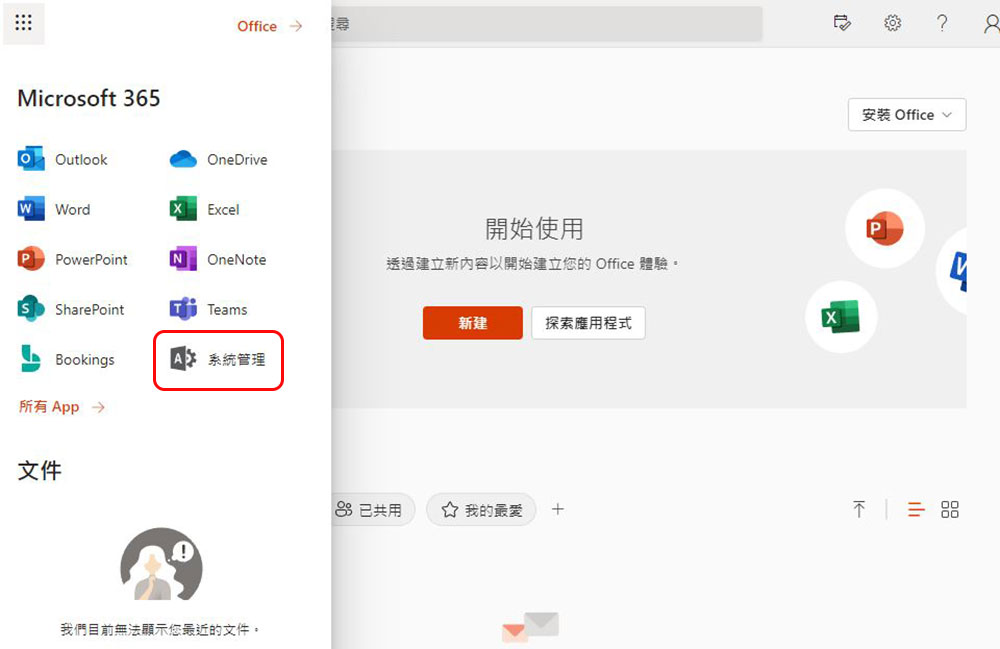
- Log in first Office.com, click the menu icon in the upper left corner, and select the “System Management” item.
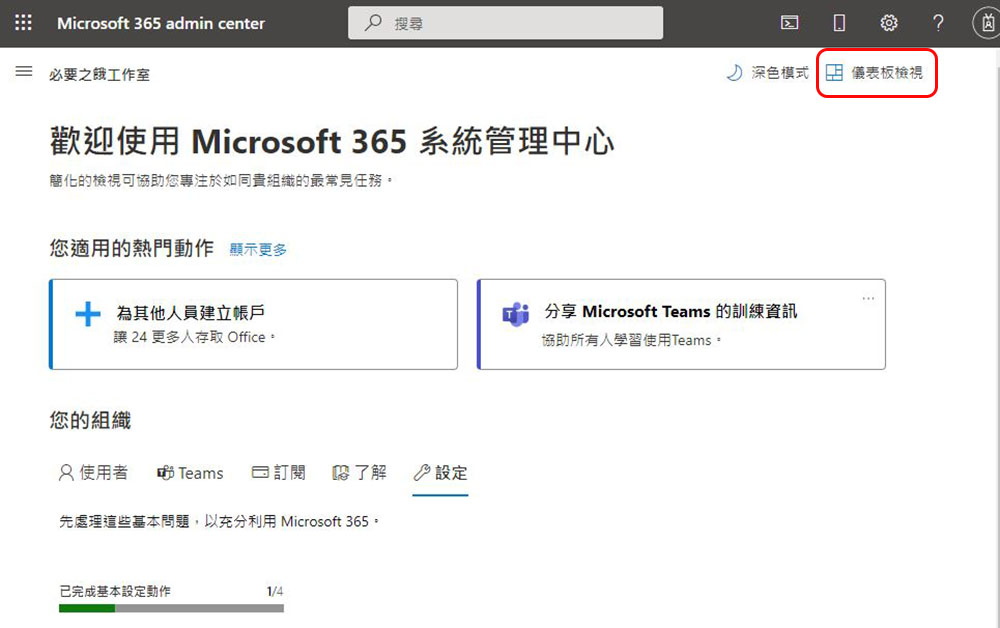
- After entering the “Microsoft 365 System Management Center”, first change the page display mode to “Dashboard View” from the upper right corner.
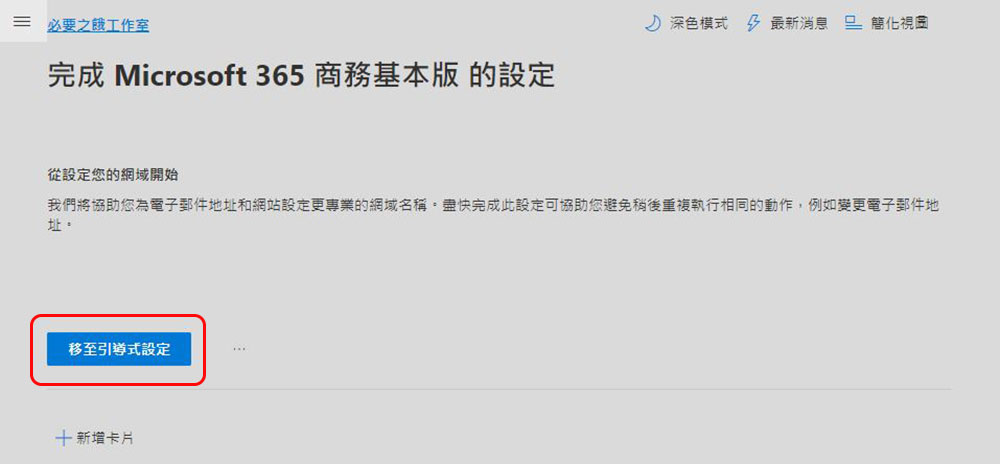
- Then click the “Move to Guided Setup” button on the page.
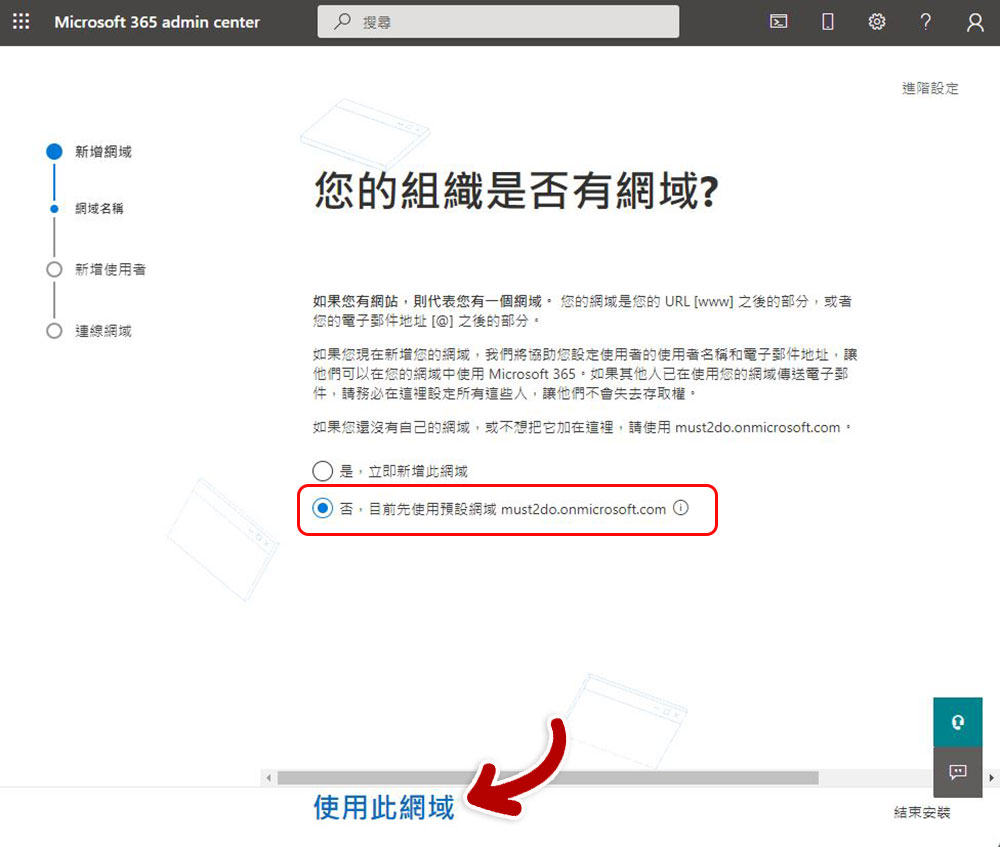
- Since you are transferring from Google Workspace, please select “No, use the default domain for now…” on this page to facilitate subsequent transfers.
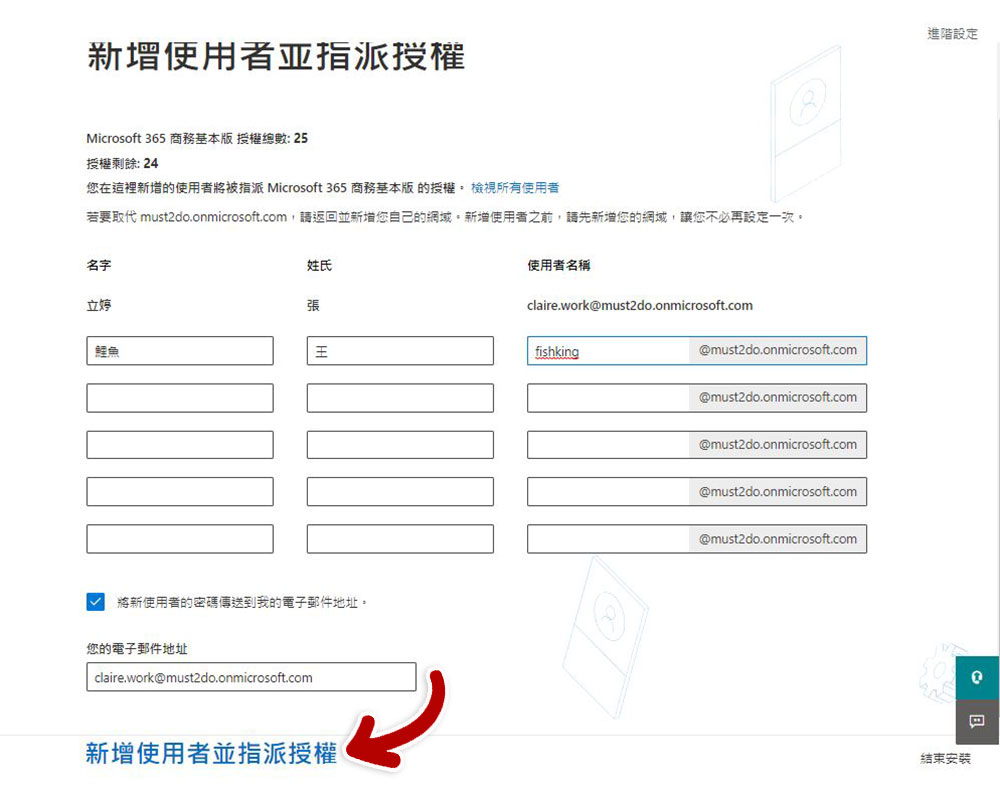
- Then on the next page, after entering all the names and usernames of users within the organization, click the “Add User and Assign Authorization” item at the bottom.
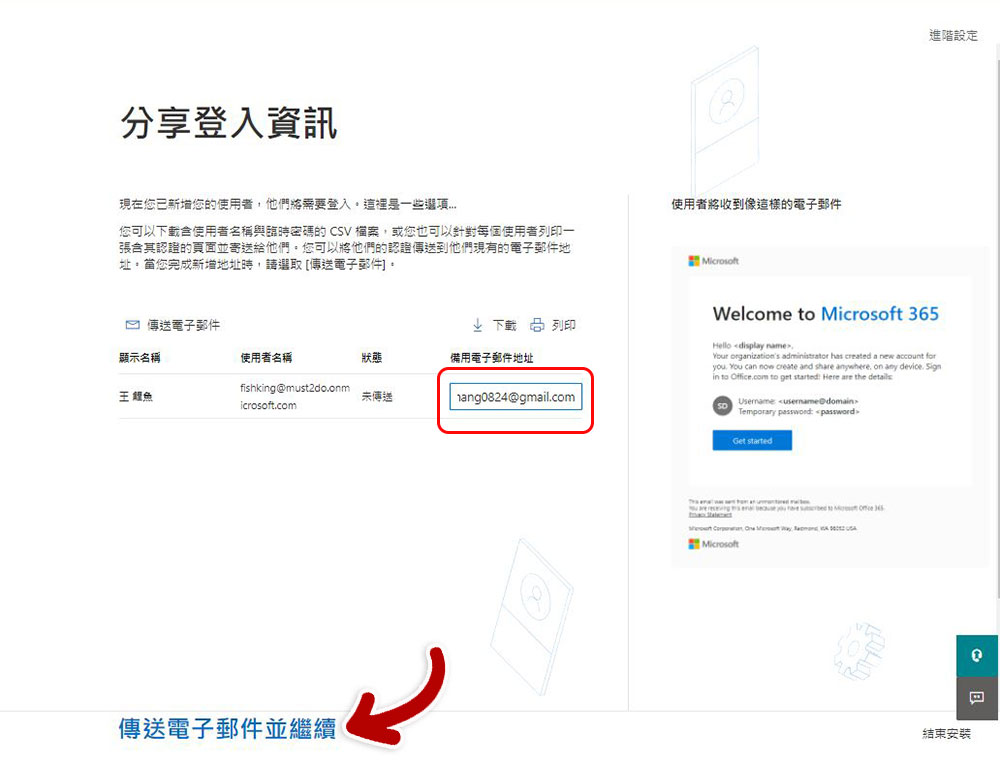
- Next, enter the alternate email address where the user will receive the verification email on this page, and click “Send Email and Continue.”
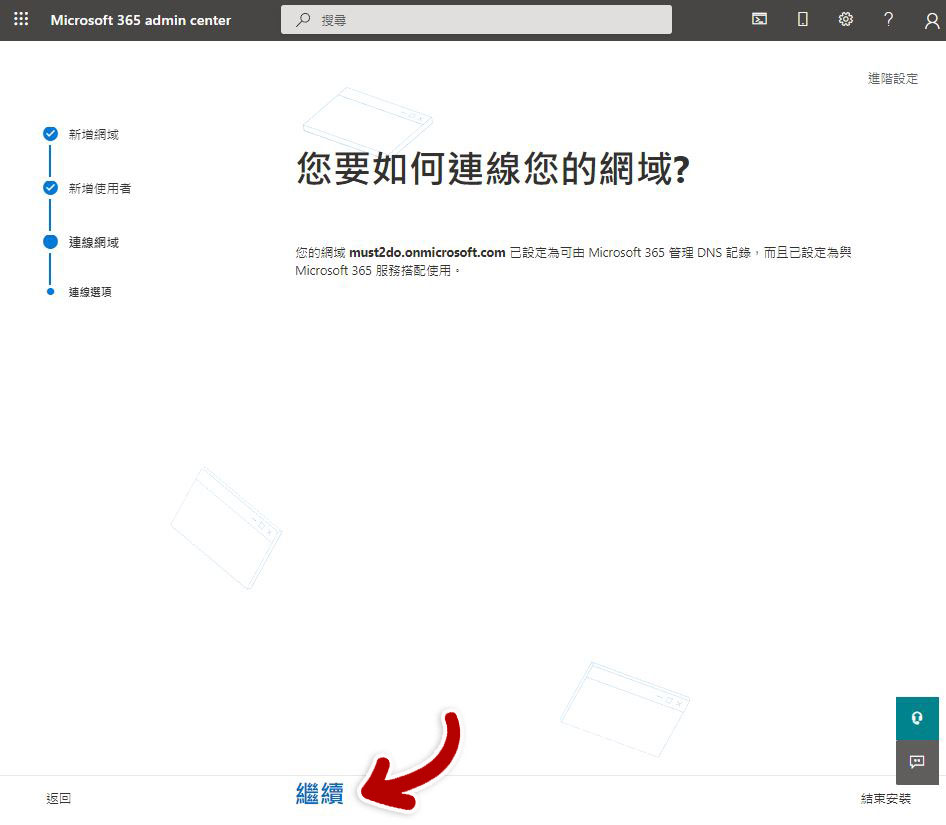
- On the next page, click the “Continue” button at the bottom to connect to the temporary domain. After the connection is completed, the first stage is completed!
Use Migration Manager to move Google Workspace to Microsoft 365
Next we have to start transferring people from Google Workspace! In this paragraph, the original Google Workspace accounts of all internal personnel of the enterprise are first transferred to the corresponding Microsoft 365 accounts. You can think of this paragraph as first assigning a house to everyone, and then moving the unified furniture in first, waiting for the residents to move in.
- First go to the SharePoint System Admin CenterTransfer administrator” and log in with an account that has system administrator rights for the enterprise unit.
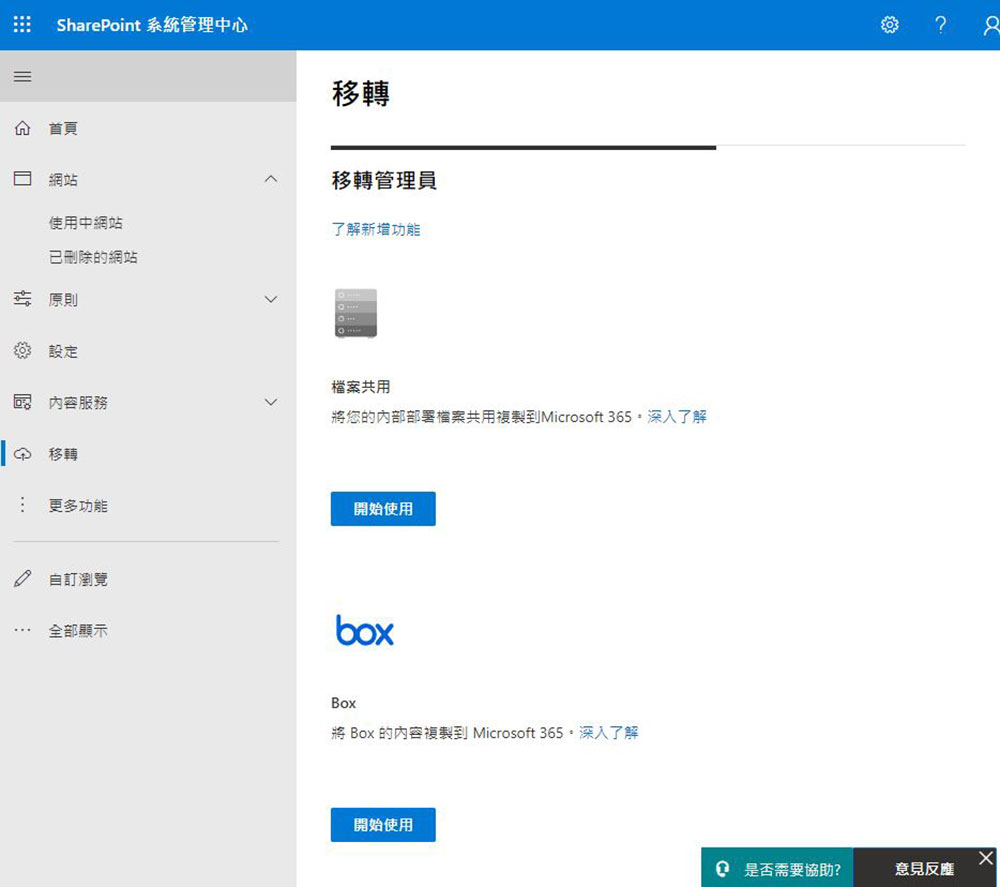
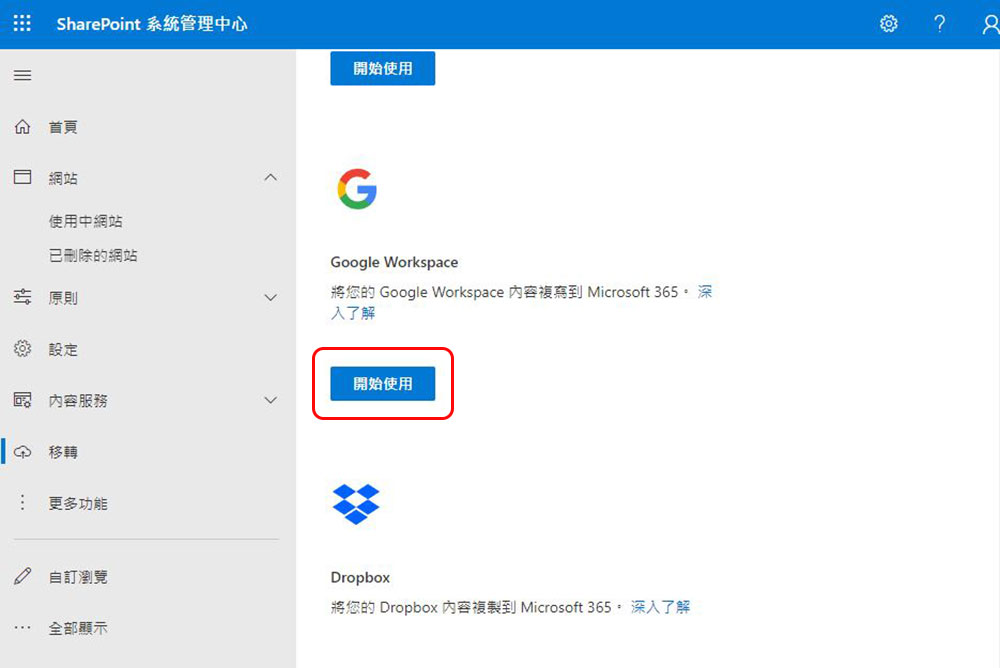
- Scroll down the page and you will see a “Google Workspace” option. Click the attached “Get Started” button.
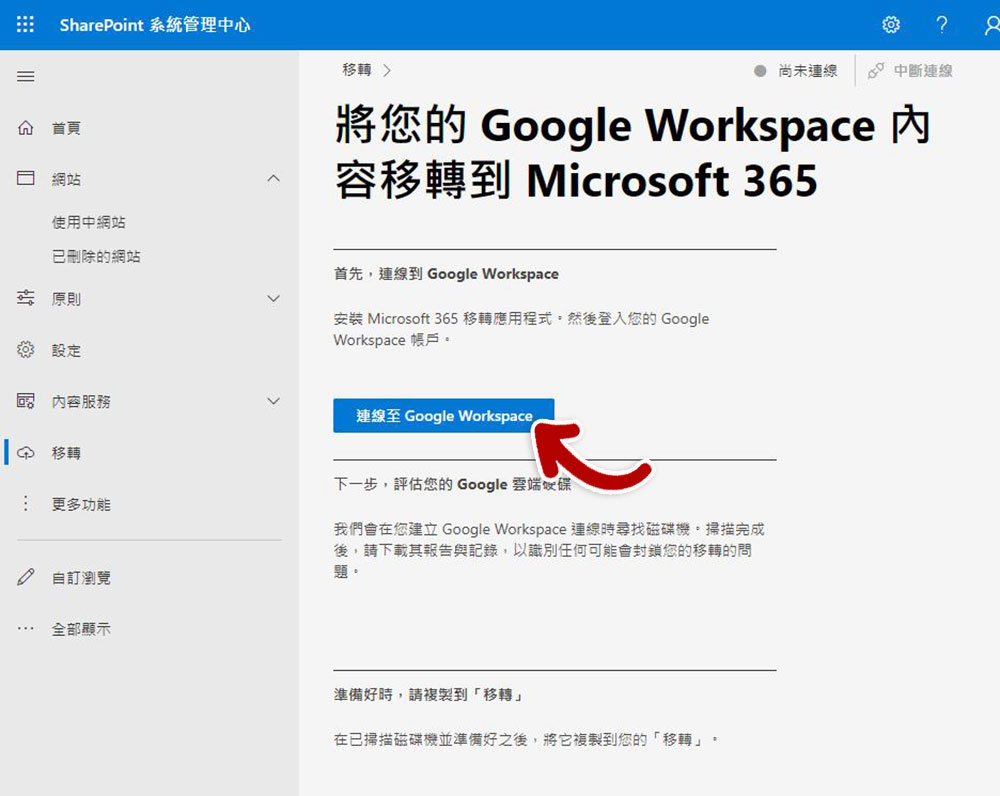
- First click “Connect to Google Workspace”.
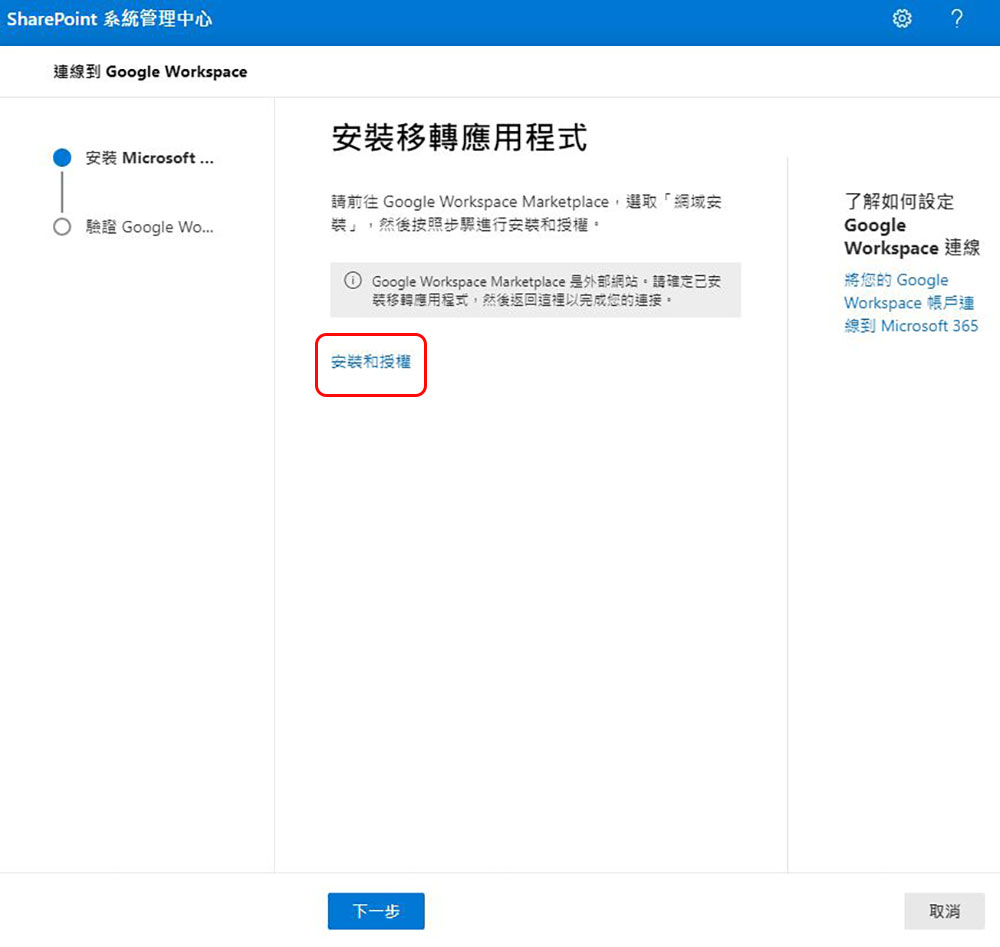
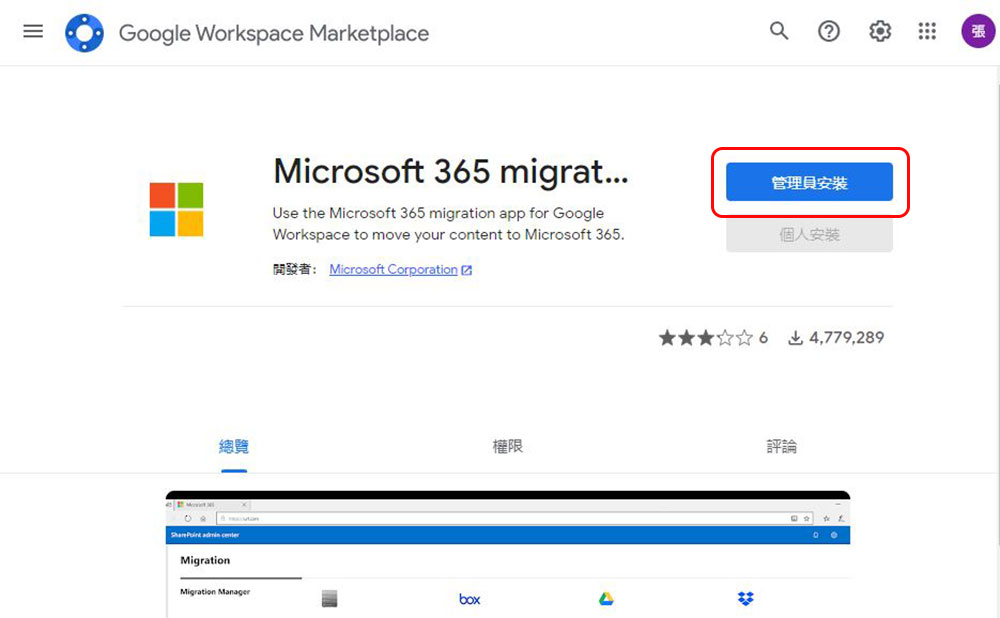
- Next, the system will pop up a page to guide you to the Google Workspace Marketplace to install and authorize the transfer application. Select “Administrator Installation” on the download and installation page. After completing the installation, return to the SharePoint System Management Center and click Next.
- In this step, click the “Sign in to Google Workspace” button displayed on the page to verify the account. Then the connected prompt will appear on the screen, and you can click the Done button at the bottom.
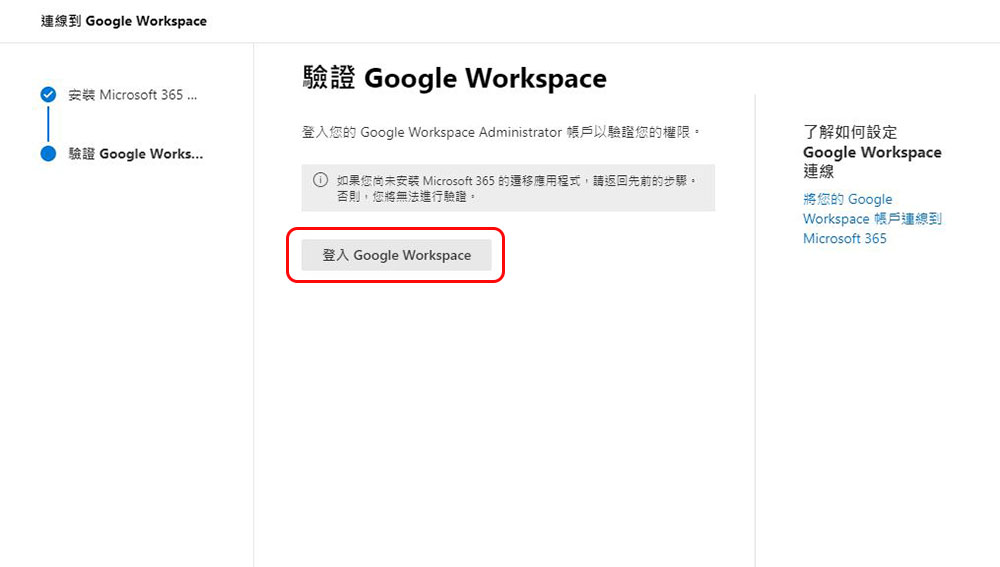
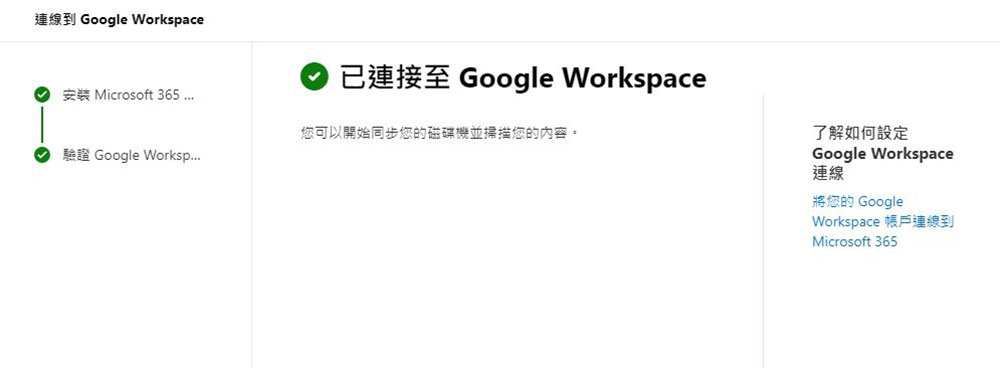
- Next, go back to the “Move your Google Workspace content to Microsoft 365” page. Scroll to the bottom to check the accounts you want to transfer and scan them first (you can also directly press Finish and Close the tutorial without scrolling). Your Google Drive account will be automatically scanned, and once the scan is complete, download the resulting report and logs to investigate any possible issues that may prevent the transfer (this is especially important for larger organizations).
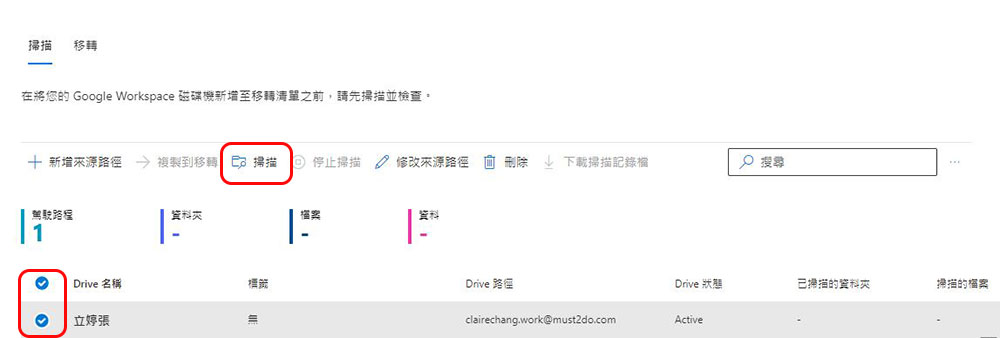
- After the scan is completed, click “Copy to Transfer”.
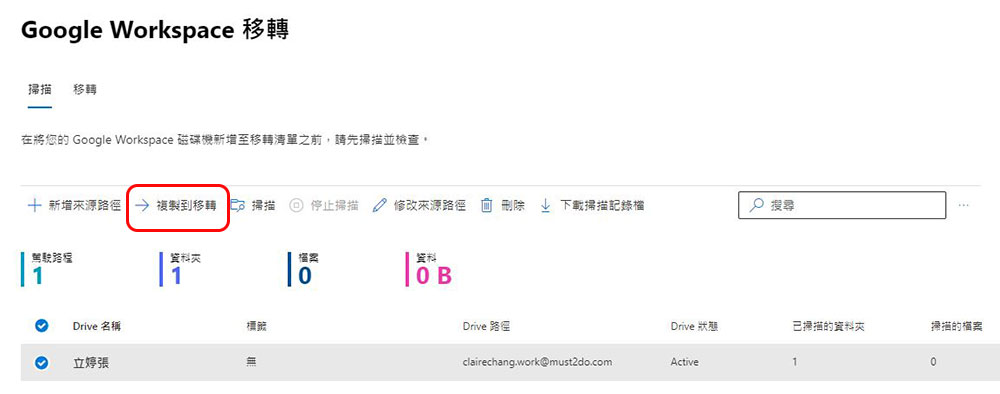
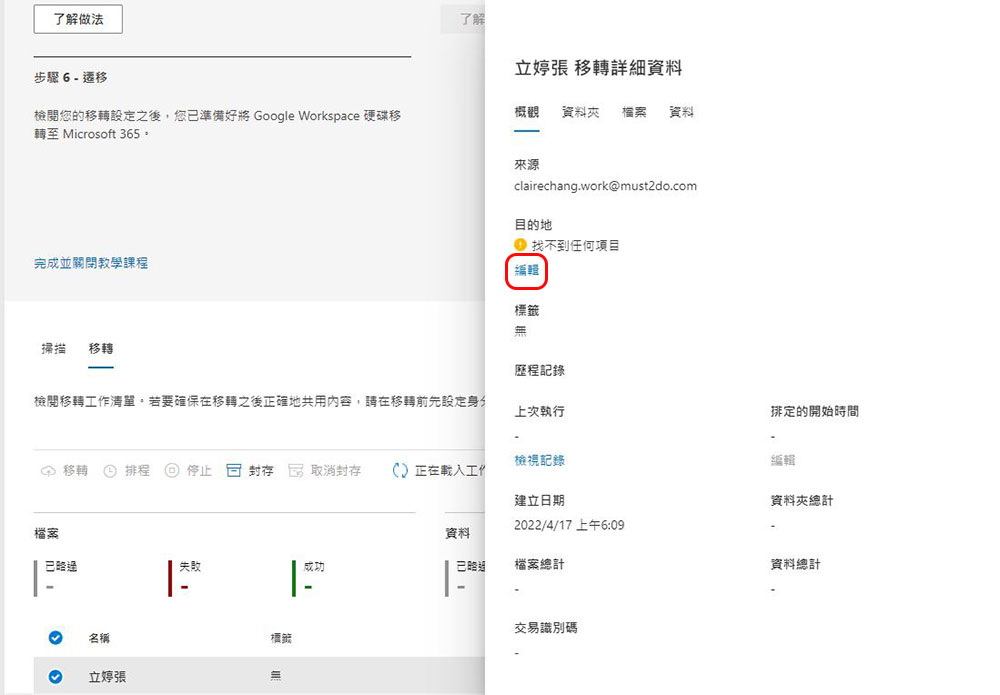
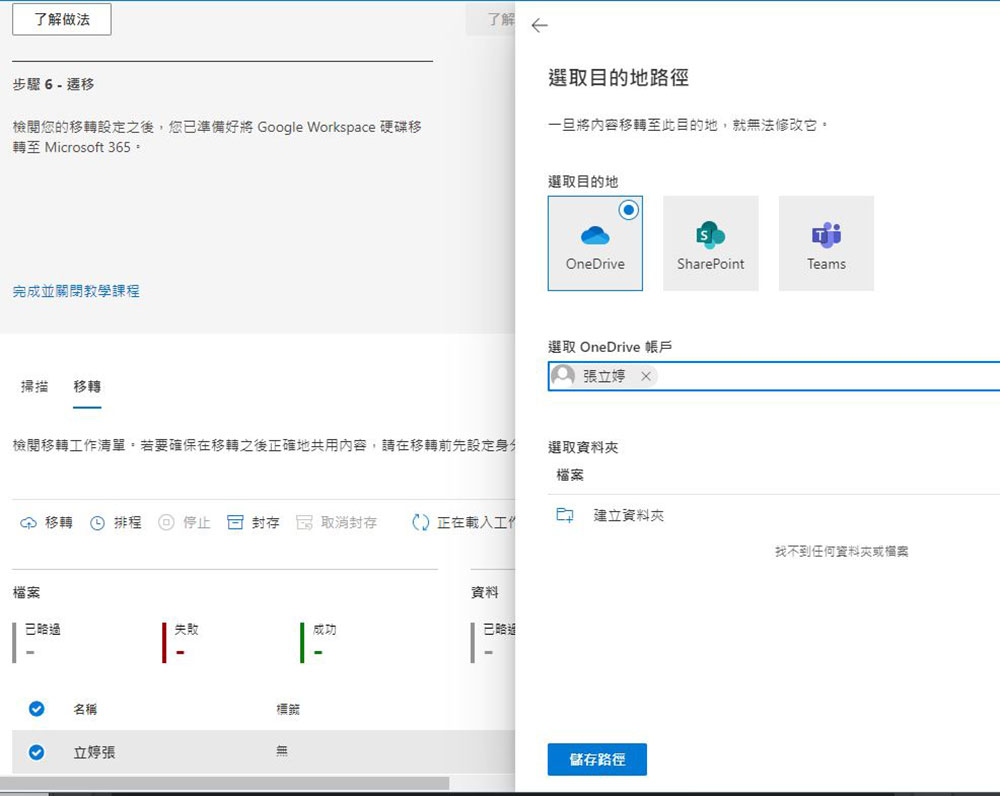
- Switch to the transfer page. First, check the destination path. Although the system will match the source path to the destination path, you still have to check and modify each destination path yourself to ensure that the content is copied to the correct location. If you want to modify the destination path, you can directly click on the field and select “Edit” to select where to transfer from the three destinations. Here we select OneDrive, and then select the corresponding account below.
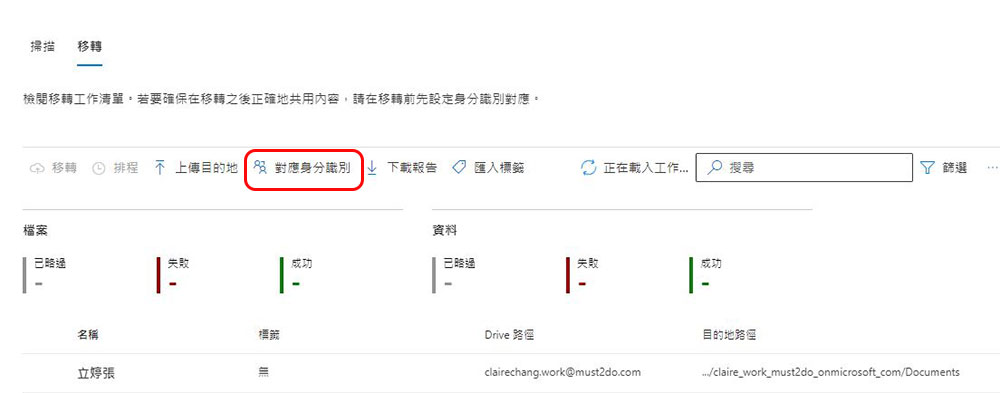
- After checking the paths, don’t forget to check the corresponding identities to ensure that the groups and users in Google Drive map to the accounts in Microsoft 365 to transfer the Google Drive permission settings. At this time, first uncheck the previous check in the list, and then click “Corresponding Identity Recognition” at the top.
- On the “Corresponding Identity Recognition” page, you can select “Automatic mapping”. When there are a large number of people, you can also select “Import users and groups” to upload a CSV file for mapping.
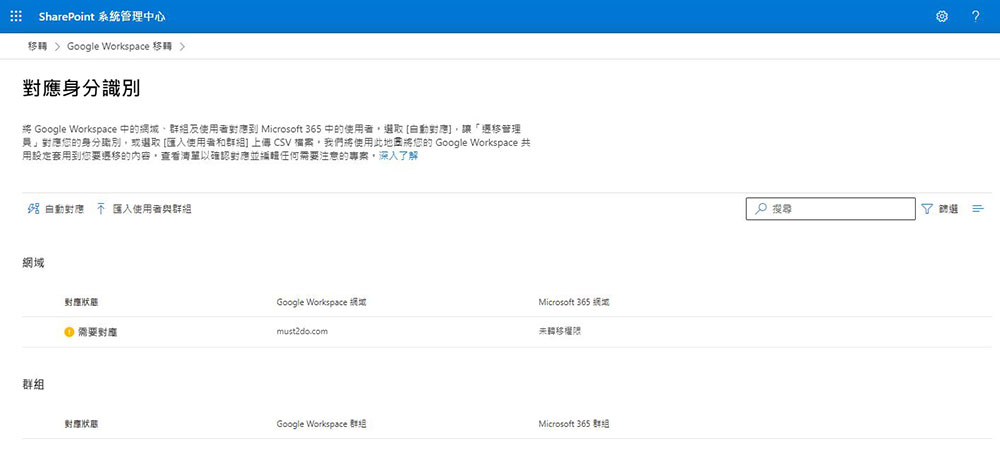
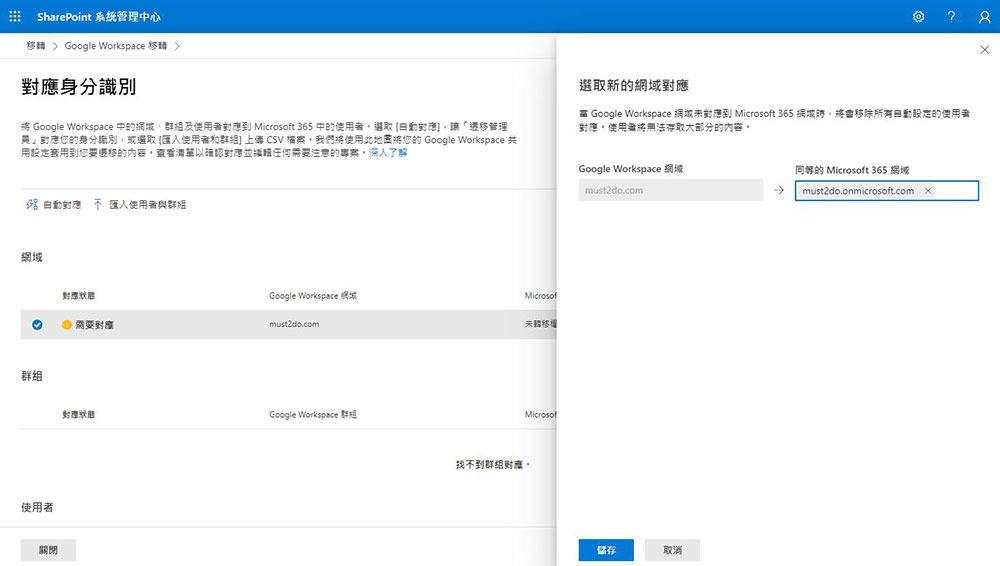
- If a “Correspondence Required” prompt appears on the page, you can click and select the domain name that you want to correspond to the original Google Workspace. After the identity correspondence is confirmed, you can click Close.
- Finally reached the last stage! Check the people you want to transfer, click “Transfer”, and wait for the system to finish.
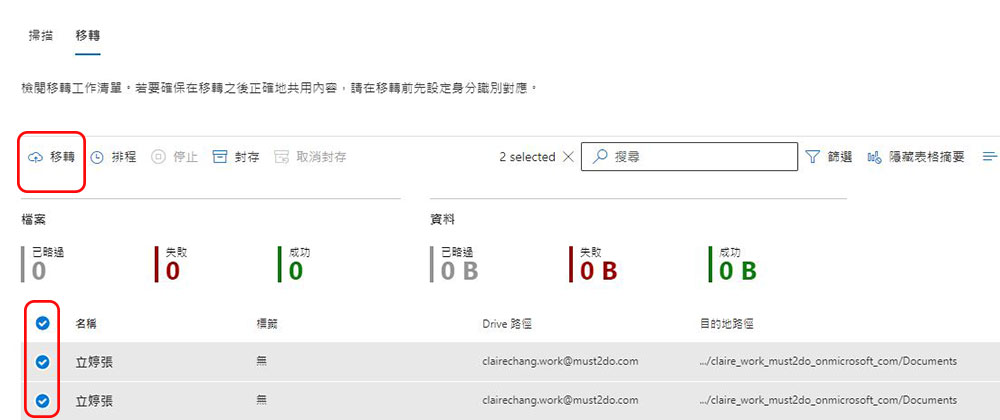
- If “Completed” is displayed in the transfer status field, it means that the data has been transferred from Google Workspace to Microsoft 365!

Move business email and calendaring from Google Workspace to Microsoft 365
For companies, business communication emails and calendars are very important, which may cover indispensable content such as cooperation with customers, confidentiality, meetings, itineraries, etc. As far as the author is concerned, the letters are kept for at least 5 years for preparation. This paragraph is to teach you how to convert these letters and calendars from Google Workspace to Microsoft 365 losslessly. This procedure is relatively complicated, but as long as you follow it, it will be completed quickly.
Phase One: Create a Google Service Account
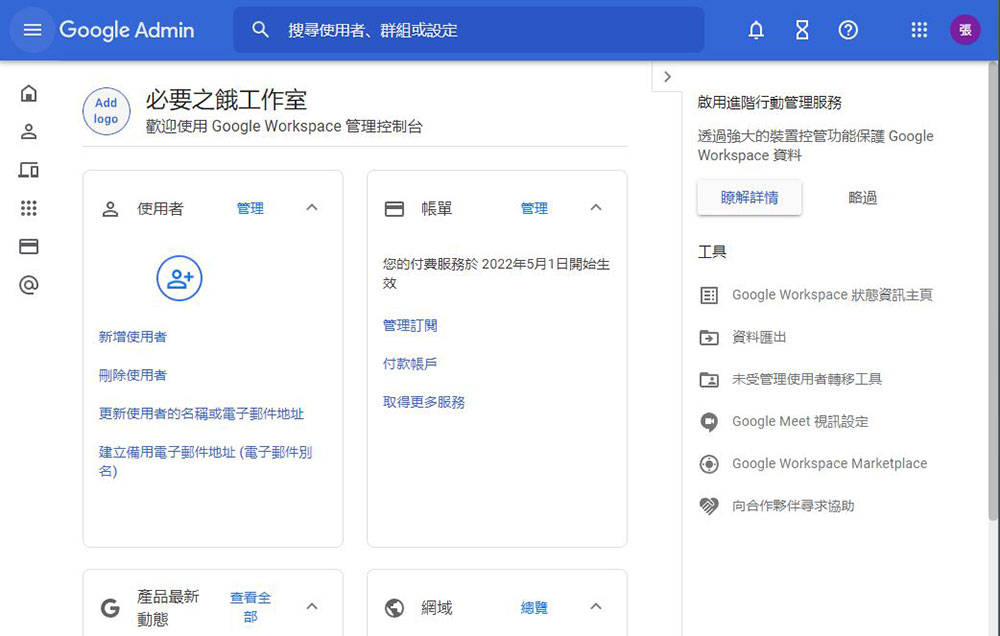
- First use Chrome browserTurn on ” admin.google.com” and log in to the administrator account to enter the Google Workspace control interface.
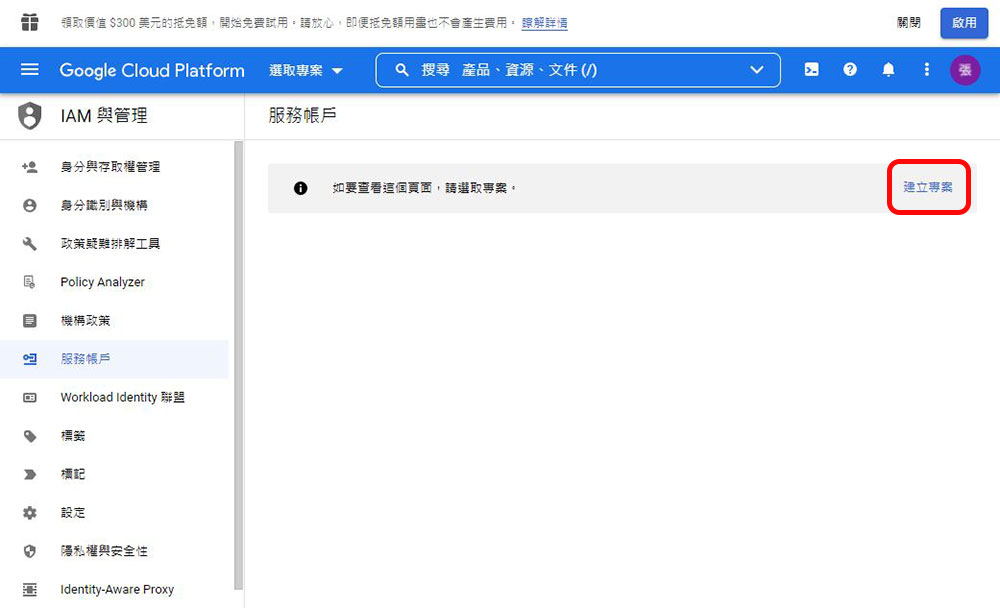
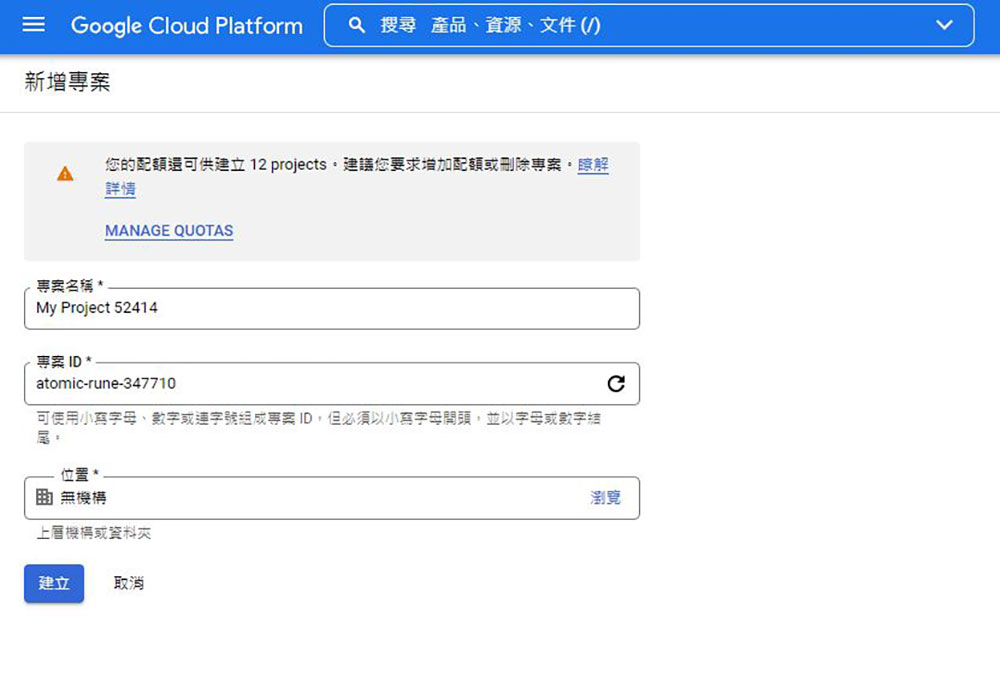
- Open a new tab or window and go to “service account” page and click “Create Project” on the page.
- On the new project page, fill in the project name and select the location of the upper-level organization or folder and click “Create and Continue”. Please note here that there is a string of project IDs under the project name, which cannot be changed once created. You can also click Edit to set the ID using lowercase letters, numbers, and hyphens, but it must start with a lowercase letter and end with a letter or number.
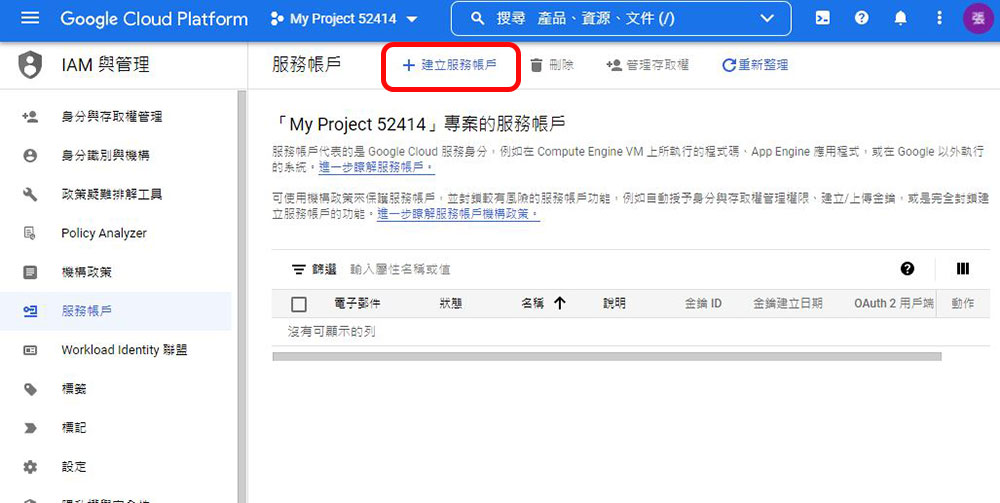
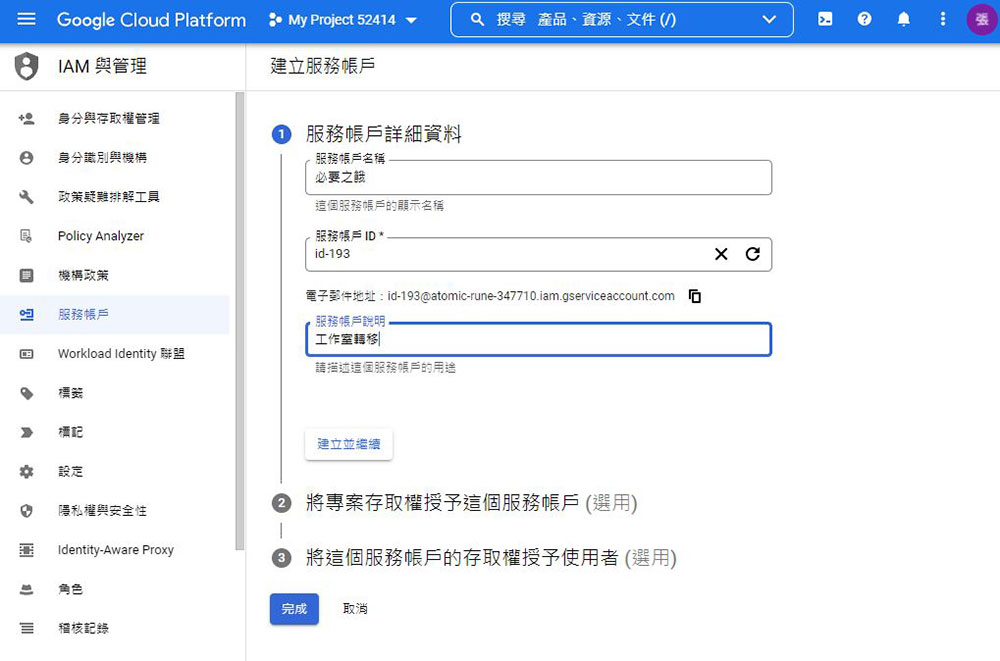
- Next, the system will jump to the “Service Account” page. On this page, please click “Create Service Account”, enter the name and click “Create”, wait for the system to run and then click “Finish”.
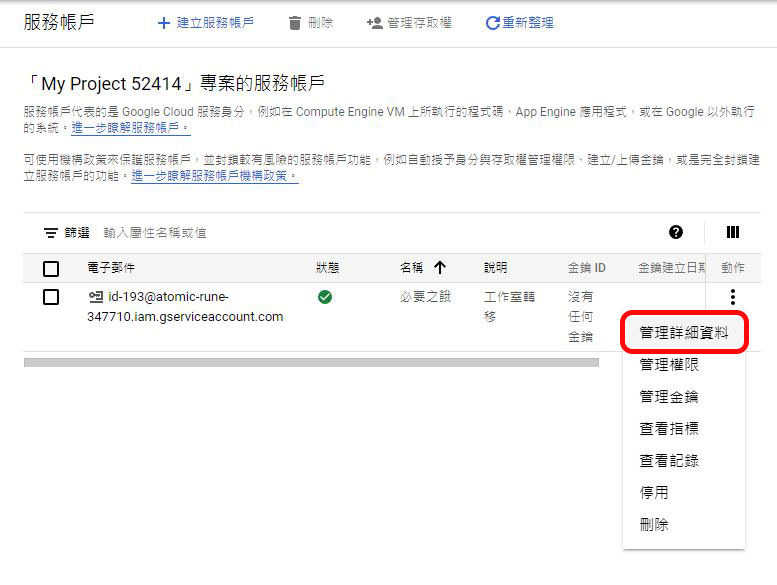
- After creating the service account, return to the service account page and you will see an “Action” at the end. Click the action menu and select “Manage Details”.
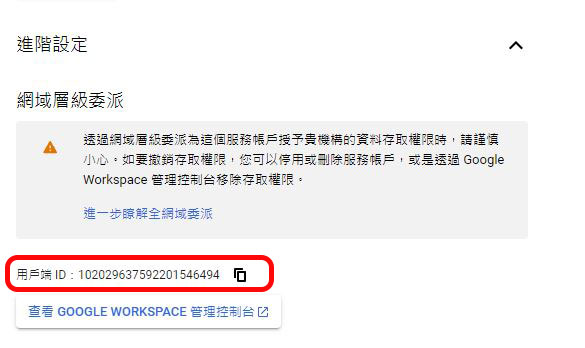
- Scroll the next page to the bottom to open the folding menu of “Advanced Settings”. Copy the “Client ID” item and paste it on another TXT. It will be used in the following steps.
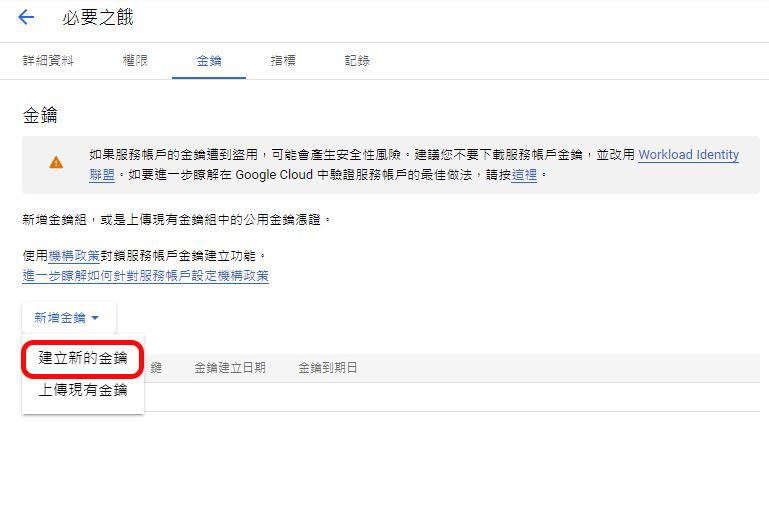
- Next, return to the previous page, click “Manage Keys” in the action menu, then click “Add Key” after entering the page, and select “Create New Key”.
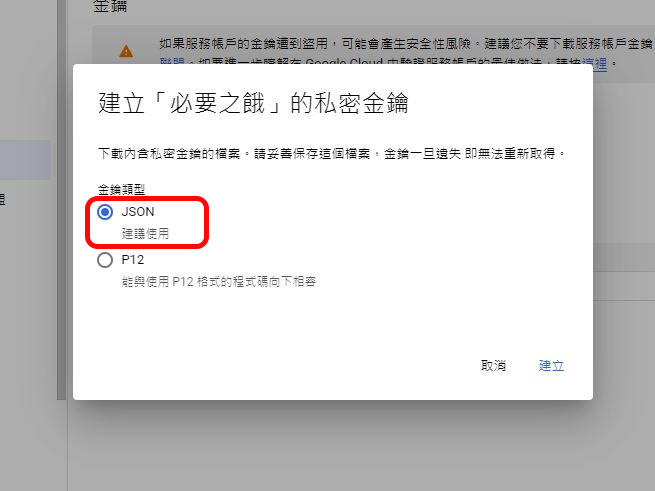
- In the pop-up window, we select the “JSON” item for the key type, and then click Create. The next window will tell you that the key has been saved in the download folder on your computer. Then click Close.
Second stage:Enable API usage for a project
- Go to “API librarySearch “Gmail API” in “.

- After searching, click to enter, and then click “Enable”.
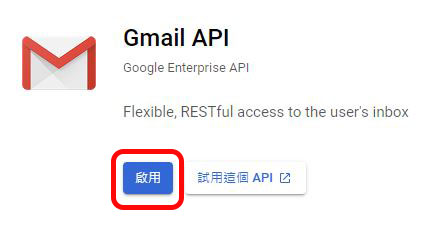
- Follow the steps above, search for “Google Calender API” (calendar) and “Contacts API” (contacts), and select enable them both.
The third stage:Grant access to service account
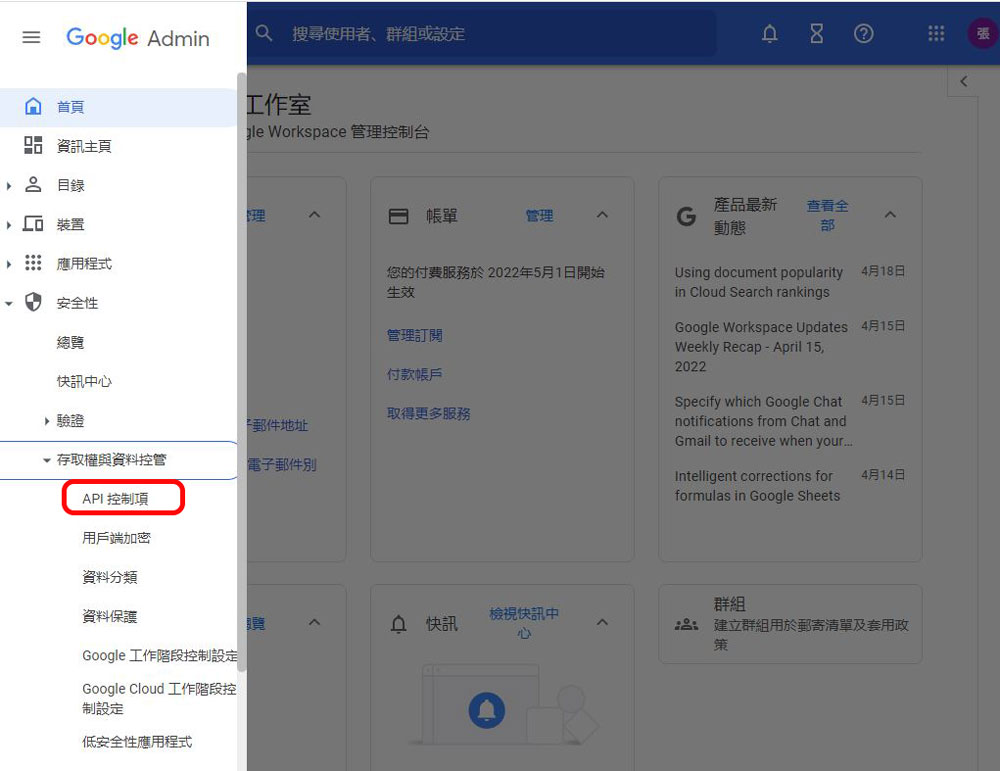
- Return to the “Google Workspace Admin Console” and select “API Controls” in “Access and Data Control” under “Security” from the main menu.
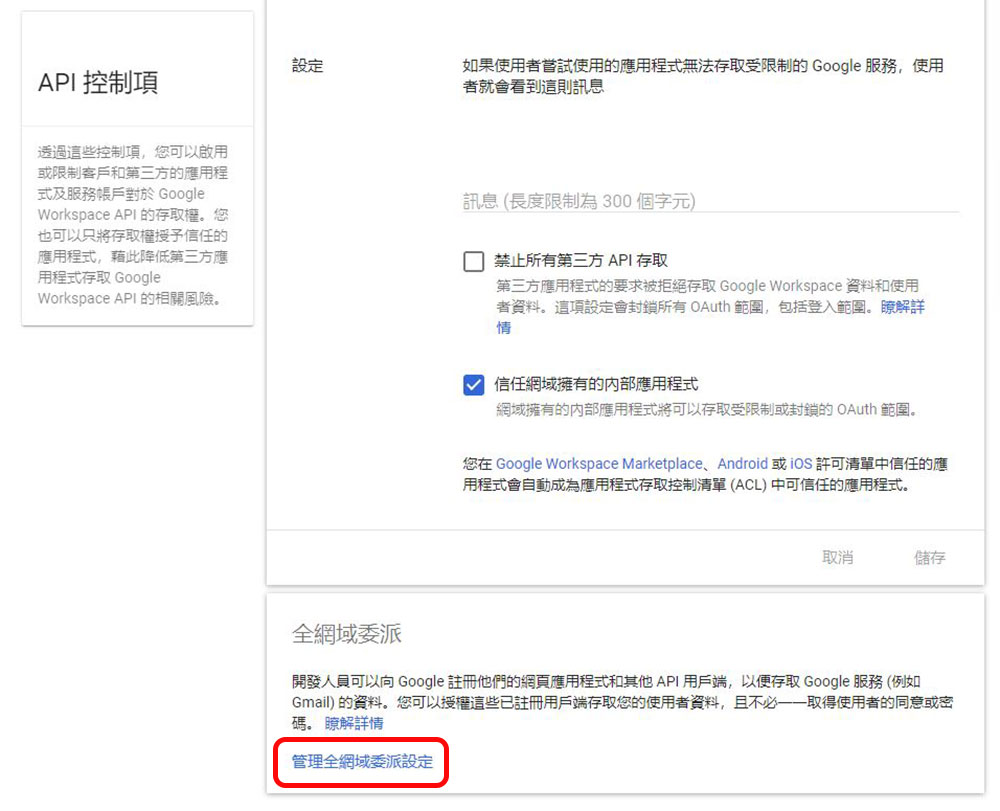
- Scroll to the bottom of the page and click “Manage Domain-wide Delegation” in the “Domain-wide Delegation” item.
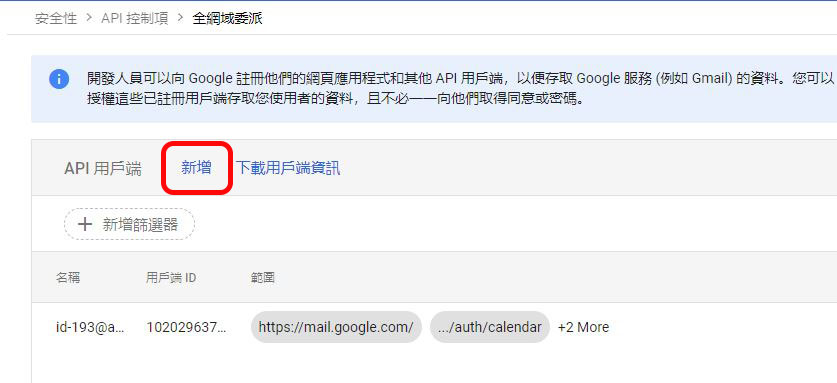
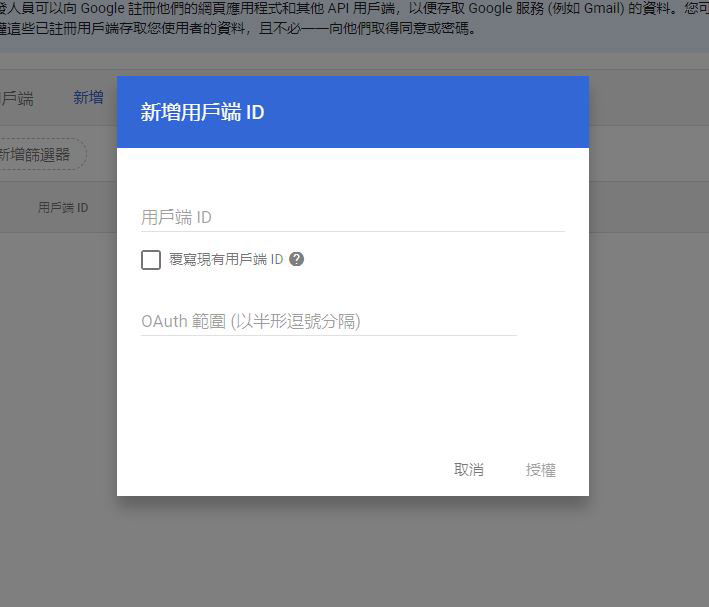
- Select “Add” on the domain-wide delegation page, and then enter the client ID recorded above. There is a field for OAuth scope below, fill in “https://mail.google.com/,https://www.googleapis.com/auth/calendar,https://www.google.com/m8/feeds/,https://www.googleapis.com/auth/gmail.settings.sharing” (It is recommended to copy and paste, otherwise it will be too long). After filling in, click the “Authorize” button.
The fourth stage:Create a third domain for mail sent to Microsoft 365
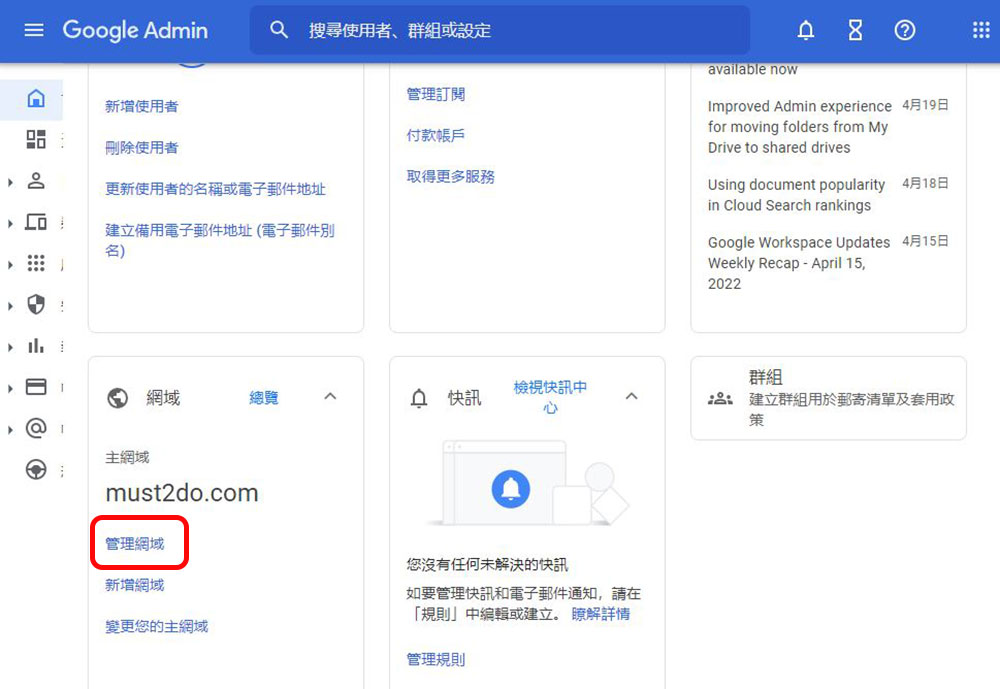
- Return to the homepage of the “Google Workspace Admin Console”, in the “Domains” item, click “Manage Domains”.
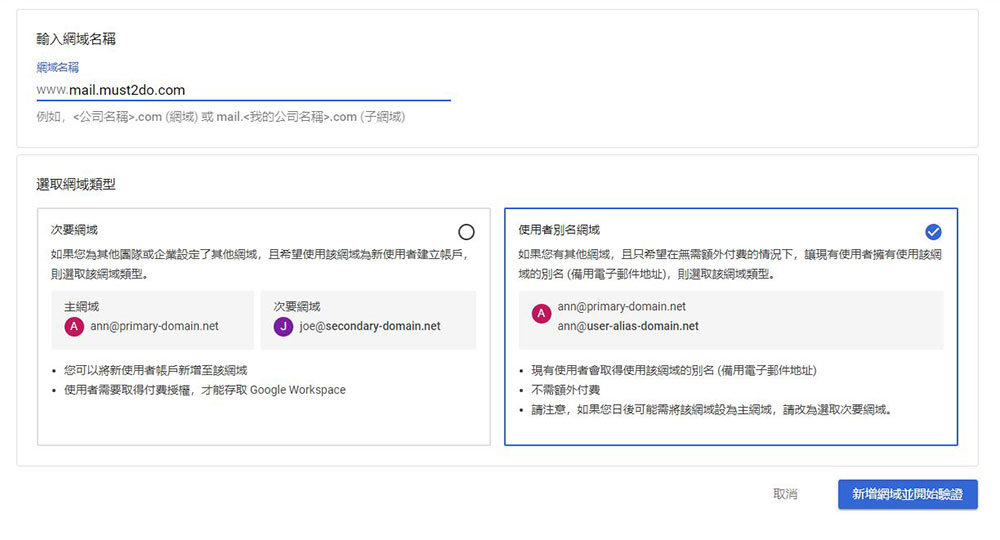
- Click “Add Domain” and enter the alias domain based on the domain name. Select Create “User Domain Alias” below, and then click “Add Domain and Start Verification”. Verification time ranges from a few minutes to 48 hours, so please be patient!
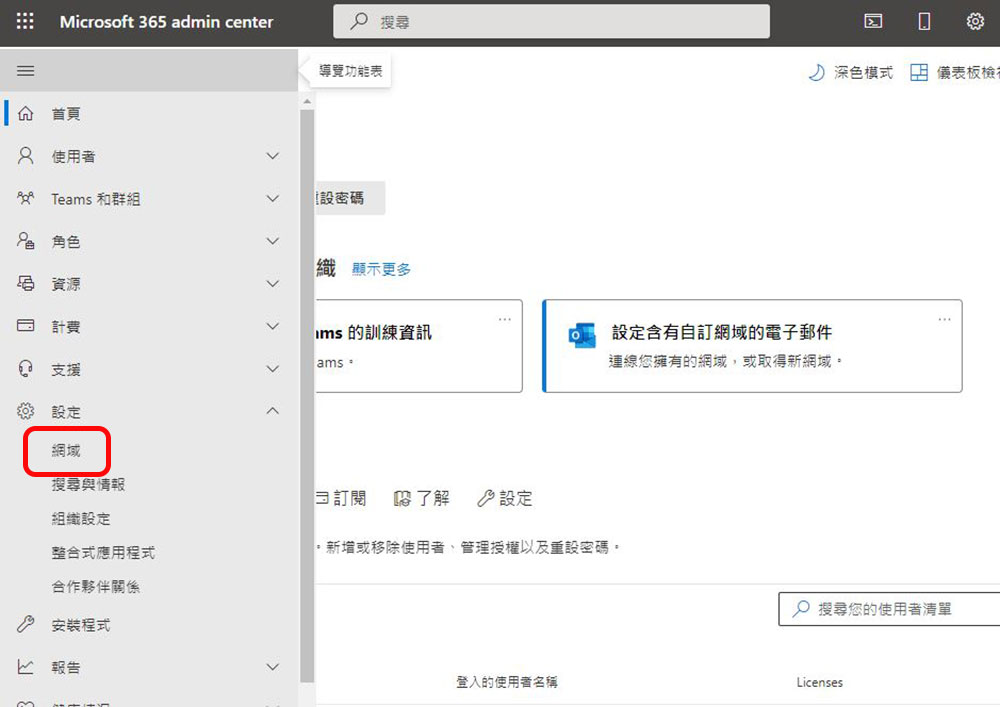
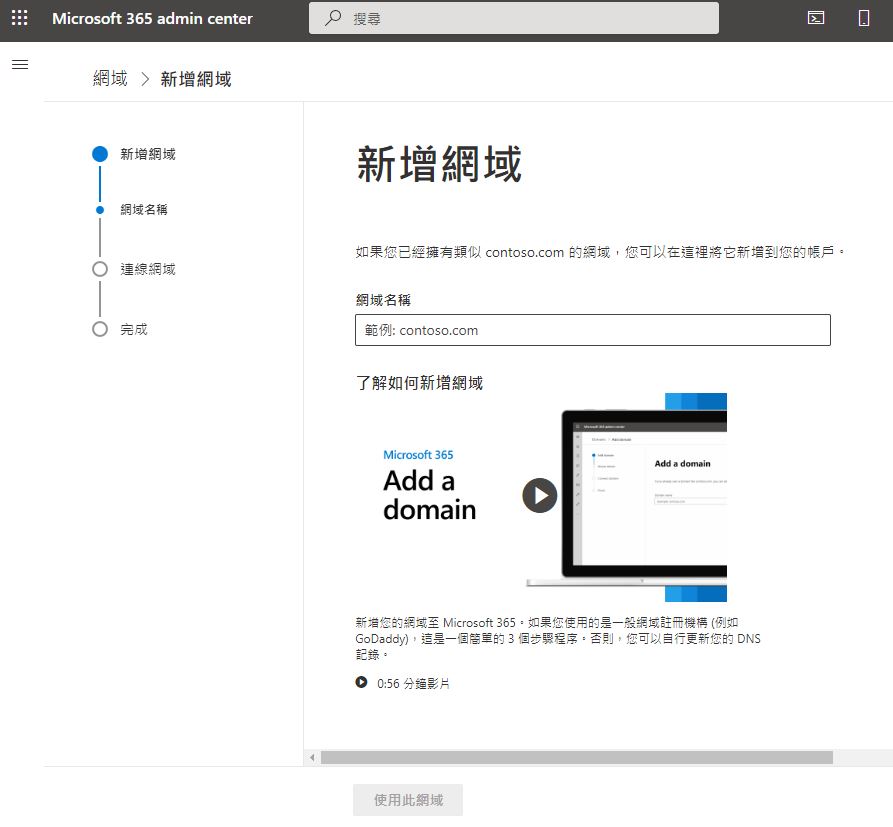
- Open a new tab or window and go to “Microsoft 365 admin center“, click the “Navigation Menu” menu (three horizontal lines) on the far left, click “Show All”, open the folded directory in the “Settings” item, select “Domains”, click “Add Domain” after entering, and then enter the name of the domain added in the previous step.
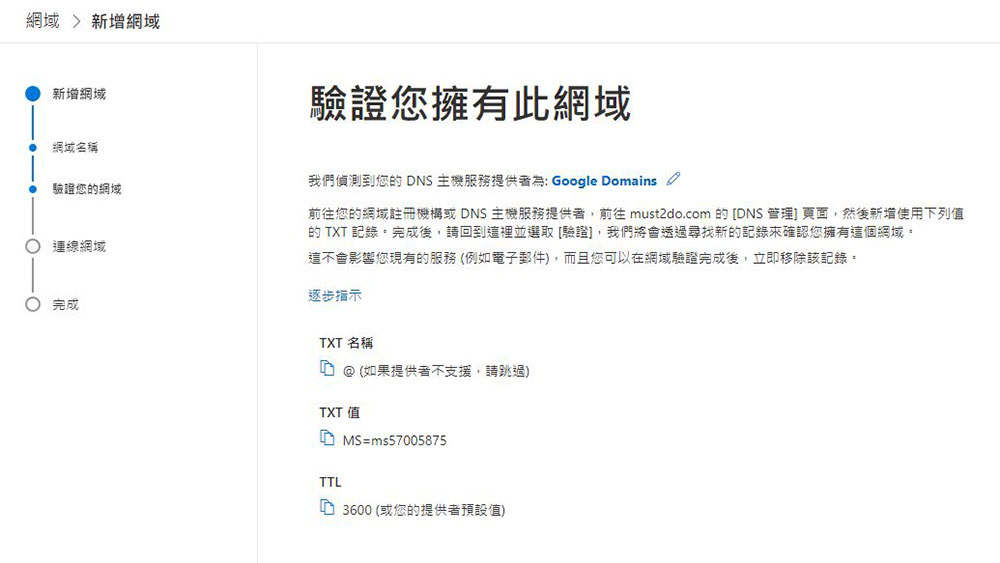
- Next, proceed to “Domain Verification”. It is recommended to use the method of adding TXT. If your domain already has a website, you can choose the third option, and then click at the bottom to continue.

- In this step, save the TXT name, TXT value and TTL generated below for later use. Don’t close this page yet! Will have to come back to verify later.
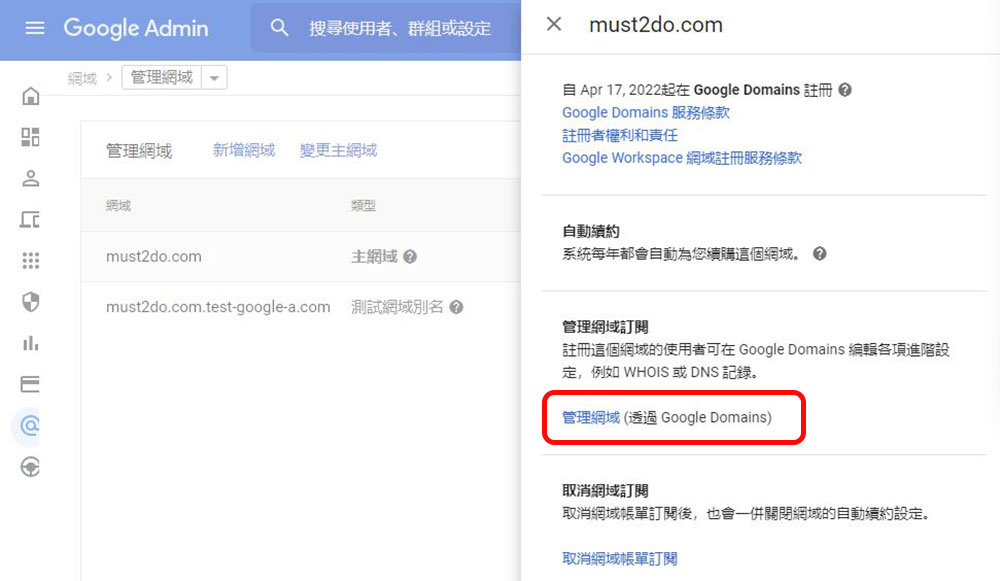
- Next, return to the “Google Admin Console” tab, click “Manage Domains” in the “Domains” category, then click “View Details” in the action column, select “Manage Domains” from there to go to the Google Domains website.
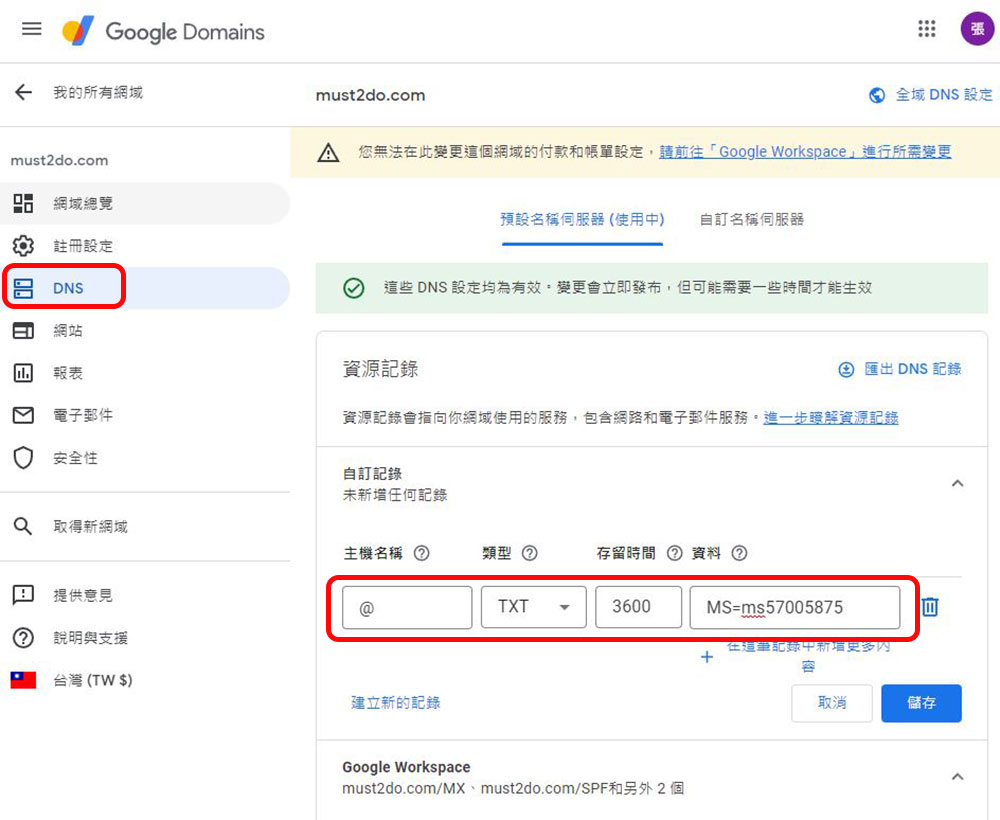
- Click the “DNS” item in the left column, and enter the TXT name, TXT value (fill in the data field) and TTL (fill in the time column) that we have recorded above in the “Customized Record” item. Select TXT as the type. Click Save after filling in.
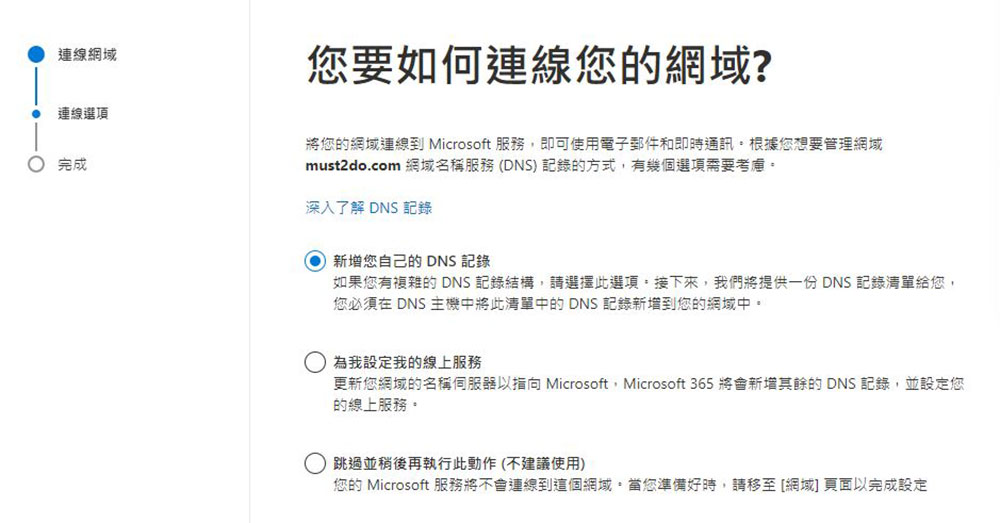
- Switch back to the page where we just copied the TXT content, and then click Verify at the bottom of the page. After verification is complete, select the connection option. Select the option “Add your own DNS records” and click Continue.
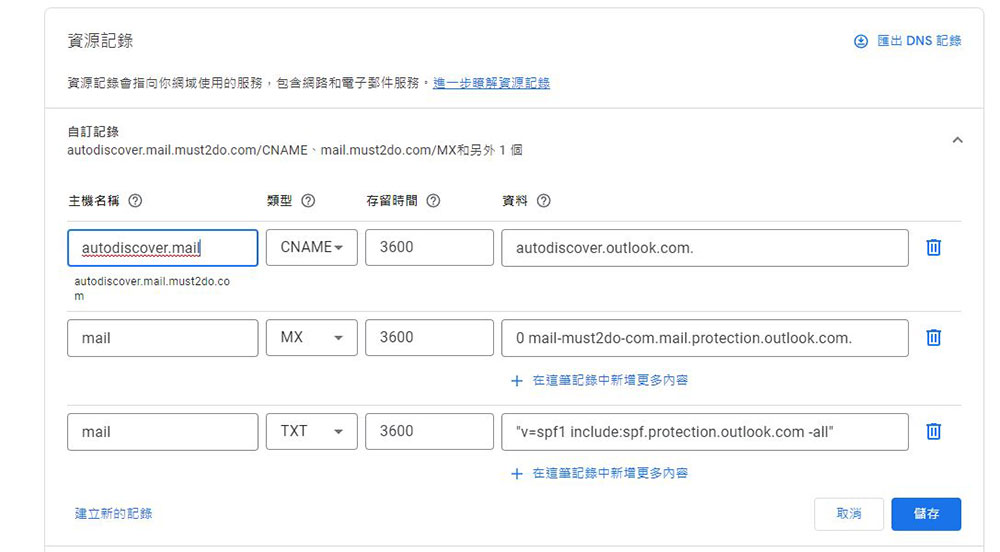
- Download the CSV file and open the file with EXCEL. Return to the Google Domains website just now, click to create a new record, and paste other CNAME records and MX records (remember to change the type). Or you can copy and paste it directly from the bottom of the page without downloading it, but it is a bit troublesome to keep jumping back to the page to copy.
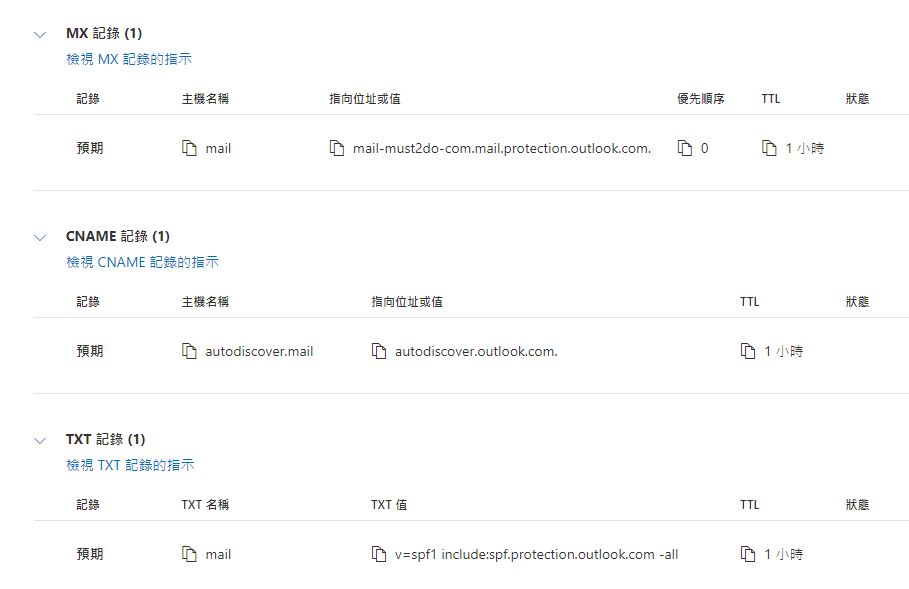
- When you finish filling in Google Domains, click Save, and then the system will prompt you to delete existing records. Please agree to go back to the Microsoft 365 admin center tab just now and click Next until you finally click “Finish”. At this point, your domain has been set up.
- After the setting is completed, remember to go back to the Microsoft 365 admin center to set the newly added domain alias as the default domain.
Phase Five: Establish an email alias in Microsoft 365
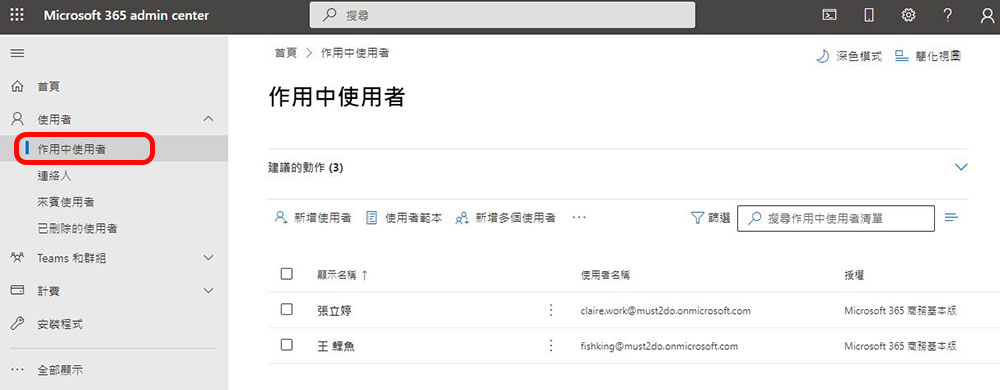
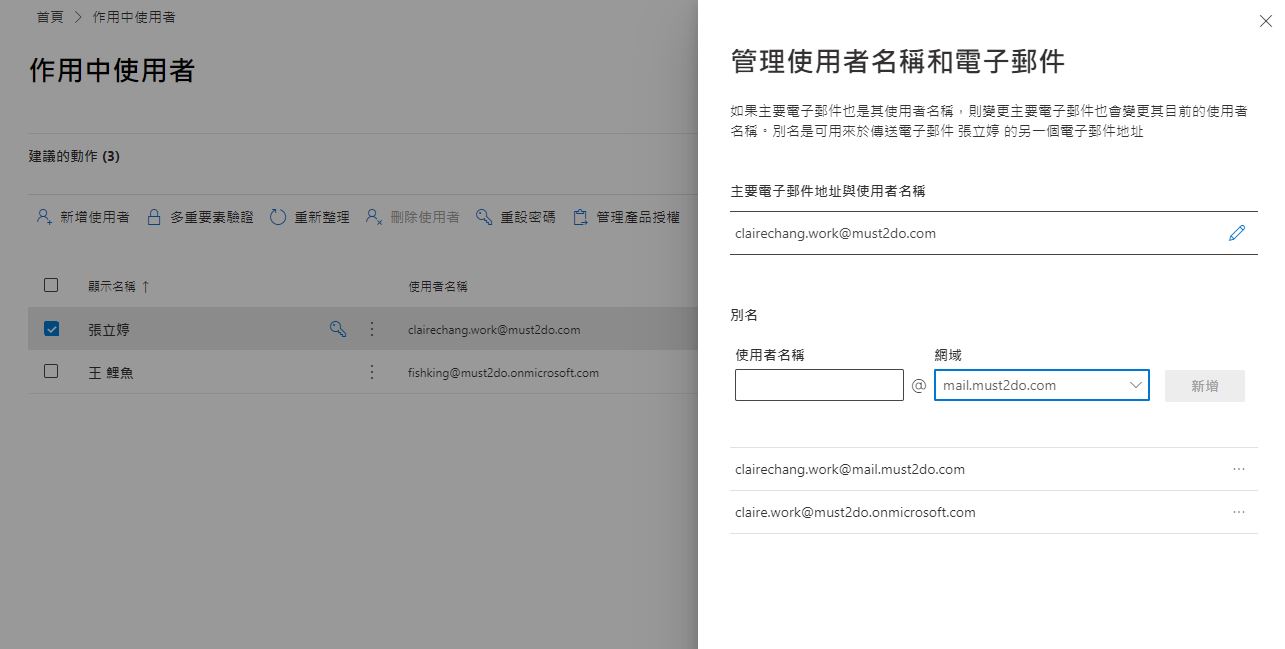
- Before starting the transfer you will need to create email aliases for all users using the new domain name. First go to the “Users” item in the sidebar navigation menu of the Microsoft 365 admin center homepage and click “Active Users”.
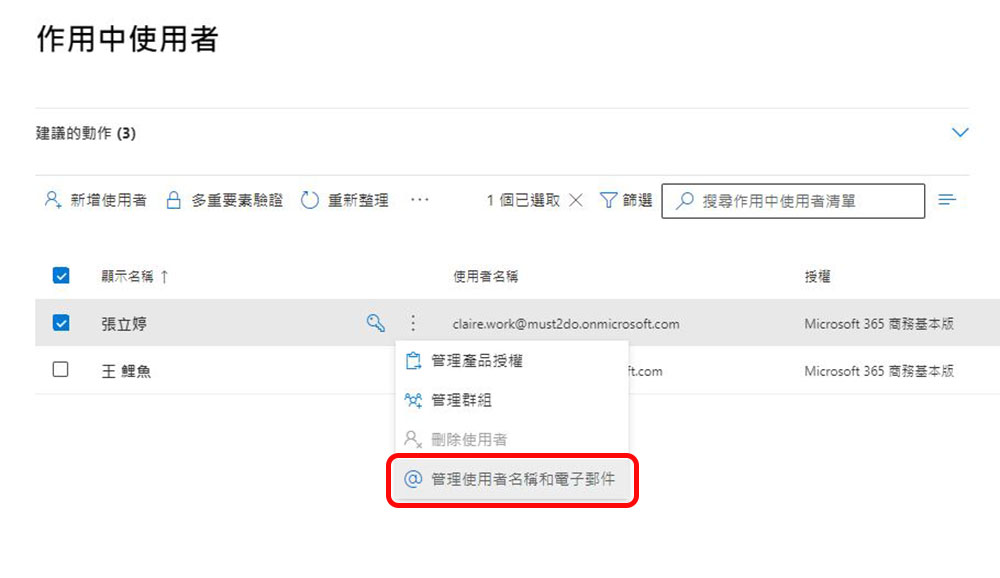
- Click the menu icon next to your username and select “Manage usernames and emails.”
- First change the primary email and username to the mail you ultimately want to display, enter the username in the alias field below, and select the third-party domain name you created earlier from the drop-down list in the “Domain” field. After entering, click “Add”, then save the changes and close the small window when you see the completion notification. Every user who needs to be migrated must follow these steps.
Final stage: start the transfer
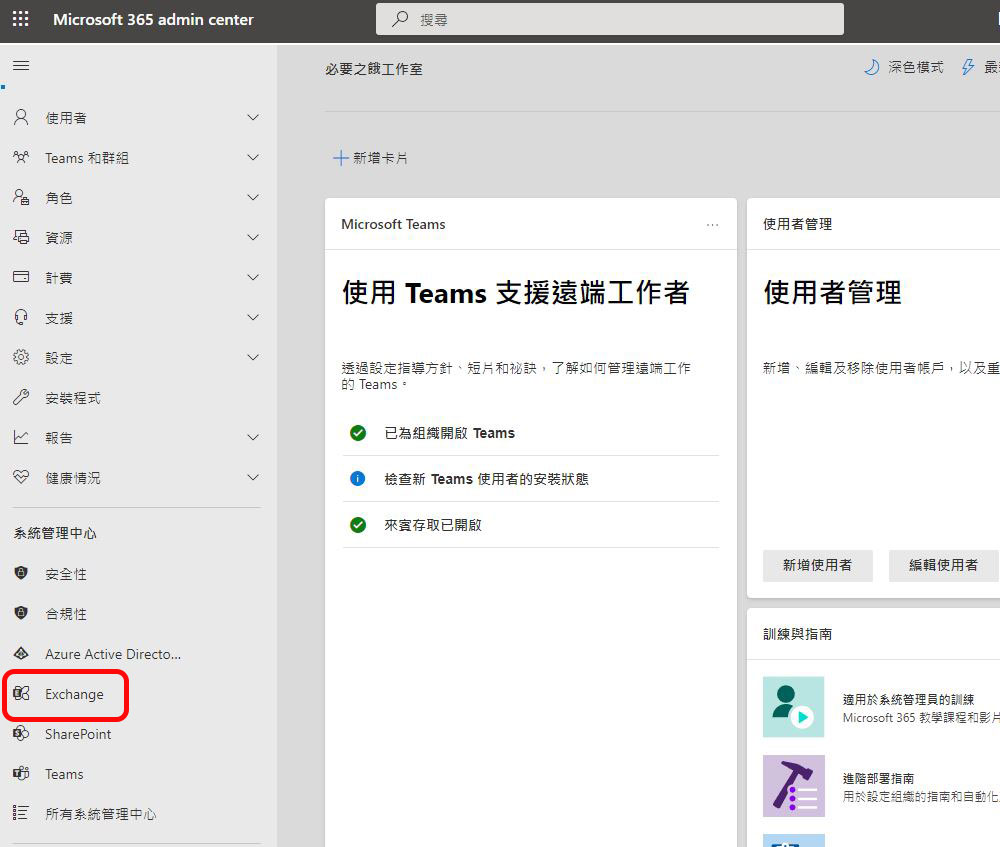
- Go to the Microsoft 365 admin center homepage, open the sidebar menu, click “Show All”, scroll to the bottom and click “Exchange” in the System Management Center item.
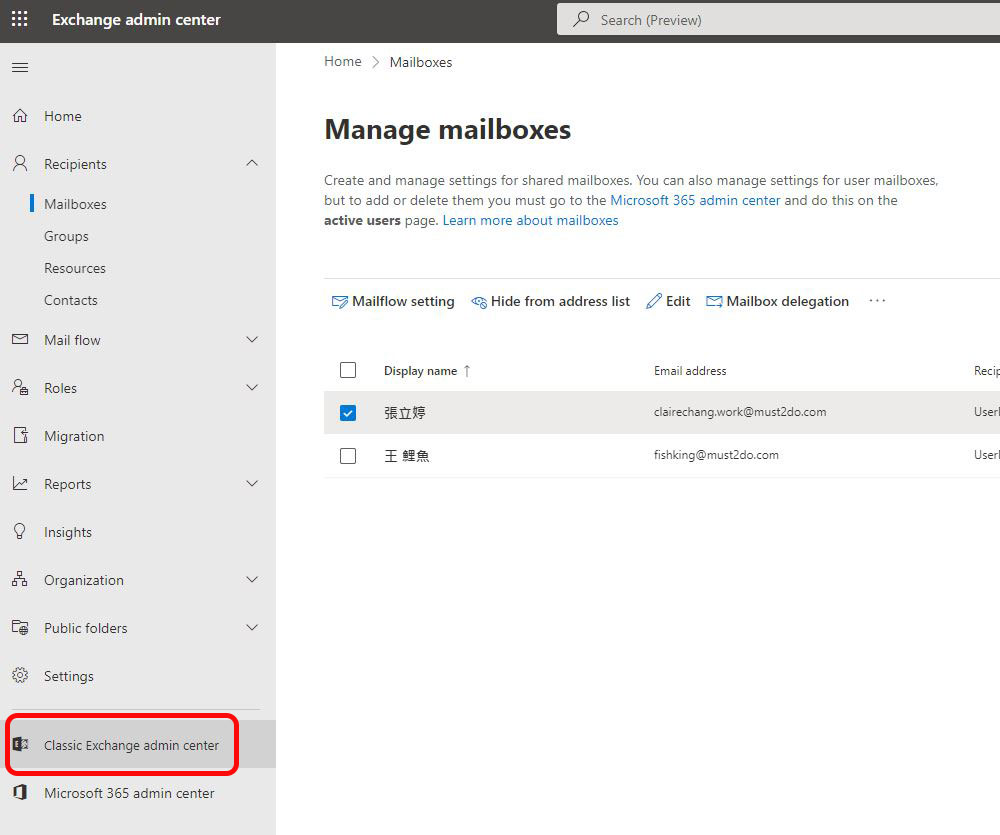
- Let’s first switch to the “Classic Exchange admin center” (Classic Exchange admin center).
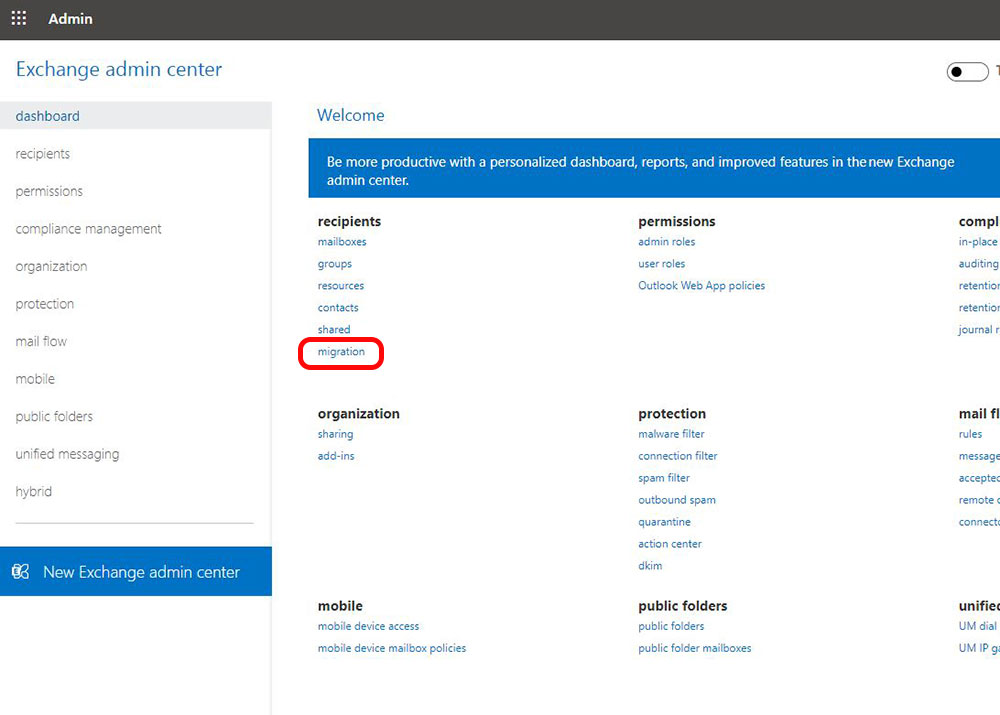
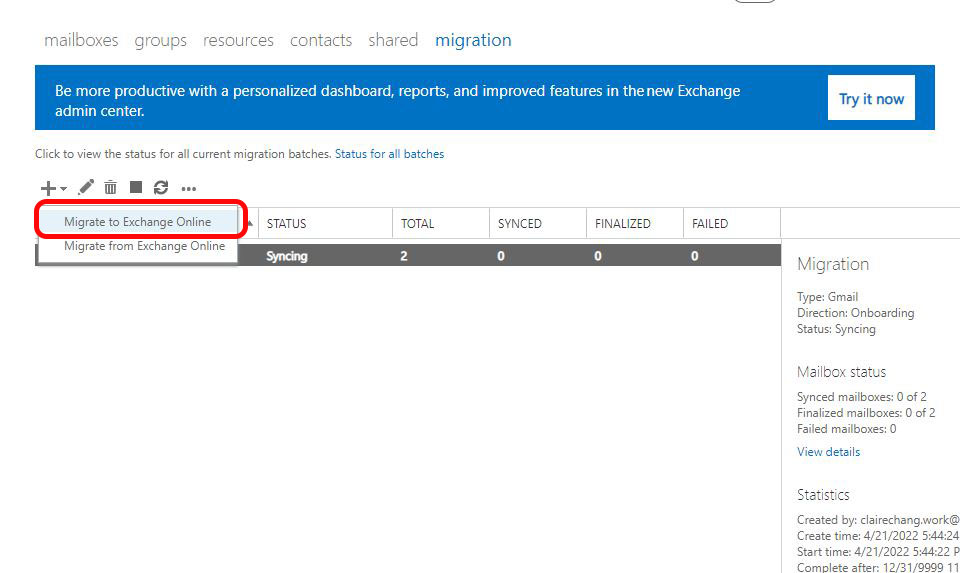
- Click “migration” under the recipients item.
- Click “+” and select “Migrate to Exchange Online”.
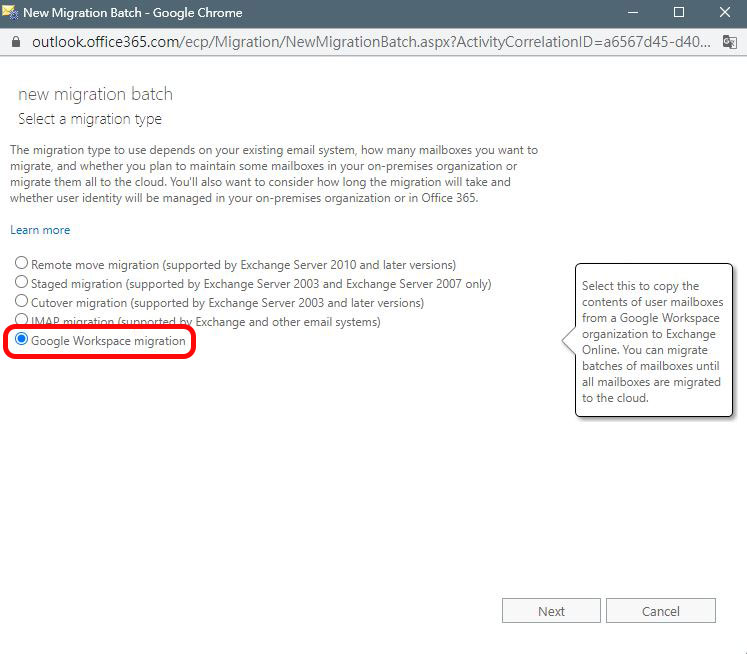
- Select the “Google Workspace migration” item at the bottom of the pop-up window, and then click “Next”.
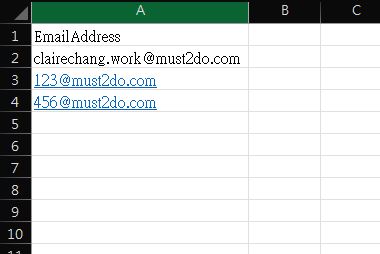
- The next step is to import the CSV file. You can create your email list in Excel using the format below, then save it as a CSV file and import it, then click Next.
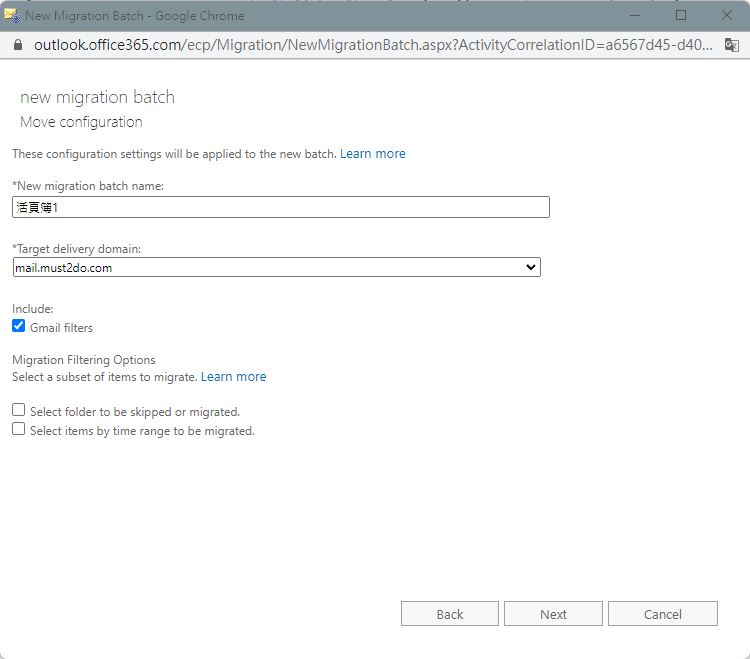
- Next, set the name of the new Batch (endpoint), copy and paste your third domain alias into the “Target delivery domain” (the target delivery domain must be copied) and click Next.
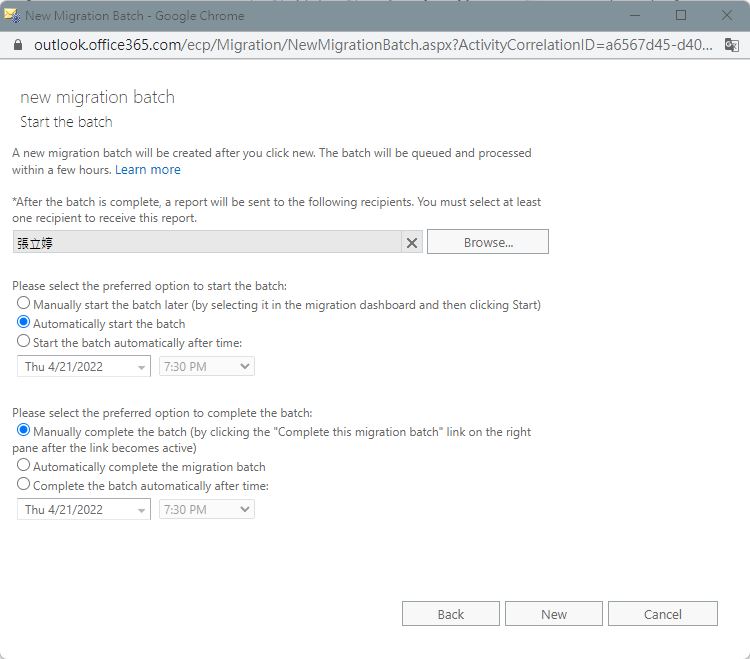
- The next step is to set the migration schedule time. The top field is to select a super administrator who was previously in Google Workspace as the target to send the migration report to.
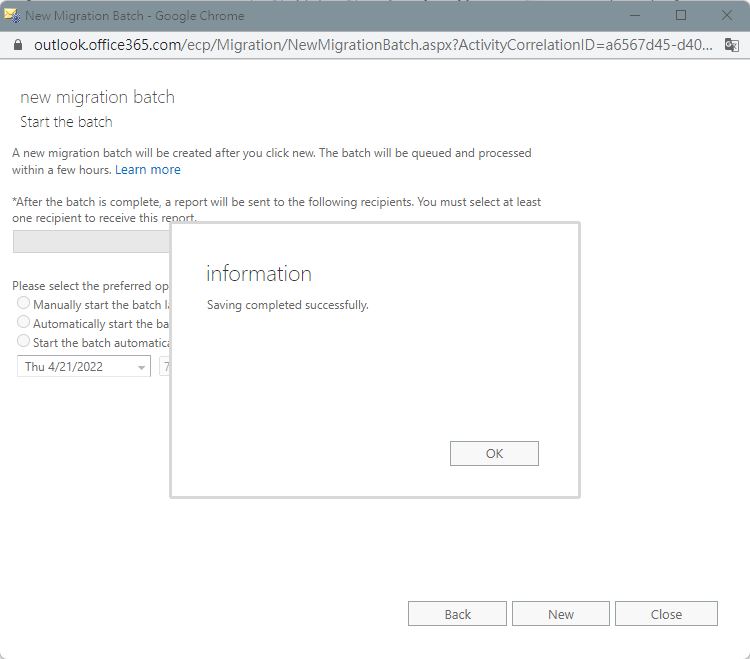
- Next, the system will tell you that the data has been saved successfully. Click OK to return to the schedule overview page.
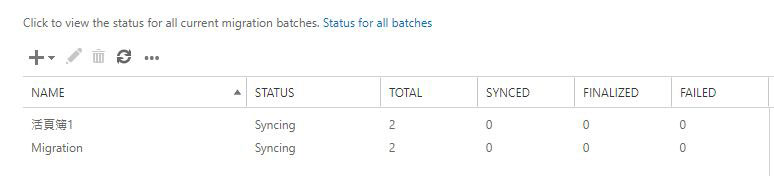
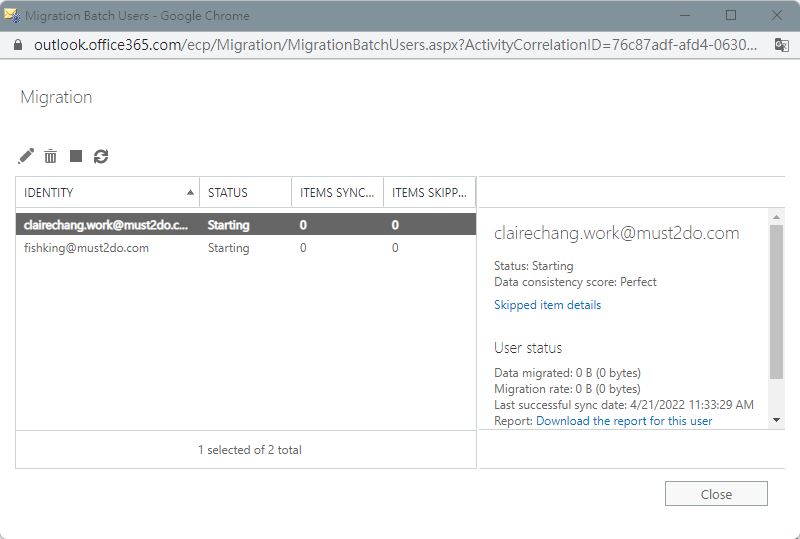
- On the schedule overview page, you can see the status of the entire transfer progress, as well as how many pieces of data have been transferred, how many failed, etc. Click on a single record to view all transferred account information contained therein.
In summary, although there are a few more steps, fortunately, the operation of the transfer tool provided by Microsoft is quite intuitive. There are some difficult terms and simple explanations. As long as you follow the steps, you can handle the entire transfer yourself without losing important letters, contacts, and calendars. The author highly recommends small, micro-enterprises and other units with few members to carry out the transfer. If you have a large organization and don’t want to handle the migration yourself, Microsoft is now also working withLingyi Technology cooperates to launch an exclusive preferential transfer plan, in addition to getting two extra months for annual payment, it will also help you handle the related work of transferring from Google Workspace to Microsoft 365 Business Edition. You can contact a specialist for more information (Click here to contact a specialist)。
Source: KOCPC Chinese