


VMware workstation is an ultra-high-quality virtual machine software that enables one hardware device to execute multiple operating systems at the same time. It is a simulation environment that facilitates players to develop, test, and deploy applications. It is an indispensable tool for IT personnel. After the recent release of Widnows 11, the euphemistically called free upgrade actually wants you to buy a new generation of computers. Computer hardware manufacturers are probably laughing! Many of the author’s computers cannot be upgraded, and there is no turning around. It is possible to use VMware to play the Widnows11 virtual machine!

用 Telegram 訂閱【挨踢路人甲】最新文章:https://t.me/itwshare
Windows 11 features everything from a revamped Start menu to new ways to connect with the people, news, games and content you care about most, and best of all, free upgrades and running apps on Android. However, there was a cry on the Internet. Although the basic hardware requirements of Windows 11 are not high, there areA few fatal limitations are the generational issues between TPM and CPU., it doesn’t matter, a passerby will tell you that it is OK to use VMware to play Windows 11.
Hardware and software requirements for installing virtual machines
Of course, the hardware used to play a virtual machine must have a certain level of performance. Memory and CPU cannot be ignored. The more memory, the better. The CPU is preferably Intel i5 or above. Of course, the virtual machine simulates the system as a hard disk file, so the hard disk space is also essential. It is best to use an SSD, and the system must be equipped with 64-bit. As for the tool software, the following instructions are required:
- [Software name]: VMWare Workstation 16
- [Software language]: English
- [Software nature]: Paid software (trial available)
- [System Support]: Windows Win7/Win8/Win10 (supports 32/64 bit)
- 【Official website】:http://www.vmware.com/tw/
- [Software download]:http://www.vmware.com/products/workstation/workstation-evaluation

VMware Workstation can simulate a complete network environment and hardware equipment on a physical machine. In terms of technology, operation, functions and speed, it is unparalleled by other virtual software on the market. Its network, snapshot, drag and drop copy and sharing functions are guaranteed to be addictive as soon as you use it. The signature actions of Windows will appear during installation. Press “Next” to complete most of the process.

Set up a Windows 11 virtual machine
Since I have created a Mac virtual machine, I still use the old version of VMWare Workstation 15.x and select “Create a New Virtual Machine” to create a virtual machine. However, I am accustomed to using the menu method to operate it. Select [File] → [New Virtual Machine…]. When the wizard screen appears, select “Custom (advenced)” and click the [Next] button.

▼The virtual hardware uses the default “Workstation 15.x” to simulate the hardware environment. Different VMWare Workstation versions will have corresponding hardware simulations. At least Workstation 11 or above is required to support the installation of Windows 10! Please click the [Next] button to continue.

▼The advantage of virtual machine installation is that you do not need to burn the downloaded ISO to a disc for installation. You can directly click “Install disc image file (iso)” to install. As for where to download the ISO file of Windows 11, please use Google to find a lot.

▼The simulated operating system is of course “Microsoft Windows”. Since the new version already supports the simulated system option of Windows 10, so the simulated system is selected as “Windows 10 x64” and click [Next] after confirmation. Enter the name of the virtual machine in “Virtual machine name” and enter the directory location of the virtual machine in “Location”. If you want to change the directory location, press [Browse] to change it. After confirming the name and directory location of the virtual machine, press [Next] to continue.

▼There are firmware types that support UEFI. Generally, you can use “BIOS” to simulate old systems. Please select “UEFI” for Windows 11.

▼Please adjust the settings of the CPU processor according to your personal device. If it is powerful enough, give it a little more. The memory size specification varies depending on the needs. I set the memory size of 8G (of course, you need to consider the memory of your own device).

▼In order to facilitate testing, select “Use bridged network” as the network connection method and press [Next] to continue.

▼Set “I/O controller type” and “Virtual disk type” to default values and click [Next].

▼Coming to the Disk selection, use the default “Create a new virtual disk”. As for the specification of the disk capacity, the default value is 60GB. Because it is only for testing, 30G of space is specified. In order to facilitate the specification of a single virtual hard disk file, “Store virtual disk as a single file”.

▼The simulated hard disk space operates in the form of files, so you need to specify the name of the virtual hard disk file. In principle, the virtual machine name you specified before is the file name. You can also change it, but generally you just press [Next] to continue. When your virtual machine is created, a list will be listed for you to review. Finally, click [Finish] to end the virtual machine configuration.

Install Windows 11 operating system on a virtual machine
I believe many people are looking forward to the arrival of Windows 11, because the use rate of the dynamic tile start screen is not high, perhaps because most people do not have touch tablets, and the lack of the “Start button” start menu, the operating soul of Windows 7, makes many people prefer to return to Windows 7. However, in addition to the improvements in appearance and cloud integration, Windows 8.1 also restores the “Start button”, but there is no traditional start menu. Windows 10 is Windows 7 plus Windows The combination of 8, start key and menu are back.
However, Windows 11 has a new interface. First of all, the “Start” button is moved to the center. It feels completely different from the Mac system. The window adopts a rounded corner design and the interface is more beautiful. The gadgets on the desktop are also back. More importantly, it can run Android apps. Let us use a virtual machine to play with the Windows 11 beta version.
▼In the above-mentioned creation of the Windows 11 virtual machine, it does not start immediately. If you want to install Windows 11 on the virtual machine, directly press “Power on this virtual machine” to start the virtual machine. The Windows 11 ISO image file set previously will be automatically loaded during startup.

▼Just like physically inserting the Windows 11 boot disc to boot, the message “Press any key to boot from CD or DVD” appears. Please be careful to click on the black area with the mouse and press any key on the keyboard to start. Don’t wait too long, otherwise it will time out!

▼After seeing the window logo, does it look familiar?

▼Finally we come to a familiar screen, I believe it will be familiar to anyone who has installed Windows 10! Please feel free to press [Next] directly.

▼After pressing “Install Now”, the serial number startup screen will appear. The official version has not been released yet, so click “I don’t have a product key” to skip it for now. As for which version to install, of course it is Windows 11 Pro!

▼Check “I accept Microsoft Software License…” to accept the licensing terms, and click [Next].

▼The simulated hard drive is in a brand new state, and the system has not been installed at all. The “Upgrade” selection has no effect, so select “Custom:Install Windows Only (advanced)” for the installation category, then search for the simulated hard drive, and press [Next] to continue. .

▼Does this picture look familiar to you? Besides waiting, isn’t it great to feel that joyful feeling in your heart?

▼Enter some basic settings of the installation, such as region, keyboard and login environment.

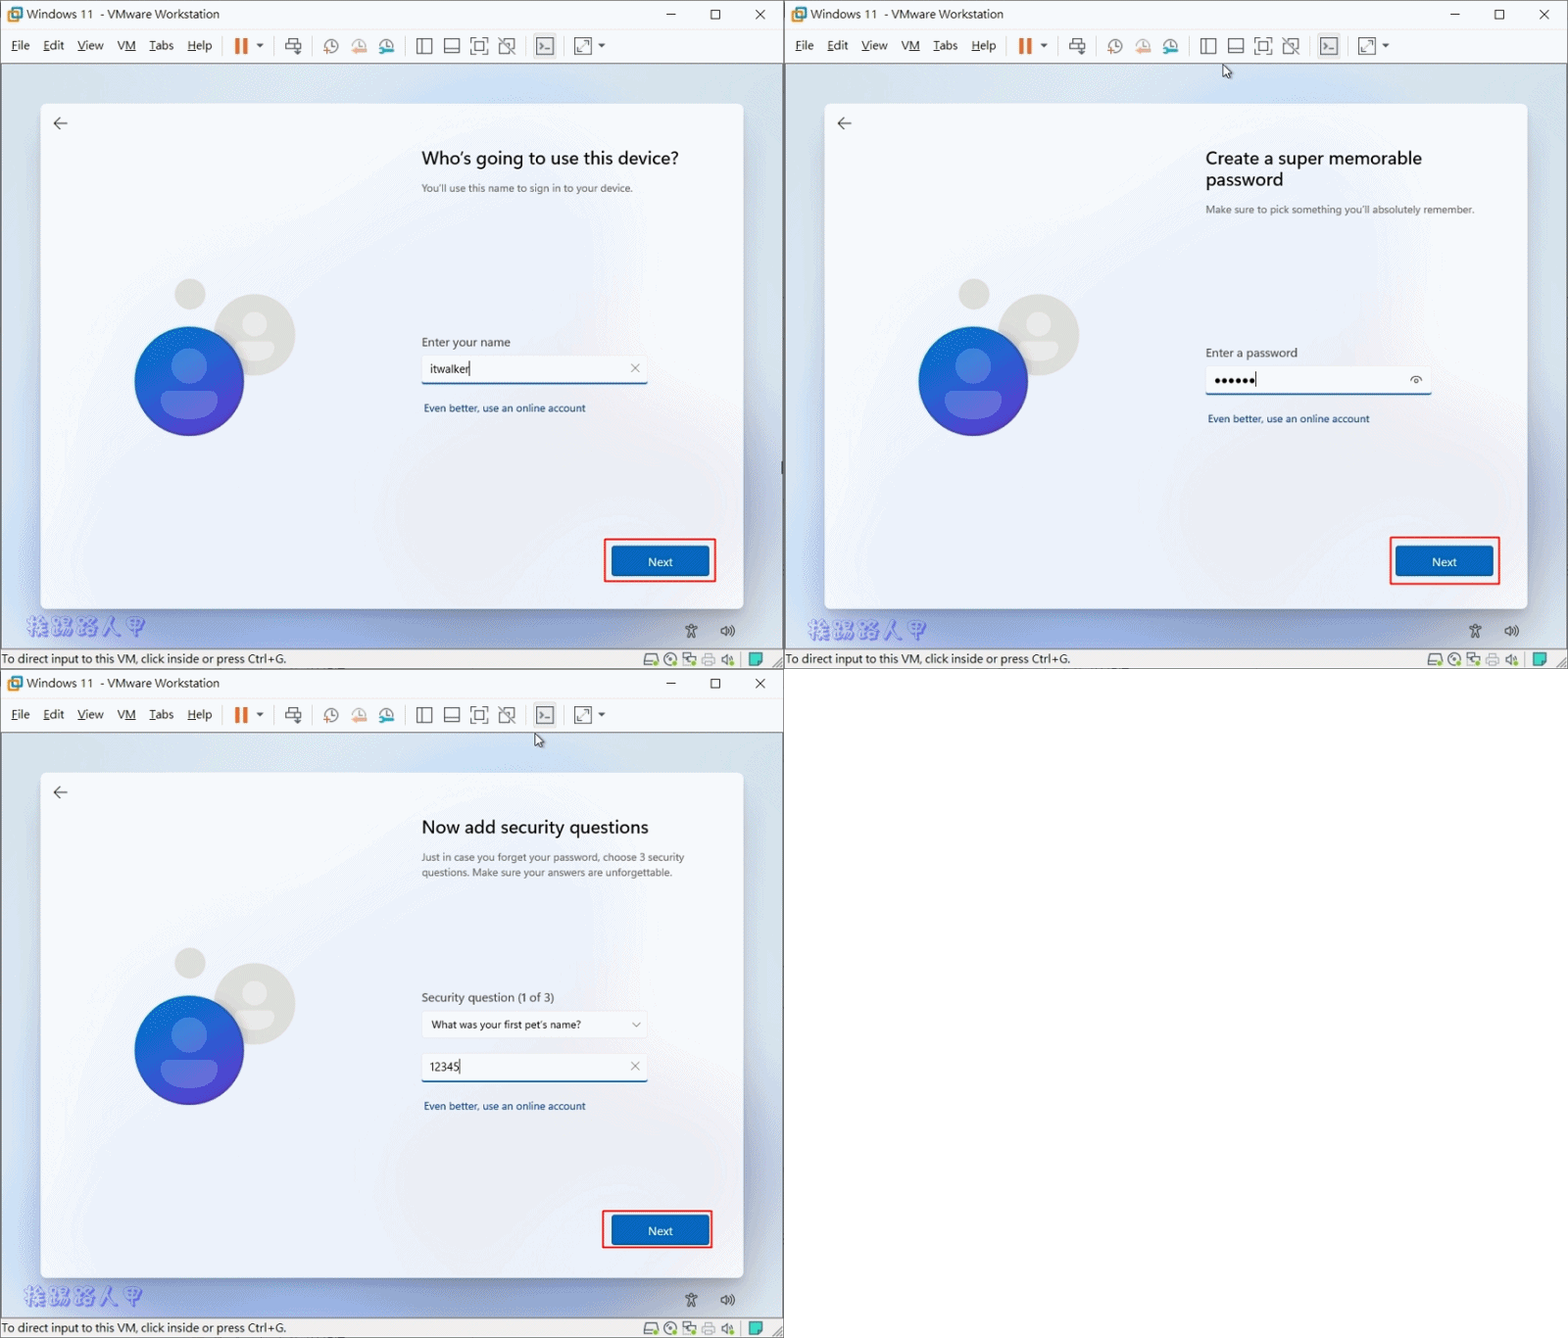
▼Windows 11 Pro has two ways to log in like Windows 10, one is a Windows account, and the other is the traditional local account like Windows 7. Although there are many advantages to using a Windows account, based on test use, and not everyone has a Windows account, so Passerby A chose to create a new local account login method, as follows.

▼After entering the account and password of this machine, you also need to specify three security options.
After setting the privacy settings, you can see the Windows 11 start function screen.

Windows 11 has a new interface. The window adopts rounded corners and the “Start” button has been moved to the center. At first glance, it seems to be a beautified version of Android.

VMware Tools installation
Anyone who has used VMware Workstation knows that from time to time you will receive a message that Vmware Tools is not installed. So what is Vmware Tools and why do you need to be reminded all the time? I am not an expert on VMware. I usually only mention the enhancements of the Guest OS screen driver. For example, the basic and vmware virtual machines have mouse control rights. When VMware Tools is not installed, you must use [Ctrl] + [ALT] to get back the mouse control rights from the virtual machine. This is a bit troublesome every time you go back and forth between the local machine and the virtual machine. As long as VMware is installed Tools, the mouse focus can automatically shuttle between the host screen and the virtual machine, and supports more resolutions. Among them, dragging files from the local machine to the virtual machine is one of my most commonly used functions.
▼First go to the [VM] menu and select [Install VMware Tools…], or directly press [Window] + R and enter “d:\\setup.exe”.

▼In the environment of Windows 8/10/11, a window for using this account will appear during execution. This is because a security warning window of “User Account Control” will appear due to security issues. Mainly when the user performs some actions that will affect the system, a confirmation screen will often appear, so it is better to press [Yes] to continue (if you want to remove this warning, please refer to “Talking about User Account Control (UAC) in Windows 8/10″article)

▼Then enter the installation wizard of VMware Tools and press [Next].

▼Select the type of installation. Generally, the default “Typical” is used for installation, so press [Next] to continue.

▼After pressing [Install], it didn’t take long to see the completed screen.

▼After leaving the VNware Tools program, you will be asked to reboot. Press [Yes] to reboot.

▼Then the account and password input screen will appear. Please enter the local account that was previously installed to log in.

▼Congratulations! You can try switching mouse control back and forth between the local system and the system on the virtual machine. You don’t need [Ctrl]+[Alt] to help.
Further reading:
Source: KOCPC Chinese