Windows File Explorer is the hub for managing various files in the operating system and is also an advanced tool. While the default settings are fine for general use, you can use a variety of options and settings to organize and search your files more efficiently. So, whether you’re overwhelmed by messy hard drive partitions or struggling to find files in Windows, these 9 tips will help you unleash the full potential of File Explorer.

9 Ways to Organize and Search Your Files More Efficiently with Windows File Explorer
1. Take advantage of quick access and pinning
Quick Access is located on the left sidebar of File Explorer. Quick Access is a great way to open your most used or recently used folders more efficiently. It will automatically list your recently used folders, but you can also manually pin any folders you frequently use. Instead of opening and browsing multiple folders, you can navigate directly to pinned folders with a single click.
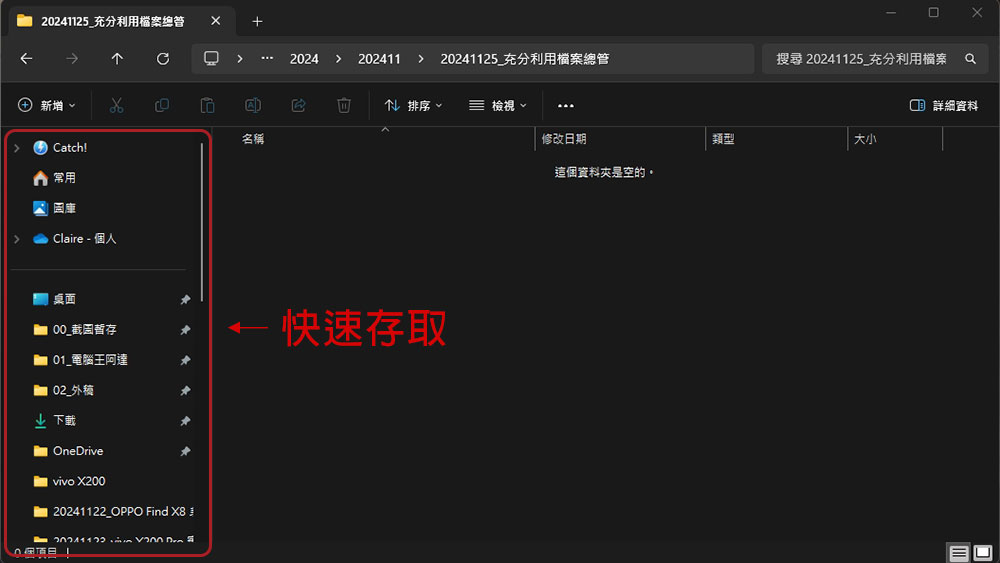
Pinning a folder to Quick Access is easy. Right-click any folder you want to pin to Quick Access. From the context menu, select the “Pin to Quick Access” option and that’s it. If this bothers you in the future, you can easily unpin it by right-clicking on the Quick Access item from the left sidebar of File Explorer.
2. Use the “Details” view
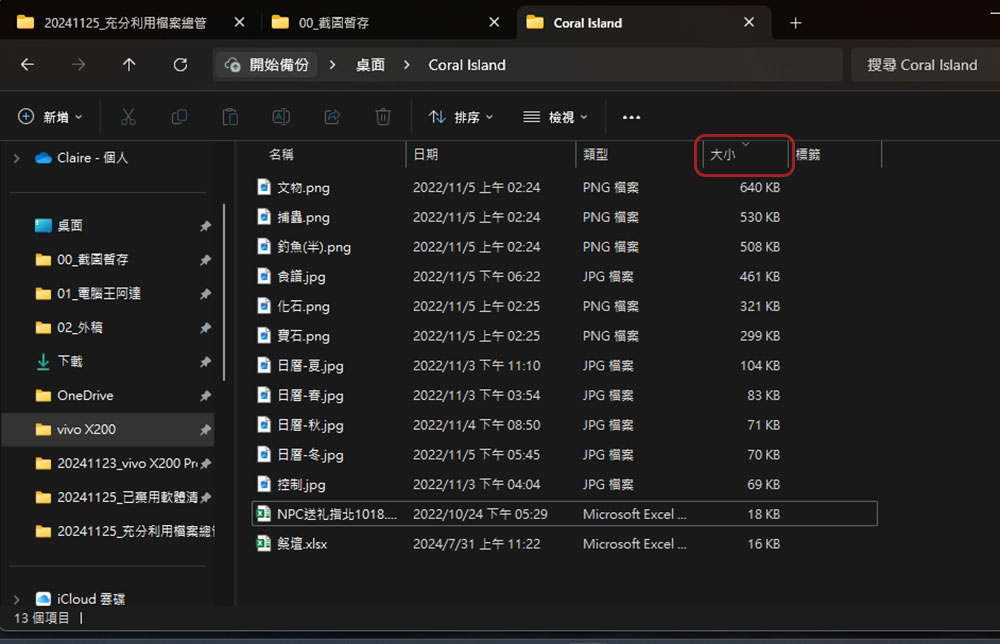
The Details view in Windows File Explorer is great for getting an organizational overview of your files. It displays attributes such as file name, size, type, and modification date in a columnar layout. This is especially helpful when working with directories containing a large number of files, as you can sort and filter files based on attributes.
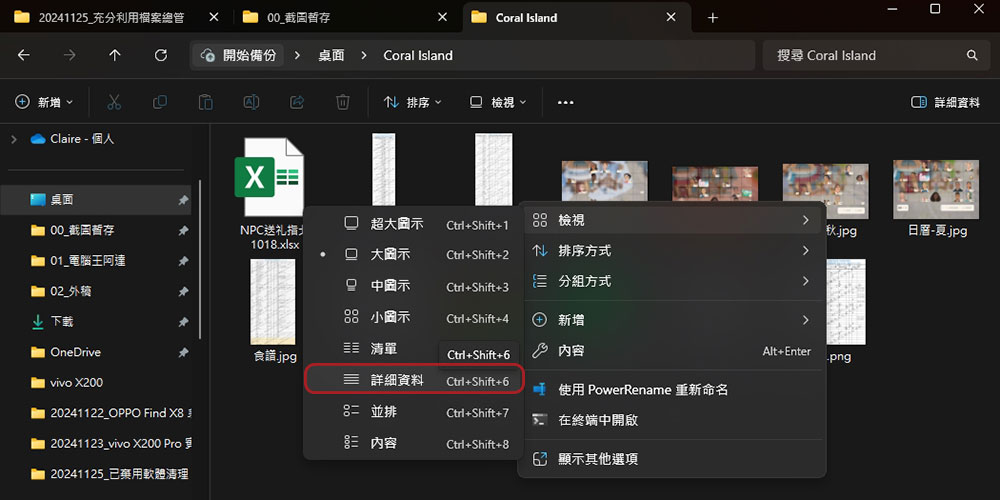
For example, if you want to sort the files in a folder in ascending order of size, you can click the title of the “Size” column in the details view to sort the files in ascending or descending order.
3. Tag your files
Windows lets you add virtual tags to files to help you categorize them and make them easier to find no matter where they are saved. For example, mark all Excel worksheets related to invoices and accounts with “Finance”. You can use the keyword “Finance” to quickly find them later. Currently, Windows only allows you to mark Microsoft Office files (DOCX, EXCEL, PPT, etc.) and image files (I tried it, PNG did not work). The operation method is as follows:
- Right-click on a document that supports adding tags and select Content.
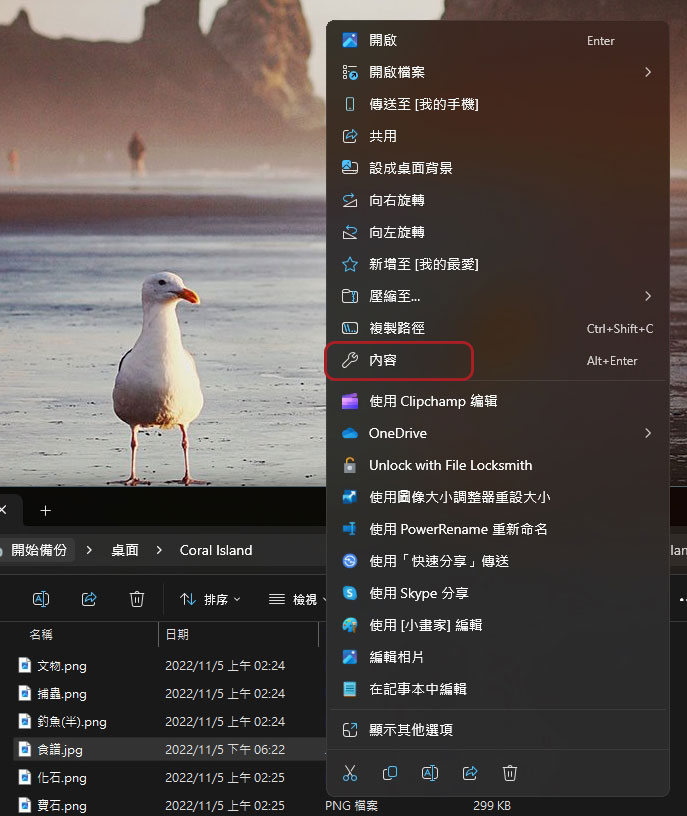
- Switch to the “Details” tab, click the “Label” field and enter the label text you want to use. If you want to enter multiple tags, please separate them with a semi-shaped “;”.
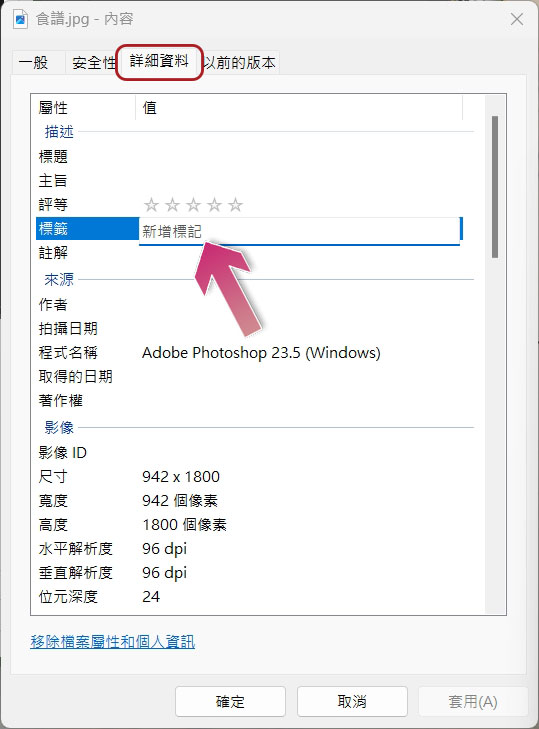
- Finally, click Apply and OK.
4. Enable grouping
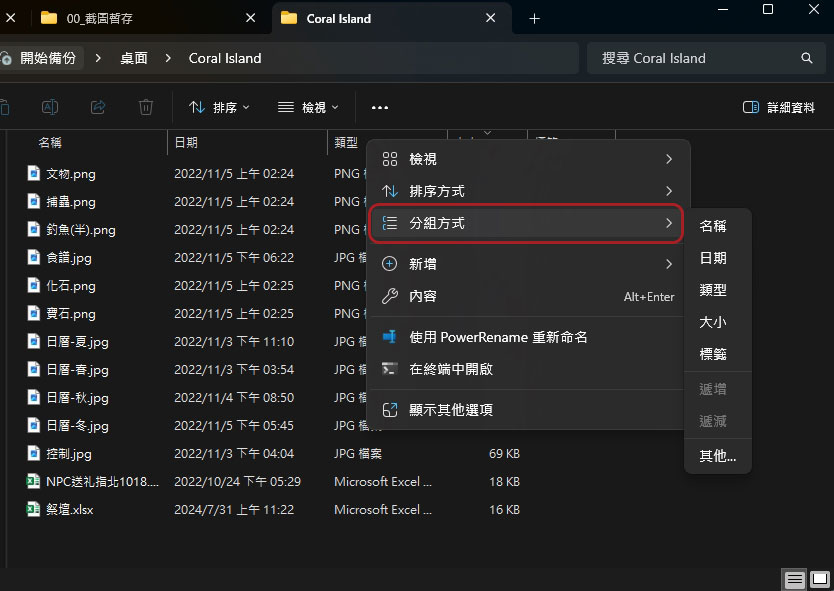
Windows lets you group files and folders based on various attributes such as name, date modified, type, size, and more. This makes organizing and accessing specific files easy. For example, in the Downloads folder, you usually want the most recently added files and folders at the top, so you can simply group the files and folders by the modified date attribute and then select Sort Descending, which will always group the most recently downloaded files and folders at the top. Likewise, you can select the Type attribute, which will group files of a specific type (such as JPEG images).
Grouping files and folders in Windows is easy, here’s how to do it on your hard drive or any folder:
- Open the hard drive or folder where you want to group files.
- Right-click the empty area and select the attribute you want to base on from the “Group by” menu. You can also choose to increase or decrease.
5. Use different panes
Windows File Explorer has multiple built-in panes, such as the navigation pane, preview pane, and details pane, each of which can improve your file management experience. The navigation pane is enabled by default and can be accessed from the left side of the Explorer window. It is used to navigate to different sections or folders such as Quick Access, Local Computer, etc.
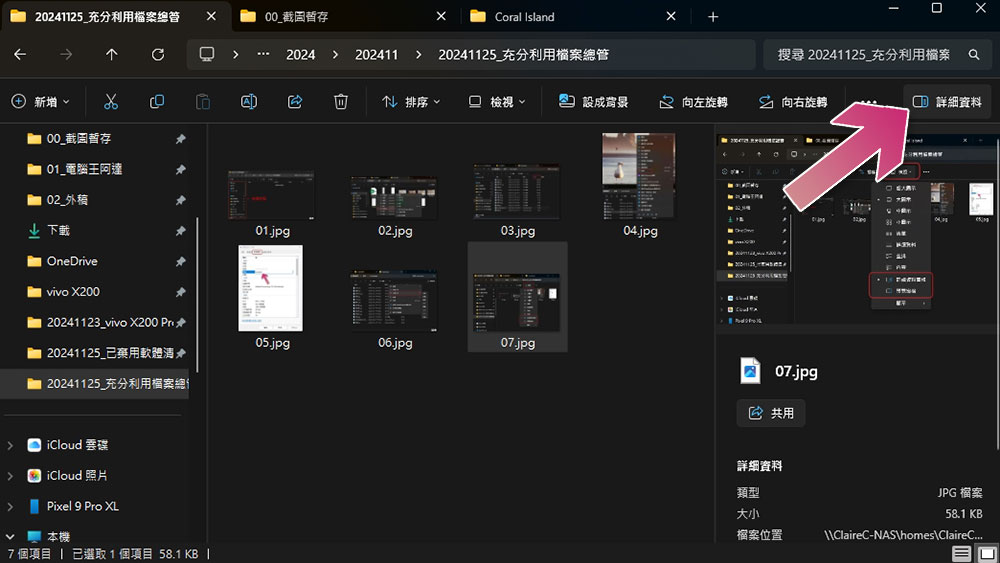
You can enable the preview pane and details pane on a specific drive or folder. The preview pane lets you view the contents of a file, such as a PDF or image, without opening the file. The details pane provides raw data such as file size, creation date, and tags. Enabling the preview or details pane is as simple as clicking View on the File Browser and selecting from the drop-down menu.
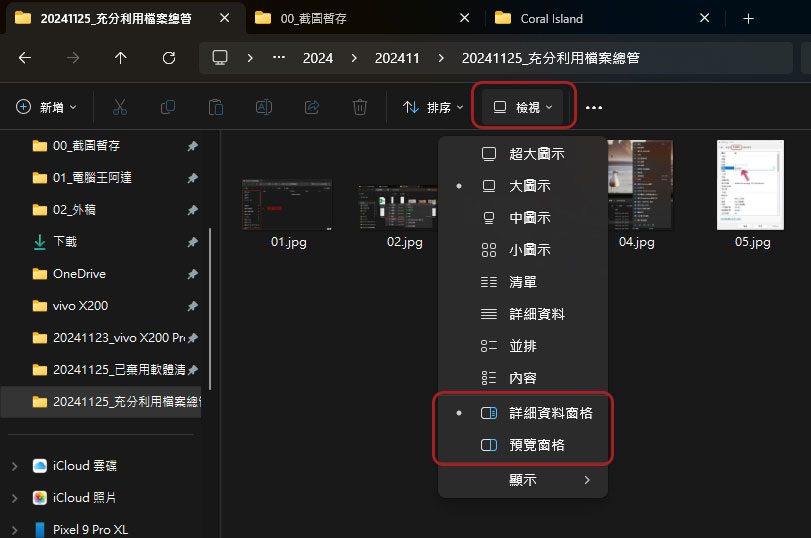
If you want to close the pane, just click the “Details” or “Preview” button in the upper right corner.
6. Establish a logical structure of folders
A well-thought-out folder hierarchy saves time and reduces clutter. For example, instead of a single directory named Job, you can create subdirectories such as Jobs > Projects > Project Name . This structure keeps your files and folders separate and easier to find. The author provides you with three key points of best practice:
- Use folder names that reflect the content, and strive to be clear and concise.
- Avoid having too deep a hierarchical structure and keep it simple.
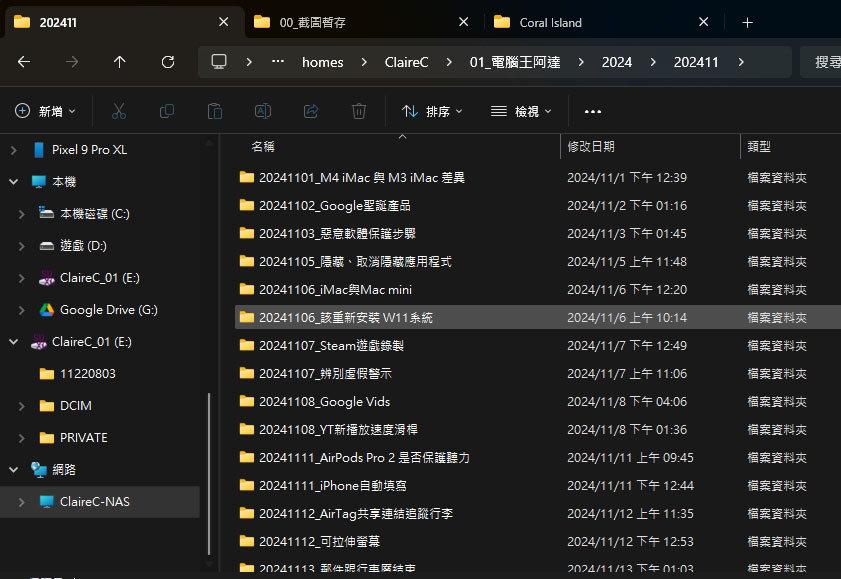
- Use consistent naming rules, such as “YYYYMMDD_Project Name” (the picture below is the author’s own work folder naming method).
7. Use advanced search filters
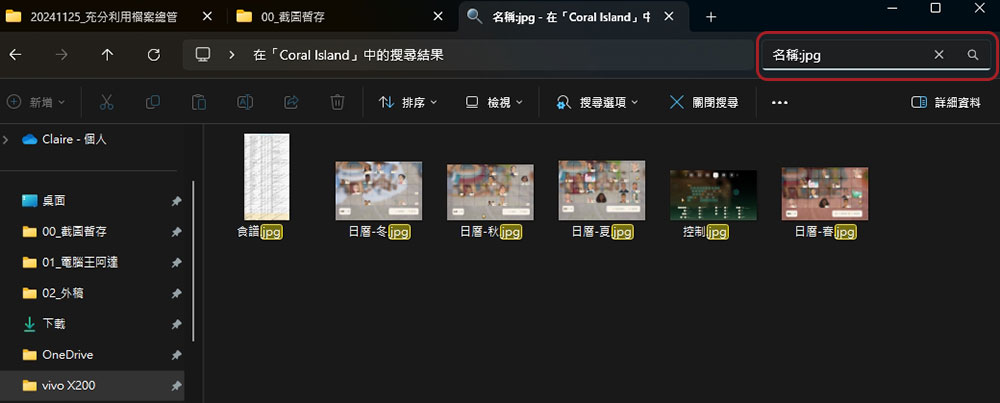
Windows File Explorer search supports various filters, such as type, size, modification date, etc., to make searching efficient. Using these filters, you can accurately list file types with the same or similar properties. For example, using “name:jpg” will display all JPG files in the folder where you search. Here are some commonly used filters, such as:
- Filter by size, for example “Size:<100MB".
- Filter by date, such as “Date: 2024/11/25”.
- Filter by file type, such as “Type: jpg”.
In addition, if you are working with a large number of files in different types of folders, you can combine multiple filters separated by white space to make your search more precise. For example, if you want to search for JPG files smaller than 100KB, just enter “Type:jpg Size: Boolean operators (AND, OR, and NOT) help exclude or include certain keywords to make search results more precise. Wildcards can be helpful if you don’t remember the exact name of the file you’re searching for. Wildcard characters such as “*” and “?” allow you to search for files with partial names. For example, “*.jpg” will display all files with “.jpg” in their name. Likewise, if you forget the file name but know the exact number of characters, you can use the wildcard “?” For example, if the file name starts with Pranav but you don’t remember the first three letters, just use “???nav” in the search box. Those are the 9 best ways to effectively organize and search your files on Windows. If you work with a large database, applying these methods will make you more efficient and less frustrating. These are all available within Windows Settings and Options, and are so easy that you don’t need to install specific third-party apps for anything at all. Start using these tips today and you’ll experience positive changes in your workflow and productivity. Source: KOCPC Chinese8. Use Boolean operators

9. Use wildcards for partial matching