


Windows File Explorer may be one of the most commonly used tools for everyone to open a computer. It is very convenient for browsing and finding and saving files. Whether you are a Windows 10 or Windows 11 user, this time the author will help you sort out 10 practical functions that must be learned and mastered, so that the ability of File Manager can be fully unleashed, and you will learn like a professional user!
10 useful functions you must learn about Windows File Explorer
Quickly open the file manager
You will most likely start File Explorer from the “Start” menu, but there are actually many ways to do it. If you, like me, often need to open File Explorer, here is a faster and more convenient way to do it with one click.
- Right-click the Windows icon and click File Explorer.
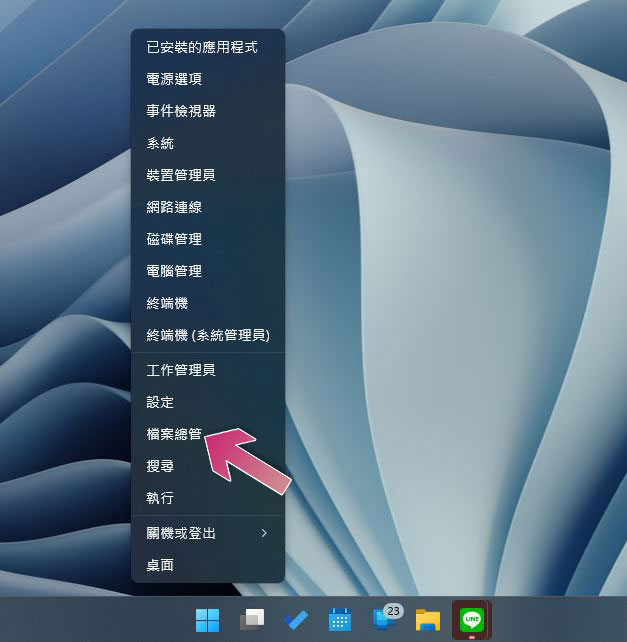
- Press Windows + E to quickly open File Explorer.
- Pin the file manager to the taskbar for easy access at any time.
Make full use of the paging function of File Explorer
Although many people have been knocking on the paging function of File Explorer since Windows 10, Microsoft has implemented this much-anticipated feature on Windows 11 in version 22H2. The operation method of File Manager paging is basically the same as that of a web browser. There are three commonly used operation methods:
- Click the “+” next to the current tab label to open a new tab.
- Press the key combination Ctrl + T directly in the File Explorer window.
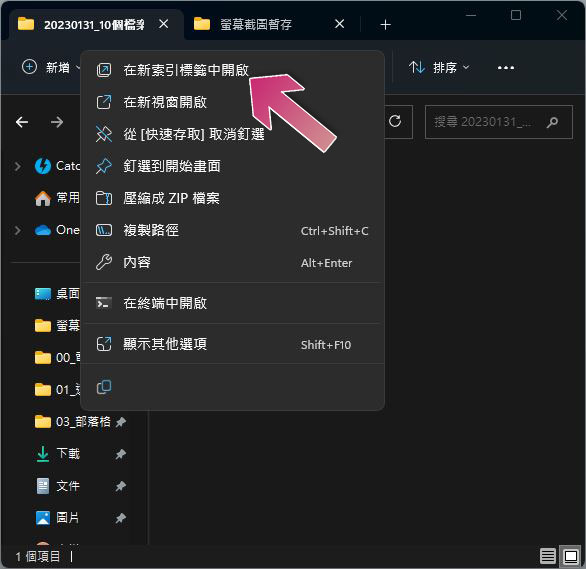
- Right-click the folder you want to open and click “Open in new tab.”
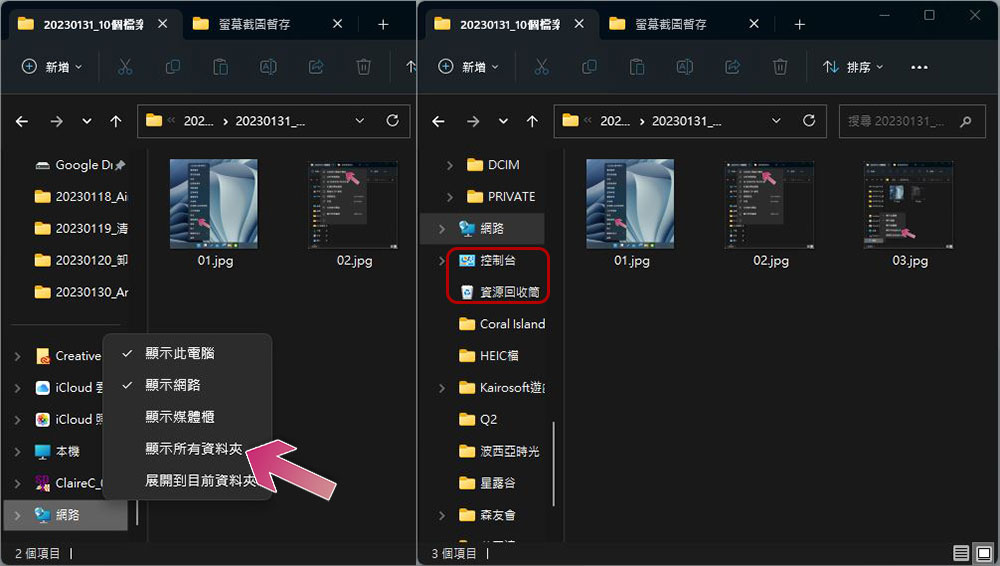
Added recycle bin and console to File Explorer sidebar
By default, the Recycle Bin and Control Panel don’t appear in the sidebar next to File Explorer, but you can easily make them appear here for faster access. The operation method is very simple. Just right-click any empty space in the sidebar of the file manager and select “Show All Folders” to see the two of them appearing here hand in hand.
Show File Explorer preview pane
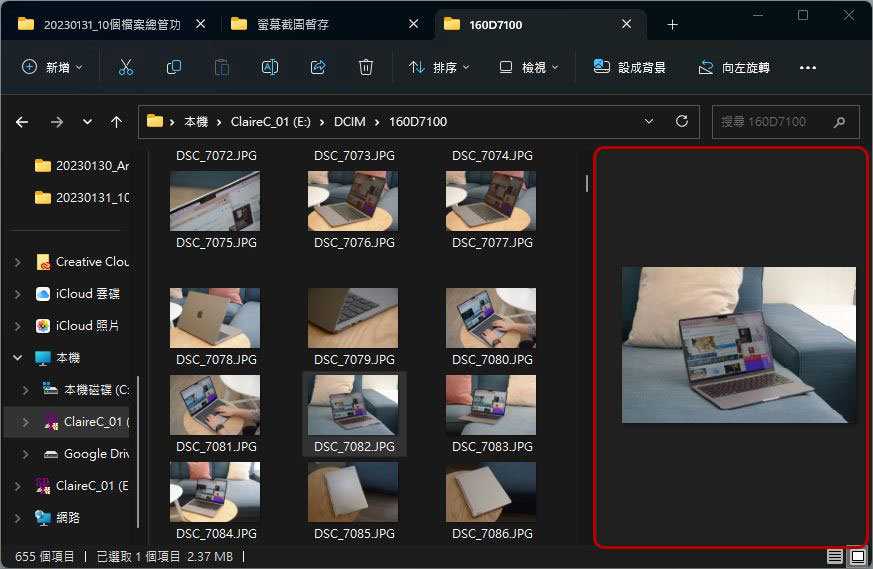
If you want to find a specific file but can’t remember the name of the file, it would take too much time to click through them one by one. The preview pane of File Explorer allows you to view the contents in advance without opening the file, saving a lot of time waiting for it to be opened. This feature is not enabled by default, but if you often run out of patience while searching, it is recommended that you turn it on.
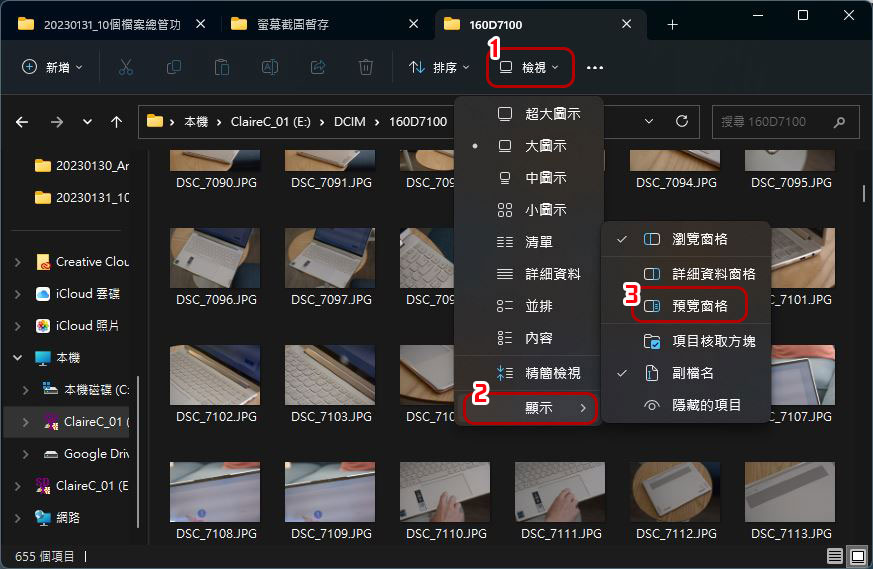
The activation method is very simple. You only need to click “View” on the toolbar above the file manager, then move the mouse to “Display” at the bottom, and check “Preview Pane” from the menu.
Delete search history from File Explorer
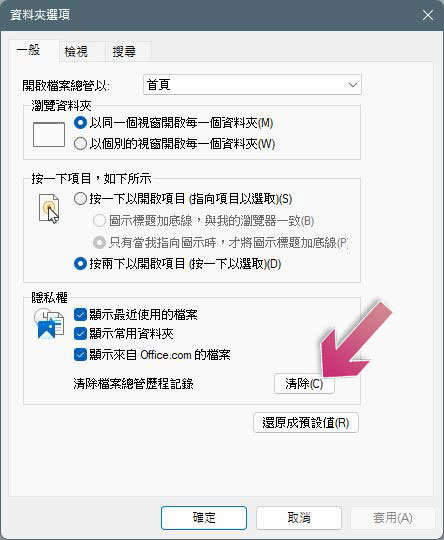
Windows will keep your previously searched keywords in File Explorer, which is convenient for repeated searches, but you may want to clear the contents from time to time, especially if you share a computer, which is easy to do on Windows. Click “Options” on the File Explorer toolbar in Windows 11, and then click the Clear button next to “Clear File Explorer History”.
Run File Explorer as administrator
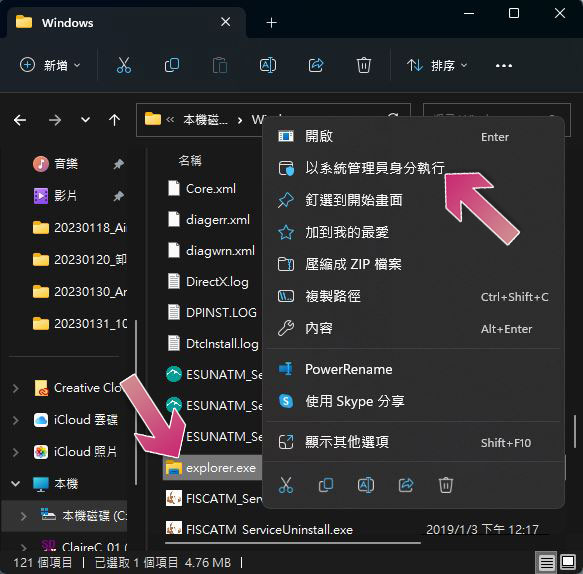
When you open File Explorer in Windows 11, it will be opened with standard permissions by default. However, sometimes you may need to run it with elevated privileges to perform certain tasks or view more options. To do this, you need to run File Explorer as an administrator. Unlike most applications, you cannot simply find the option to run as administrator in the right-click menu. You must find the exe file in File Explorer, right-click on it and click “Run as administrator”. Generally speaking, you can find “explorer.exe” in the path “Local >> Local disk (mostly C slot) >> Windows)”.
Close the checkbox in File Explorer
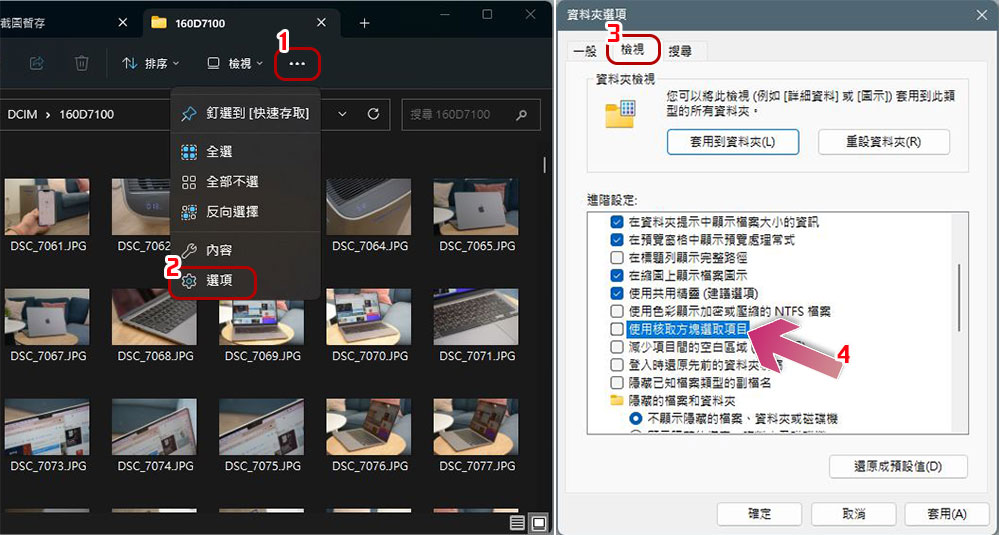
Starting with Windows Vista, File Explorer will display a checkbox for you to check when you select a file, but you don’t have to see it. Whether it is to display or hide is very simple, just click the three-dot menu on the file manager taskbar, then click “Options”, then in the window that appears next, switch to the “View” tab, find the “Use checkbox to select items” in the advanced settings to set it (remember to apply and confirm at the end).
Add or delete folders in Quick Access
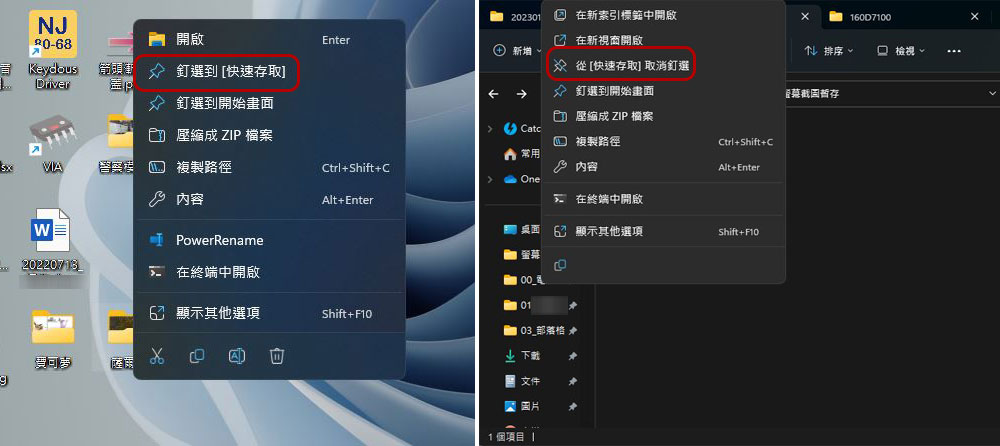
“Quick Access” is located on the left sidebar of the file manager, which allows you to quickly access the most commonly used folders. It is displayed in the top half (there is a pushpin icon behind it). You can also drag and change the order yourself. By default, some commonly used folders will be placed here, but you can also customize which content should be placed here. All you have to do is right-click on the folder you want to put in Quick Access and click “Pin to Quick Access.” If you want to remove a folder from Quick Access, right-click the Quick Access folder on the left column and click “Unpin from Quick Access.”
Add Google Drive to File Explorer
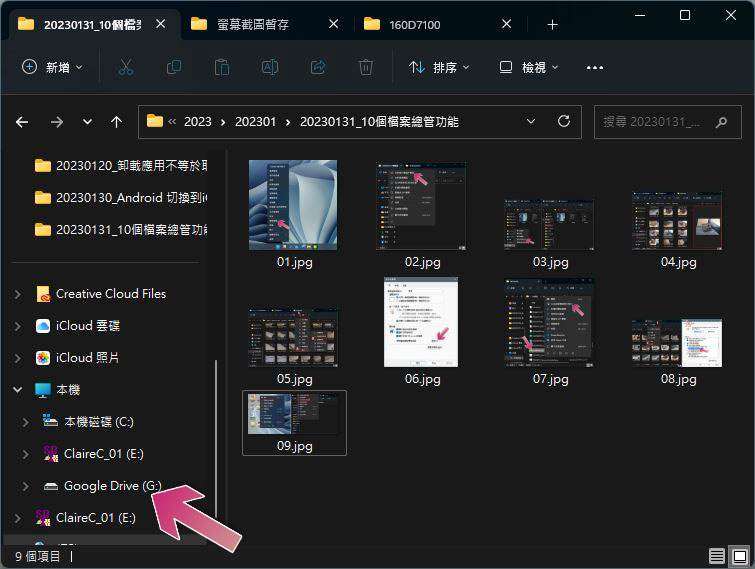
Windows File Explorer not only works with files in Windows, you can also add Google Drive shortcuts directly to the File Explorer sidebar. Google provides a tool to get up and running, please go toOfficial website to download cloud drive PC version, after completion you will see a new disk “G:” on the left sidebar.
Set File Explorer to open to local computer/iCloud Drive/iCloud Photos
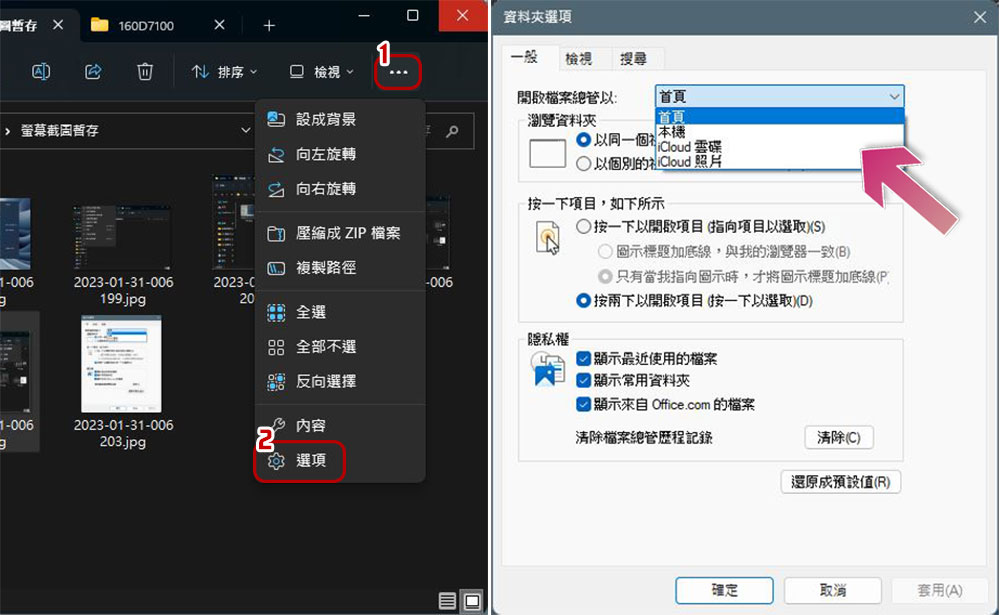
By default, when you open File Explorer, the system displays quick access content, called “Home” in Windows 11. However, if you want to automatically enter “Local” after opening it, you can make the following settings. Click the three-dot menu on the task bar above File Browser, click “Options”, and then select the content displayed after opening File Browser from the drop-down menu behind “Open File Browser with:” on the general tab (remember to apply and confirm as well).
File Explorer is an essential productivity tool on Windows computers, so making good use of it and letting it work the way you want will make you even more powerful. I hope the teaching here will be helpful to you and make you use it more smoothly.
Source: KOCPC Chinese