


According to modern people’s usage habits, your iPhone will store a lot of sensitive information, including your location, personal photos, and even financial information such as credit cards. It can almost be said that your life extends outwards from the iPhone as the center point. To this end, Apple has added many privacy features to the iPhone. Have you used them all?
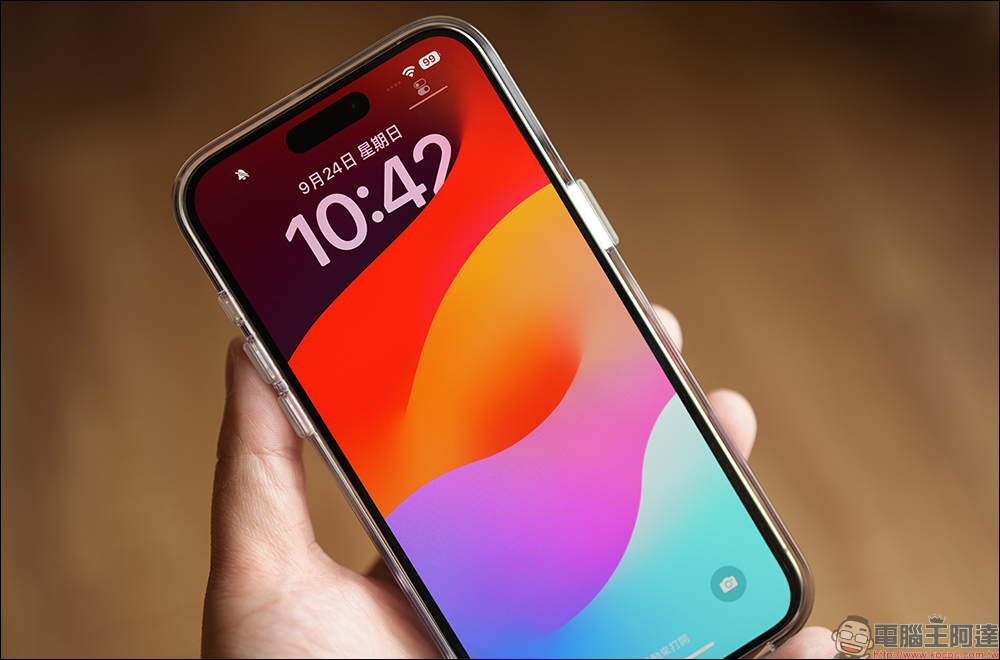
8 iPhone privacy features you might be missing
1. Lock or hide apps
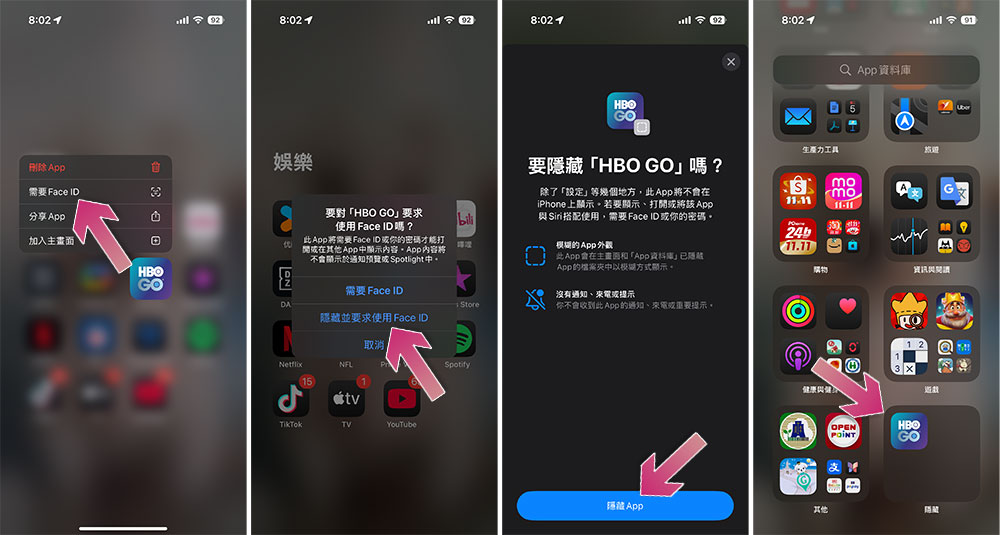
In iOS 18,Apple adds new lock and hide iPhone appsfunction. Opening locked apps requires authentication with Face ID, Touch ID, or a passcode, which means anyone with access to your iPhone won’t be able to open your locked apps.
You can also hide the app completely. After this operation, the apps can be placed in the “hidden” folder under the app library so that they will not appear elsewhere. You can only open the hidden folder by authenticating through Face ID, Touch ID, or password.
- Long press the app icon and select “Face ID required”. If your iPhone has a home button, select “Require Touch ID.”
- Then select “Hide and require Face ID.”
- Click “Hide App”.
- Next you can see it in hidden categories.
2. Protect email activity
Your inbox is probably filled with all kinds of marketing emails. Many of these letters contain remote content that allows the sender to gather information about you, such as knowing when you opened their email, how many times you opened it, and personal information such as your IP address, all of which is used to build a profile for further marketing.
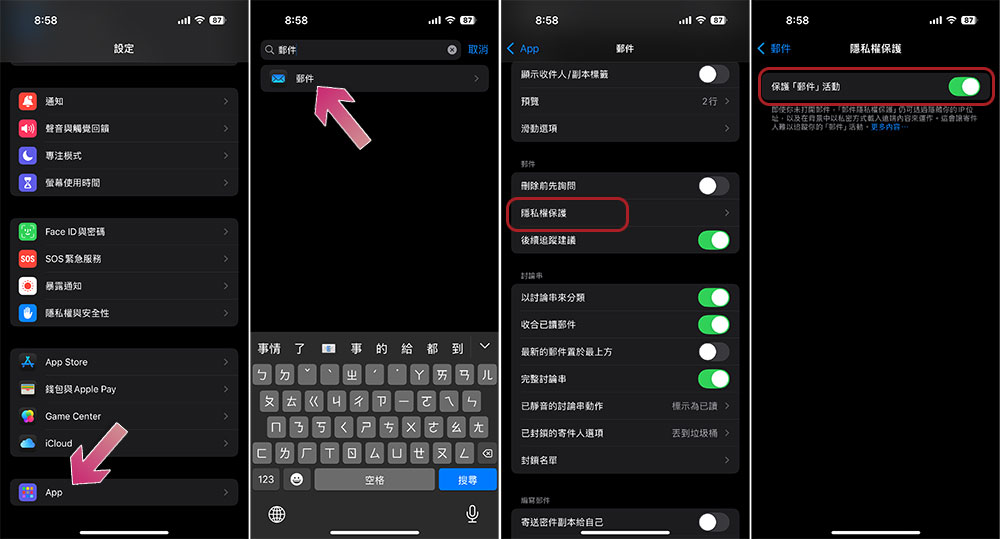
The good news is that the iPhone Mail app includes a feature to help prevent this from happening. Protected email campaigns automatically download remote content so the sender doesn’t know when the message is opened, and the content is routed through two relays so your IP address cannot be traced. Although this function is turned on by default, if you want to confirm again, you can use the following methods:
- Open the Settings app, scroll to the bottom and click “APP”.
- Find “Mail” in the APP list and click on it.
- Click “Privacy Protection” under the email category.
- Make sure the “Protect email activity” switch is turned on.
3. LAN access
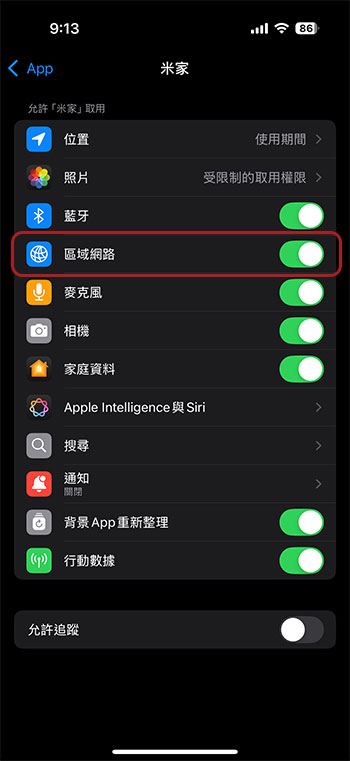
Apps on iPhone may ask for access to the local area network, and if allowed, the app will be able to interact with devices on the home network, such as smart home devices or smart TVs. This allows the app to collect information about devices in your home that are connected to the network.
Some applications require local network access permissions to run. For example, a smart TV remote control application needs to be able to access your TV to control it. But there are many apps that don’t require this permission for functionality and will still ask you to give it. You can control the LAN access your application gets by:
- Open the Settings app.
- Click to enter “Privacy and Security”.
- Scroll down to find “Local Area Network”.
- On the inner page, you can see which applications currently have local network access, and enable or disable permissions on this page.
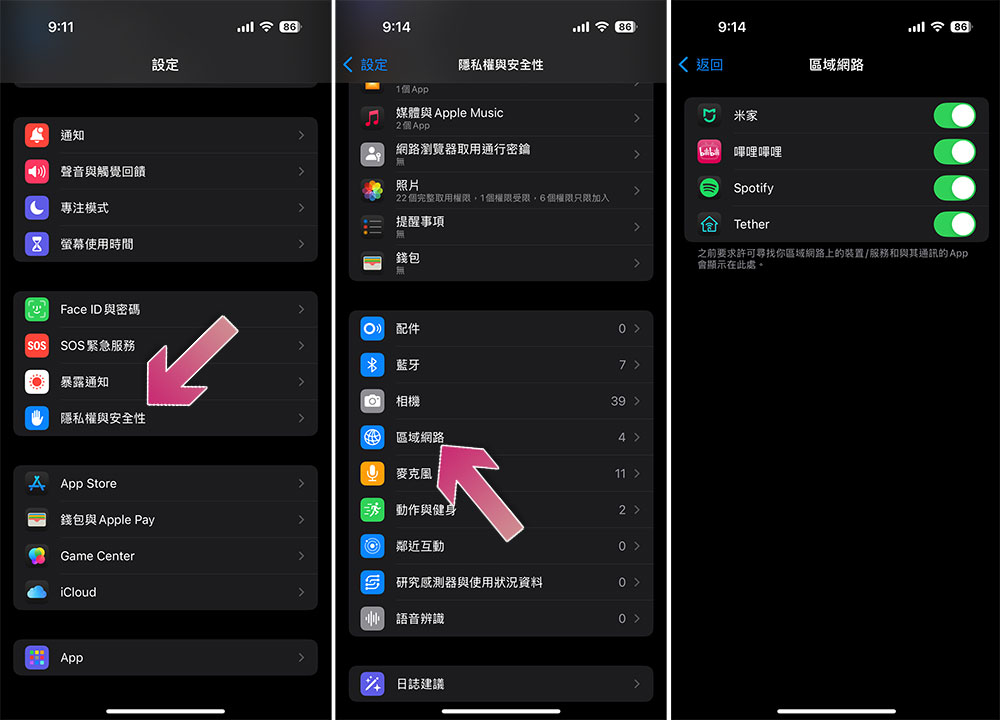
- You can also scroll to the bottom of the settings application to find “APP”, and then perform LAN permission switch operations on the applications one by one.
4. Location sharing
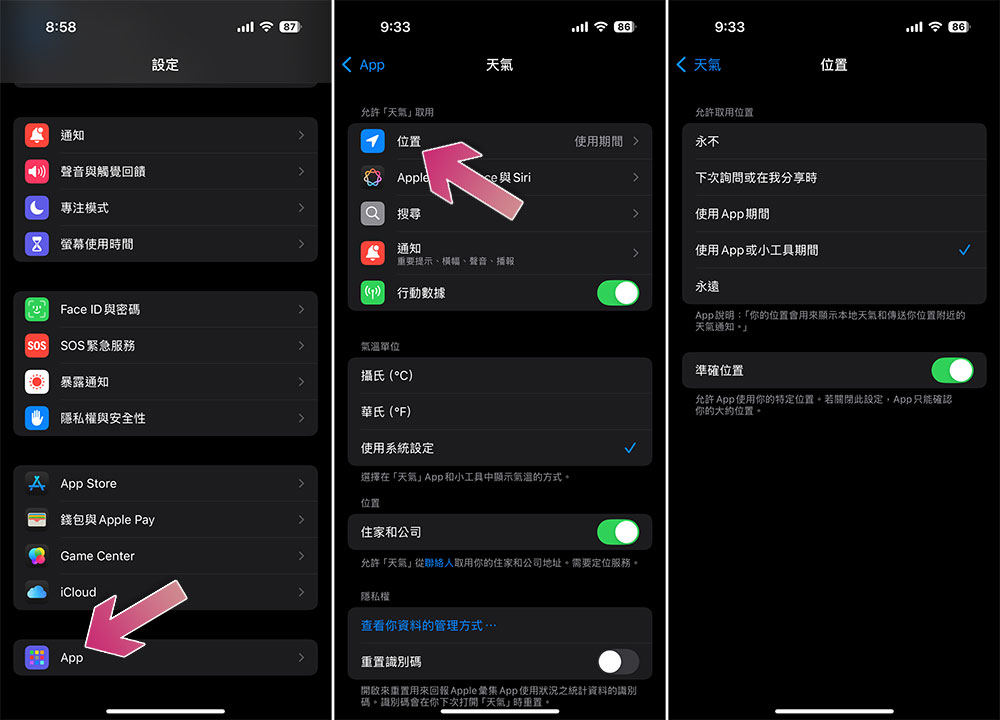
Apps can also request access to your location. Again, for some apps, like Maps, accessing your location is critical to the app’s operation, but many apps will ask for permission even if they can’t be used. However, you can deny specific apps access to your location in the Settings app. You can also decide whether apps can access your location at any time or only while using the app:
- Open settings, scroll to the bottom and click APP.
- Find the application you want to change permissions for and click on it.
- Click “Location” and select the most appropriate item from the permission options provided.
- You can also decide to turn “Precise Location” on or off depending on whether you want apps to access your specific location.
5. Photo access
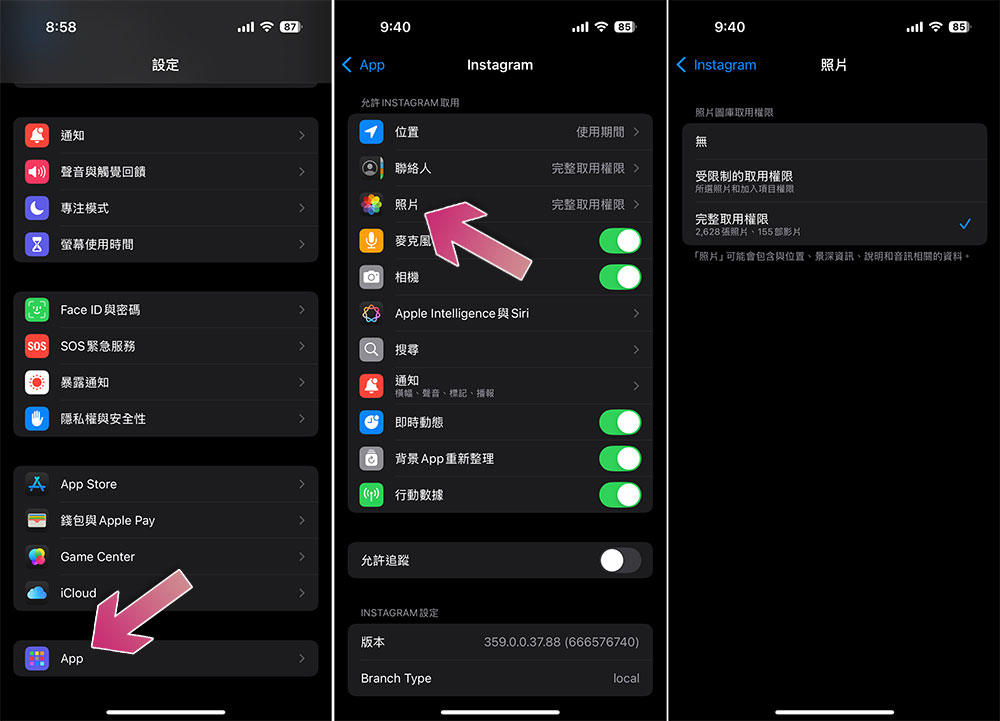
Another request that apps often make is to access your photos. For some applications, you may need to grant full access to photos, such as social platforms, but you may not want the application to access every photo indiscriminately. In the Settings app you can deny access to photos, grant full access, or grant limited access.
- Open settings, scroll to the bottom and click APP.
- Find the application you want to change permissions for and click on it.
- Click “Photos” and then select the appropriate item from the options provided.
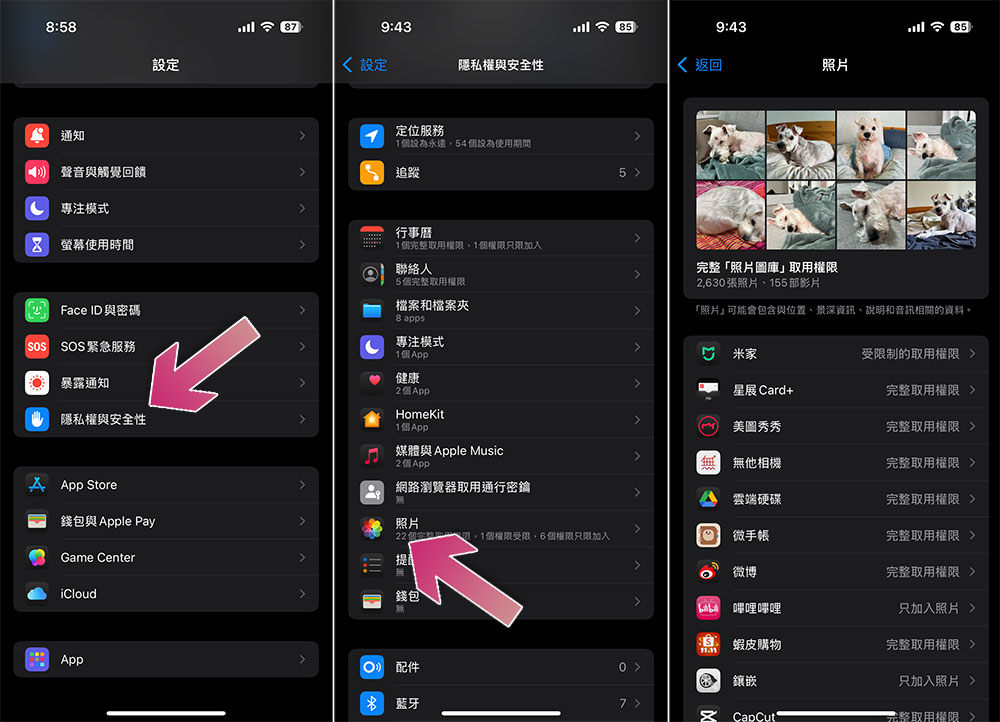
- You can also see which apps have permission to access photos in “Settings >> Privacy & Security >> Photos” and they are managed centrally here.
6. Security Check
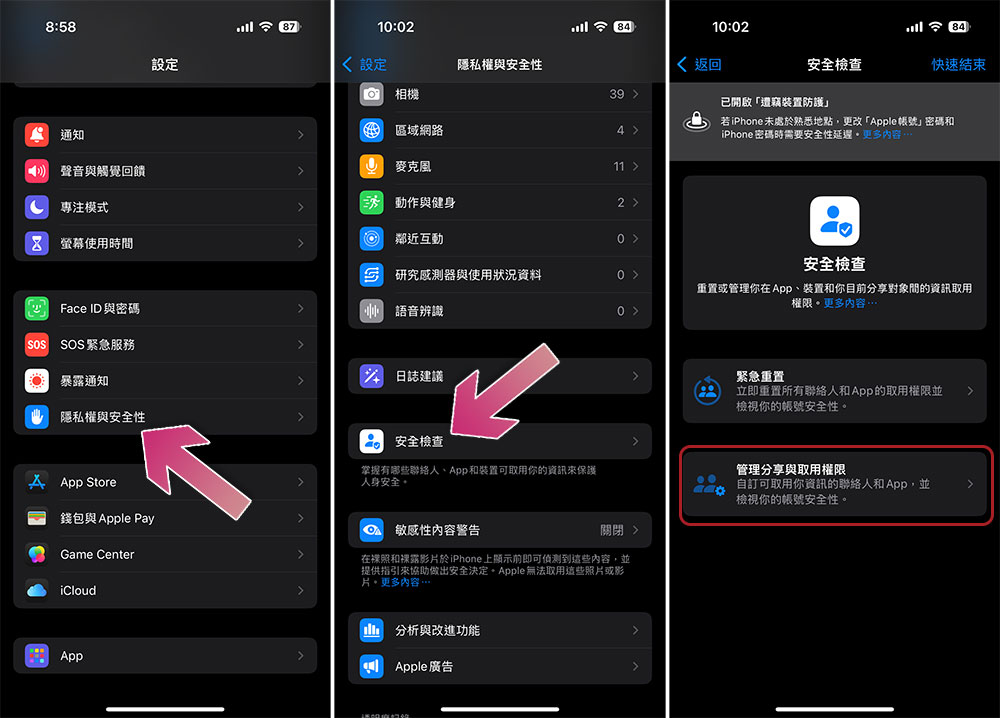
If you have a lot of apps on your iPhone, you might forget which apps you’ve granted which permissions, and while you can check and change privacy settings one by one, it can be a time-consuming and labor-intensive task. Apple has made things a lot easier by adding a “Safety Checkup” feature. You can use it to determine which apps and contacts have access to sensitive information on your iPhone, and decide whether to continue granting access to them. The Security Checkup also allows you to make other changes, such as changing your Apple ID password and your iPhone’s passcode.
- First, you need to make sure your iPhone is running iOS 16 or higher.
- Open the Settings app and go to “Privacy & Security”.
- Scroll down and click “Security Check”.
- After entering the inner page, click “Manage Sharing and Access Permissions”.
- Please follow the on-screen instructions to view all information shared with applications and contacts, and make changes as necessary.
7. Hide my email
If you have a paid subscription to iCloud+, you can also use some of the more useful privacy features on your iPhone, one of which isHide my email. As the name suggests, Hide My Email generates a disposable email address that you can use when signing up for a website or other service. Each time you use this feature, a new random email address will be generated, so the same mailbox will definitely be used twice, and letters sent to this random mail will be automatically forwarded to the email mailbox where you log in to your Apple ID.
In Safari, when you sign up for an account and are asked for your email address, the “Hide my email” option usually appears above the keyboard.
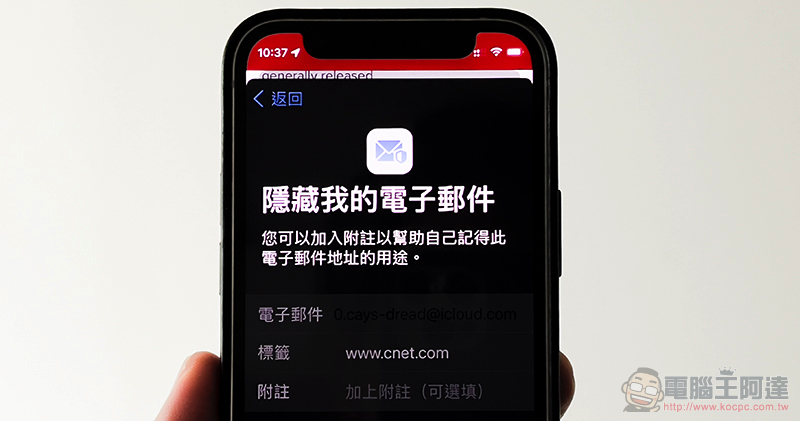
However, if you prefer, you can also create a new Hide My Email Address manually:
- Open the Settings app, tap Apple ID at the top, and then select iCloud.
- Scroll down and click “Hide Email Address” under the iCloud+ feature category.
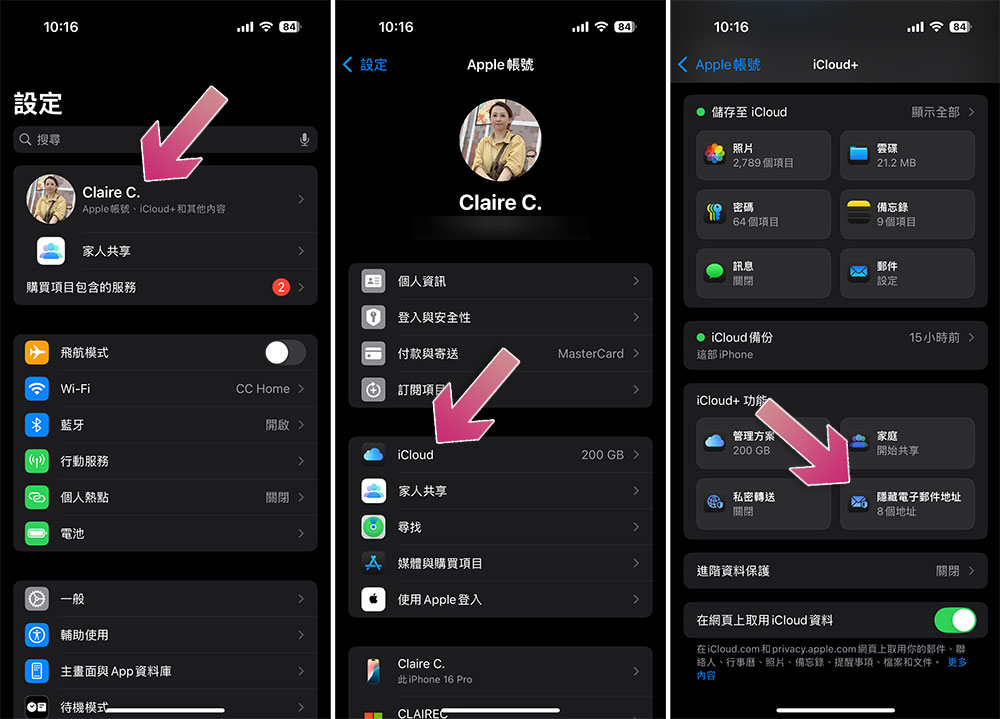
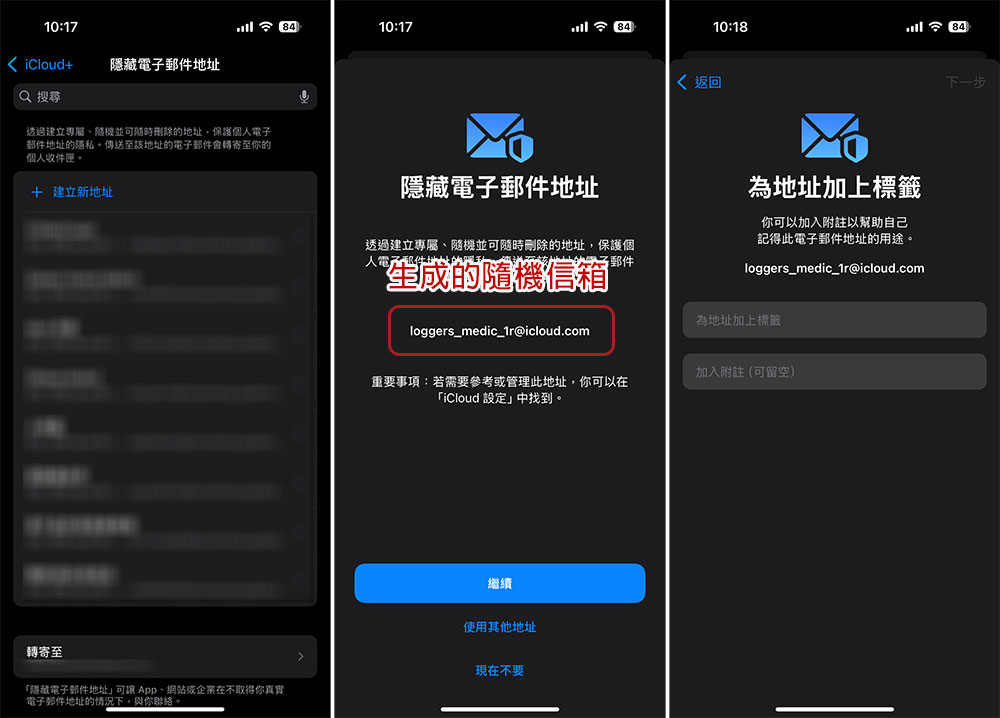
- Click “Create New Address”.
- You can see a random address on the page, press Continue. If you don’t like it, you can click “Use another address” below to generate another address. Once you are satisfied, click continue.
- Finally, make a note of the label and notes of the address so as not to forget which service or website you are using the mailbox on.
You can deactivate these random mailboxes at any time to avoid spam, then open them again when needed, or delete them entirely.
8. Private forwarding
Another very useful iCloud+ feature is Private Transfer. This feature routes Safari web traffic through two different Internet relays, making your IP address invisible to ISPs from seeing which websites you’re visiting. It’s similar to using a VPN in that your web traffic is sent through a different server, so the original source of your browsing activity is hidden. Unlike VPNs, Private Forwarding only works when using Safari.
- Open the Settings app, tap Apple ID at the top, and then select iCloud.
- Scroll down and click “Private Transfer” under the iCloud+ function category.
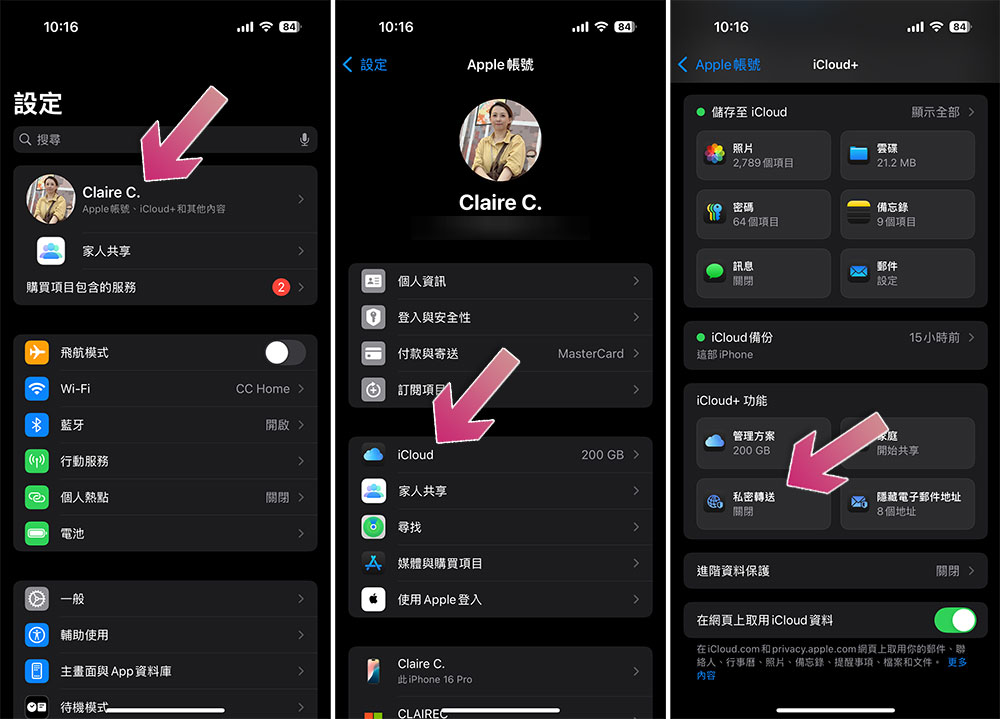
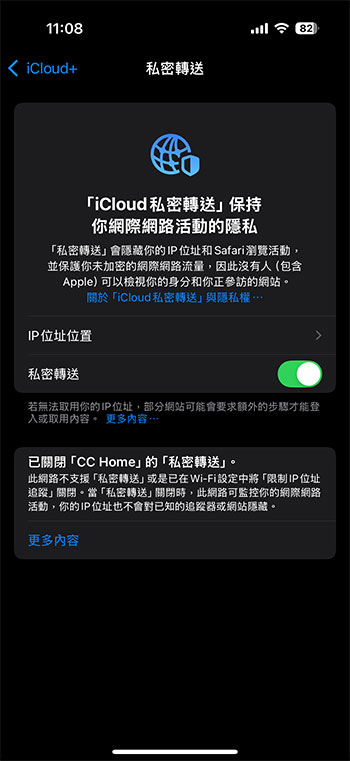
- Just turn the switch on. You can also click on the IP address location to select your blocked IP to be in the same location as your iPhone (general location), or use country and time zone to make the location wider.
In today’s online world, maintaining personal privacy has become increasingly difficult. Fortunately, iPhone has a variety of practical privacy features to help you protect your personal information. If you’re not sure where to start, start with the Security Checkup to see exactly what information is being shared.
Source: KOCPC Chinese